
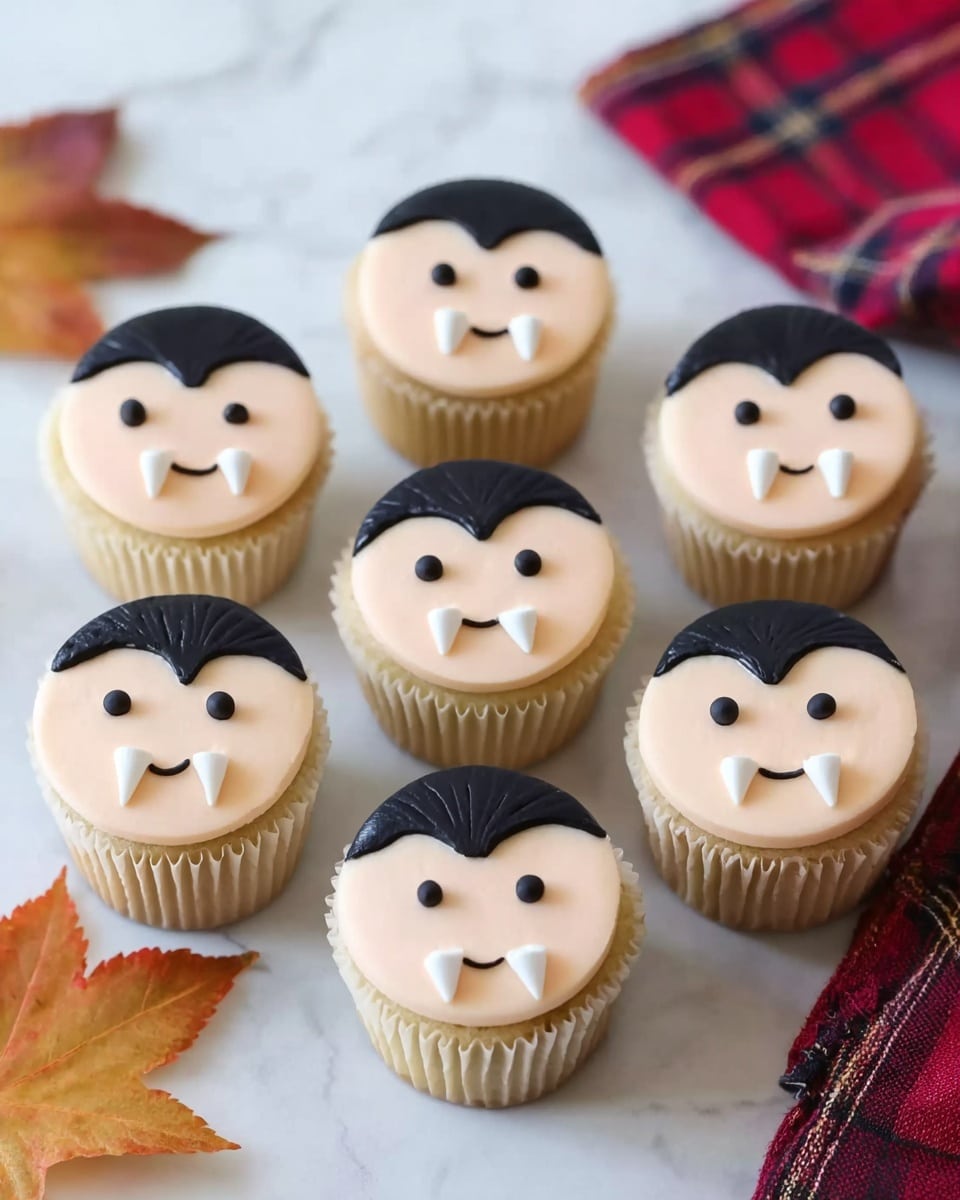
If you’re looking for a spook-tacular treat that’s both adorable and delicious, you’re in the right place. This Vampire Cupcakes Recipe is hands down one of my favorite festive desserts to make when Halloween rolls around (or whenever I want to impress with cute, creepy cupcakes). Trust me, once you dive into decorating these little vampire faces and piling on the rich, black frosting, you’ll find making this recipe as fun as eating the cupcakes themselves!
Why You’ll Love This Recipe
- Playful and Unique: Decorating Reese’s Cups as vampire faces adds a fun twist that’s perfect for Halloween or themed parties.
- Delicious Flavor Combo: Chocolate cupcakes topped with black and white frosting plus the peanut butter hint from Reese’s—what’s not to love?
- Great for All Skill Levels: Even if you’re not a pro decorator, this step-by-step is super approachable.
- Perfect Presentation: These cupcakes look impressive, yet they’re quick enough to whip up last minute.

Ingredients You’ll Need
The magic behind this Vampire Cupcakes Recipe lies in choosing ingredients that blend taste with a spooky visual punch. I recommend grabbing everything fresh and using quality chocolate frosting for that deep black color—it really makes the vampire details pop.
- White Reese’s Cups: These form the vampire’s face and give a creamy peanut butter kick—don’t skip quality candy cups here.
- Black Candy Melts: Essential for painting the vampire’s widow’s peak and facial features; melts smoothly for easy decorating.
- White Candy Melts: Perfect for adding little eye highlights and fangs for that spooky expression.
- Chocolate Frosting (colored black): A rich base on your cupcakes that complements the candy decorations.
- Chocolate Cupcakes: Choose moist, chocolatey cupcakes that hold up well when topped with frosting and candy decorations.
- White Frosting: Used for the “ruffled shirt” detail; make sure it’s thick enough to pipe neatly.
- Red Fruit Roll Sheets: These are great for cutting collar and bow tie shapes that dress up your vampire cupcakes.
Variations
I love how versatile this Vampire Cupcakes Recipe is. You can easily make it your own by swapping out ingredients or embellishments to suit different tastes or occasions—get creative and have fun with it!
- Peanut-Free Version: Swap Reese’s Cups for white chocolate discs decorated similarly, so friends with allergies can enjoy the fun too.
- Flavor Twist: Try using red velvet cupcakes instead of chocolate for a pop of color and a different flavor profile.
- Alternative Frosting: If black frosting feels intimidating, use dark purple or deep red icing for a vampire vibe with less effort.
- Gluten-Free: Use your favorite gluten-free chocolate cupcake mix to keep this treat accessible.
How to Make Vampire Cupcakes Recipe
Step 1: Bring Your Vampire Faces to Life
Start by unwrapping your white Reese’s Cups. Using a small, food-safe paintbrush, dip into melted black candy melts to paint a sharp widow’s peak (that classic vampire hairline) on each cup. Then, add eyes, a mouth, and eyebrows with the same black candy melts—you’ll want to be patient here, taking your time to get the facial details just right. Pop them in the freezer for a few minutes to let the candy harden nicely; this little chilling trick helps keep your decorations crisp and in place.
Step 2: Add the Finishing Touches and Fangs
Once the black features are set, melt some white candy melts and add tiny highlights to the eyes to make them pop—this little detail makes a huge difference! Use the white melts to pipe on two sharp fangs. Let everything harden completely—you want those vampire faces looking sharp and deliciously spooky.
Step 3: Prepare the Vampire Sticks
Dip a Pocky Stick into black candy melts and lay it on parchment paper to dry. Then, gently press one of your decorated Reese’s Cup vampires on top so the stick acts like a lollipop handle. Let the candy melts harden fully. This little “lollipop vampire” is what you’ll later insert into your cupcakes—cute, right?
Step 4: Frost the Cupcakes
Pipe a generous swirl of black frosting on each chocolate cupcake. I like to go big here because the dark frosting creates a perfect base for the vampire to stand out. Then, pipe a little white frosting on top in a ruffled pattern—it’s your vampire’s “shirt,” adding a classy touch that really finishes the look.
Step 5: Add the Vampire’s Clothes
Using scissors or a small knife, cut collars and bow ties from the red fruit roll sheets. Wrap a collar piece around the base of the frosting swirl, just under the vampire’s head, and stick a bow tie onto the ruffled white frosting. This adds that charming, spooky style that makes these cupcakes stand out at any gathering.
Pro Tips for Making Vampire Cupcakes Recipe
- Use a Fine Paintbrush: It gives you better control for painting the vampire faces precisely, especially for the tiny eyes and fangs.
- Freeze Between Steps: Chilling the candy melts between layers keeps your work from melting together and helps features stay distinct.
- Work Quickly with Candy Melts: Candy melts can harden fast; if they start thickening, gently reheat to maintain smoothness for painting.
- Avoid Overloading Frosting: Too much frosting makes inserting the lollipop stick tricky—pipe a sturdy but not overly tall swirl to keep your vampire standing tall.
How to Serve Vampire Cupcakes Recipe
Garnishes
I like to sprinkle a few red sugar crystals or edible glitter lightly around the frosting to give a little “blood splatter” effect—it’s subtle but adds dramatic flair. Sometimes a mini plastic bat or spider picks up the theme if I’m serving these at a bigger Halloween party.
Side Dishes
These cupcakes pair beautifully with dark hot chocolate or a tart cherry punch. I’ve also served them alongside simple finger foods like pretzel “bones” or a fresh berry salad to balance the sweetness.
Creative Ways to Present
For parties, I arrange them on a tiered cake stand draped with faux cobwebs and plastic spiders. Another fun idea is to place each cupcake inside a little “crypt” made from black cardstock to amp up the vampire vibe even more!
Make Ahead and Storage
Storing Leftovers
I store leftover Vampire Cupcakes in an airtight container in the fridge. Because of the candy melt decorations, I give them plenty of space so they don’t stick together. They stay fresh for about 3 days—after that, the frosting can start getting a bit soft.
Freezing
If you want to freeze them, wrap each cupcake individually in plastic wrap and place them in a sealed container. When I’ve done this, I found it best to freeze without the candy vampire decorations on top—add those fresh after thawing to avoid breakage.
Reheating
Since these cupcakes are best enjoyed chilled or at room temperature, I usually just let refrigerated leftovers sit out for 20 minutes before serving. Avoid microwaving, which can melt your candy decorations and make frosting runny.
FAQs
-
Can I use regular peanut butter cups instead of white Reese’s?
You technically can, but white Reese’s Cups give you a perfect pale “vampire skin” look that regular peanut butter cups don’t. Using white candy also makes the facial details stand out better when painted with black and white candy melts.
-
How do I melt candy melts without burning them?
I recommend microwaving candy melts in short 20-30 second bursts, stirring in between until smooth. Using a lower power setting helps prevent overheating, which can cause the candy melts to seize or burn.
-
What if I don’t have a Pocky Stick?
No worries! You can use any sturdy, thin biscuit stick or even a lollipop stick if you have some handy. Just make sure it’s food-safe and strong enough to hold the decorated Reese’s Cup.
-
Can I bake the cupcakes myself or use store-bought ones?
Both work perfectly! If you have time, homemade chocolate cupcakes add a personal touch, but good-quality store-bought cupcakes save time and still taste great when topped beautifully.
Final Thoughts
I absolutely love how this Vampire Cupcakes Recipe brings fun, flavor, and a little bit of spooky charm all in one bite. When I first tried this, I was amazed how simple candy melts and a few creative toppings turned into a show-stopping dessert that everyone raved about. Whether it’s for Halloween, a themed party, or just because you want to surprise your family with something playful, these cupcakes have a way of lighting up faces and appetites alike. Go ahead, give this recipe a try—you’ll have a blast making it and your guests will go crazy for these sweet little vampires!
Print
Vampire Cupcakes Recipe
- Prep Time: 30 minutes
- Cook Time: 15 minutes
- Total Time: 45 minutes
- Yield: 6 cupcakes
- Category: Dessert
- Method: No-Cook
- Cuisine: American
Description
Delightfully spooky Vampire Cupcakes featuring chocolate cupcakes topped with swirls of black frosting, decorated with whimsical vampire faces made from White Reese’s Cups and candy melts. Perfect for Halloween or any fun occasion, these cupcakes combine rich chocolate flavors with creative, edible vampire decorations.
Ingredients
Vampire Decorations
- 6 White Reese’s Cups
- 2 ounces Black Candy Melts, melted
- 1 ounce White Candy Melts, melted
- 3 red fruit roll sheets
- 1 Pocky Stick (for each vampire lollipop)
Cupcakes and Frosting
- 6 chocolate cupcakes
- 2 cups chocolate frosting, colored black
- 1/3 cup white frosting
Instructions
- Prepare Reese’s Cups: Unwrap the White Reese’s Cups carefully, ensuring they remain intact for decoration.
- Paint Widow’s Peak: Using a food-safe paintbrush, apply melted black candy melts onto each Reese’s Cup to create a vampire widow’s peak (hairline) detail.
- Add Facial Features: While the black candy melts are still soft, create two eyes, a mouth, and two eyebrows on each cup using the melted black candy melts.
- Harden the Candy: Place the decorated Reese’s Cups in the freezer for 1-2 minutes to allow the black candy melts to harden firmly.
- Add Highlights and Fangs: Using melted white candy melts, add tiny highlights to each eye and two fangs to the mouth. Let the candy harden completely.
- Prepare Lollipop Stick: Dip a Pocky Stick into the melted black candy melts and place it on parchment paper to dry.
- Attach Vampire to Stick: Place one decorated Reese’s Cup vampire on top of the Pocky Stick while the candy is still soft, allowing the stick to act as the lollipop handle. Allow to harden fully.
- Frost the Cupcakes: Pipe a large swirl of black-colored chocolate frosting onto each chocolate cupcake, creating a smooth dome.
- Insert Vampire Lollipop: Insert the Pocky Stick vampire decoration into the center of the frosting swirl on each cupcake.
- Add White Ruffled Shirt: Pipe white frosting over the black frosting swirl to form a ruffled vampire shirt detail.
- Create Collars and Bow Ties: Cut collars and bow ties from the red fruit roll sheets. Wrap a collar around the base of the frosting swirl beneath the vampire’s head and place a bow tie on the white frosting to complete the vampire look.
Notes
- Use a food-safe brush to apply candy melts for precise decoration.
- Freezing briefly helps candy details set quickly and cleanly.
- Be gentle when inserting the vampire lollipops into the frosting to avoid breaking the decorations.
- Red fruit rolls add a fun, edible accessory to enhance the vampire theme.
- This recipe yields 6 imaginative and festive cupcakes, ideal for parties.
Nutrition
- Serving Size: 1 cupcake
- Calories: 500
- Sugar: 35g
- Sodium: 150mg
- Fat: 25g
- Saturated Fat: 10g
- Unsaturated Fat: 12g
- Trans Fat: 0g
- Carbohydrates: 60g
- Fiber: 3g
- Protein: 6g
- Cholesterol: 30mg


