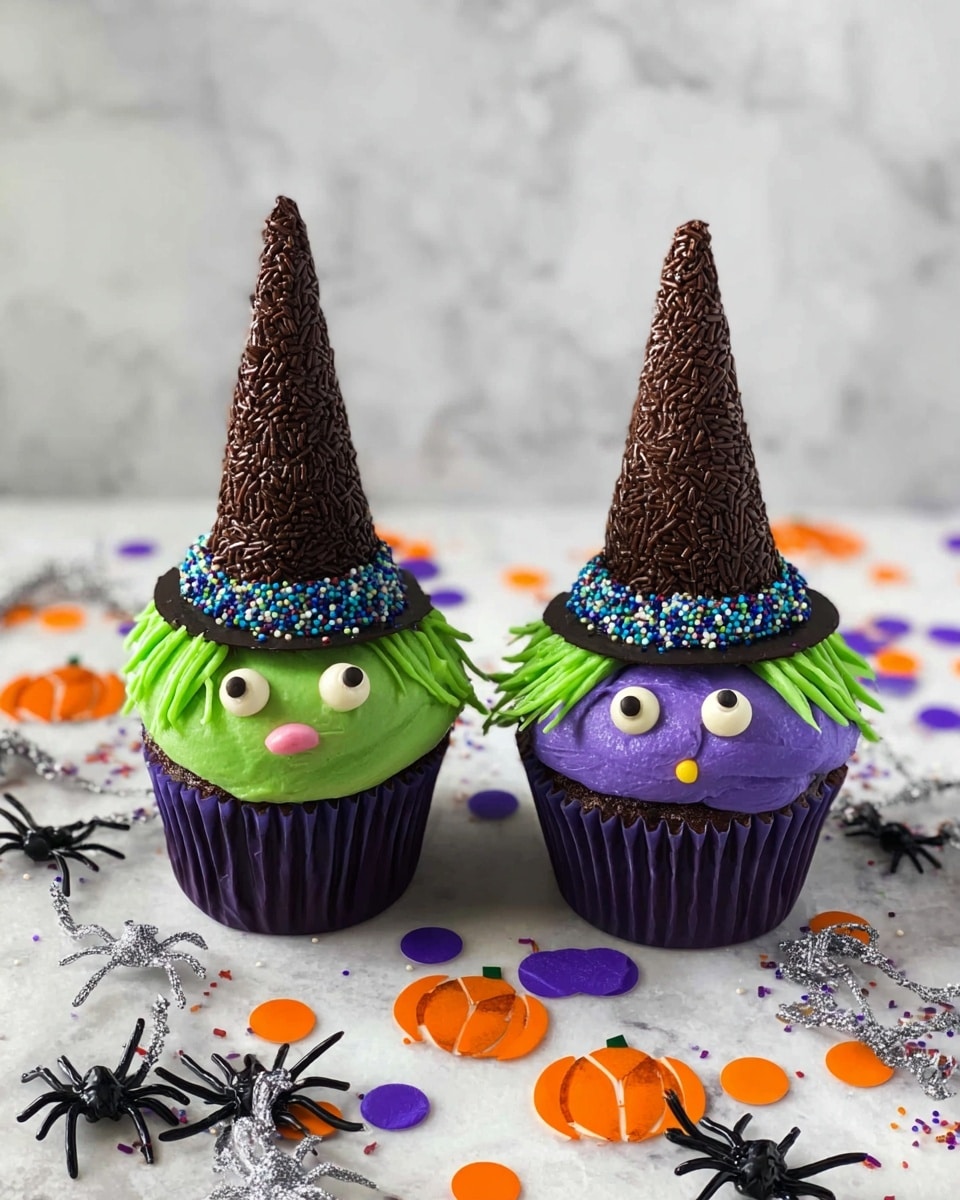
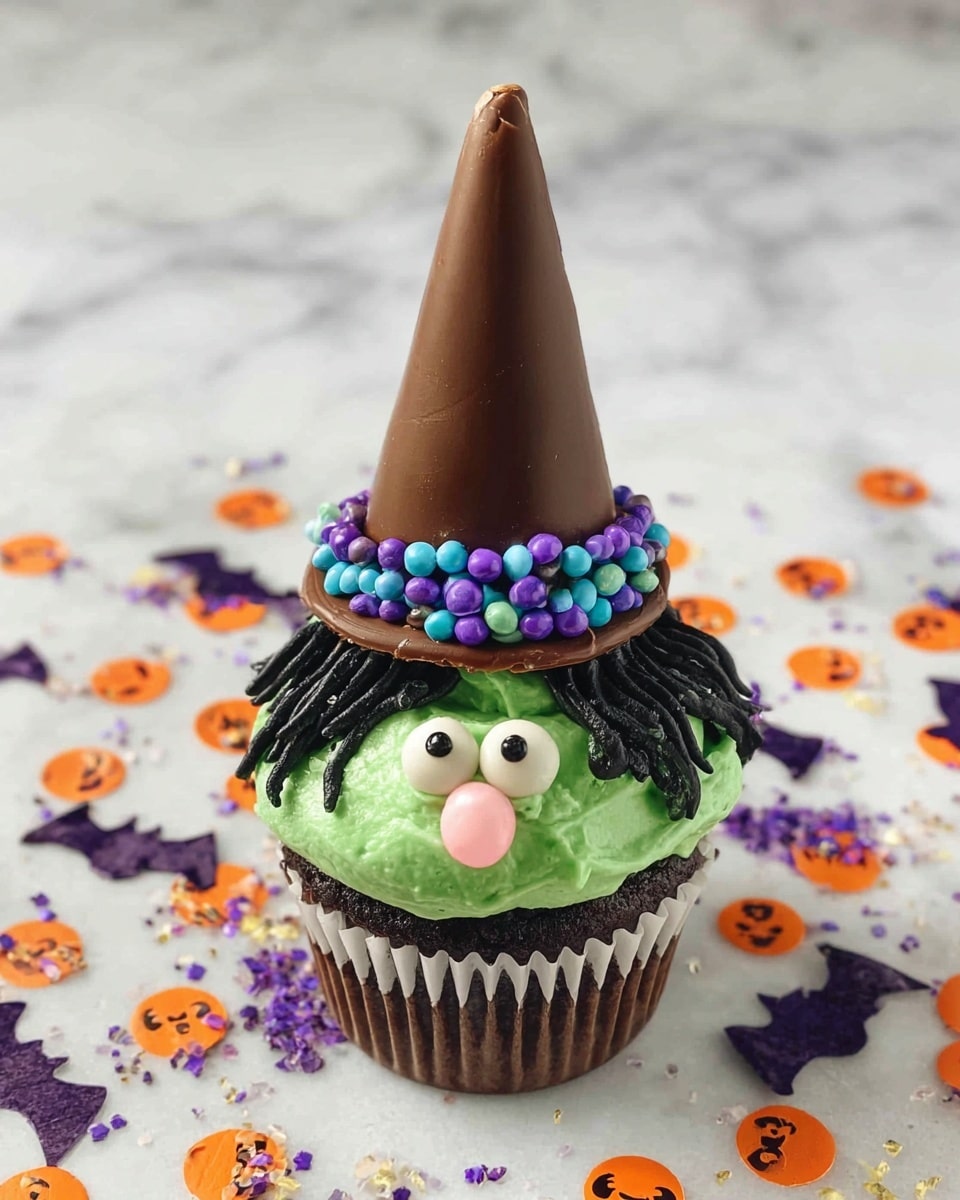
If you’re looking to wow your friends or family with a Halloween treat that’s both adorable and delicious, you have to try my Sugar Ice Cream Cone Witch Hat Cupcakes (Dipped in Chocolate) Recipe. These cupcakes are not only super fun to make but also turn out vibrant, playful, and perfect for parties or a cozy night in with the kids. The magic comes from the sugar cones dipped in chocolate and turned into whimsical witch hats that sit right on top of fluffy cupcakes. Trust me, once you see these, you’ll want to make them again and again!
Why You’ll Love This Recipe
- Creative and Festive: These cupcakes transform everyday ingredients into charming witch hats that become the star of your dessert table.
- Beginner Friendly: You don’t have to be a pro baker or decorator to nail this – I’ll walk you through each step with easy tips.
- Customizable Colors and Decorations: Switch up frosting colors or toppings to suit your party theme or personal taste.
- Perfect Texture Combo: Moist chocolate cupcakes paired with crunchy sugar cones dipped in silky chocolate make every bite a delight.

Ingredients You’ll Need
Each ingredient in the Sugar Ice Cream Cone Witch Hat Cupcakes (Dipped in Chocolate) Recipe plays an important role in creating those stunning witch hats and scrumptious cupcakes. I recommend grabbing high-quality frosting for the best flavor and picking sturdy sugar ice cream cones so they hold their shape after dipping.
- Chocolate cake mix recipe: You can use your favorite box mix or homemade version; I like a rich chocolate for the best contrast with the colorful frosting.
- Sugar ice cream cones: Pick regular-sized cones, not the mini ones—the taller the better for dramatic witch hats.
- Cookies (round, flat): These act as the brim of the hats; something sturdy but not too thick works best.
- Purple frosting: Adds that Halloween vibe and looks fantastic against the chocolate.
- Green frosting: Fun for mixing up colors between cupcakes and makes your display pop.
- Gray frosting: Perfect for piping witchy “hair” on the cupcakes.
- Sprinkles: Choose festive shapes or traditional round sprinkles—both add great texture and color to the hat bands.
- Candy eyeballs: These bring the witch’s face to life and are super fun to place on each cupcake.
- Jelly beans (for nose): Using jelly beans for noses is a clever way to add character and a pop of color.
- Chocolate (10-12 oz): Use good-quality chocolate to melt and dip the cones and cookies for a smooth, glossy finish.
- Vegetable shortening (1-2 tablespoons): Helps thin the chocolate so it’s easier to dip and sets with a shiny coat.
Variations
I love to play around with this Sugar Ice Cream Cone Witch Hat Cupcakes (Dipped in Chocolate) Recipe depending on the occasion or what I have on hand. Feel free to personalize for dietary needs or just for fun — it’s all about making magical desserts your own!
- Try different frosting colors: I’ve swapped the purple and green for orange or black frosting to suit other occasions like fall parties or birthdays.
- Use gluten-free cake mix: I tested this with a gluten-free chocolate cake mix and the cupcakes still stayed moist and lifted the whole look.
- Switch up the candy eyes: Instead of candy eyeballs, mini chocolate chips or edible markers work great if you want a subtler look.
- Decorate with edible glitter or shimmer dust: For an extra enchanting effect, sprinkle shimmer dust on the hats right after frosting.
How to Make Sugar Ice Cream Cone Witch Hat Cupcakes (Dipped in Chocolate) Recipe
Step 1: Bake and Cool the Cupcakes
Start by baking your chocolate cupcakes as per your chosen mix or recipe instructions. Make sure to let them cool completely before decorating — this is key to preventing your frosting and decorations from melting or sliding off. I like to bake mine a day ahead and store them in an airtight container so they’re ready to decorate the next day.
Step 2: Prepare Your Witch Hats by Dipping Cones and Cookies in Chocolate
Next, melt your chocolate together with the vegetable shortening to thin it out. I discovered this trick when I struggled with thick chocolate that just wouldn’t coat smoothly. Using shortening makes the chocolate glossy and perfect for dipping. Dip each sugar cone and cookie until fully coated, shaking off the excess chocolate gently, then set them on parchment paper or a wire rack. Refrigerate if you want to speed up the setting process, but be careful not to let the cones get wet or soggy.
Step 3: Frost the Cupcakes
Once your cupcakes are cool and your hats are set, it’s time to frost! I like to alternate between purple and green frosting for variety. Use a piping bag to make clean, neat designs—unless you prefer a rustic, swirled look, which is totally charming too. If you’re piping gray frosting for the witch’s hair on the side of the cupcake, go gently to create those hair strokes. It’s a fun detail that really brings your witches to life.
Step 4: Assemble the Witch Hats
Pipe a small ring of frosting around the cupcake top, then place the dipped cookie on it — this forms the brim of the hat. Next, pipe frosting around the cookie edge to act as glue and sprinkle sprinkles over it to create the hat band. Then, pipe a little frosting inside the cone opening and firmly place it on the center of the cookie. Add your candy eyeballs and jellybean nose last for that finishing touch. My kids love this part because it feels like decorating their own mini faces!
Pro Tips for Making Sugar Ice Cream Cone Witch Hat Cupcakes (Dipped in Chocolate) Recipe
- Use vegetable shortening in chocolate: This is my secret weapon to get that perfect thin, glossy chocolate coating that’s easy to dip and sets nicely.
- Work quickly when assembling: Once the chocolate sets, the frosting still needs to be slightly tacky to ensure the cookie and cone stick firmly – don’t wait too long!
- Keep cupcakes cool but not cold: I learned that frosting melts if cupcakes are too warm, but getting cupcakes straight from the fridge makes frosting harder to pipe. Room temp is just right.
- Stability matters: Use sturdy cones and cookies – a flimsy one can break under the weight of frosting or chocolate, and nobody wants sad, droopy witch hats.
How to Serve Sugar Ice Cream Cone Witch Hat Cupcakes (Dipped in Chocolate) Recipe
Garnishes
For the garnishes, I love using candy eyeballs and jelly beans because they give such a playful, spooky vibe that’s perfect for Halloween or anytime you want a fun twist. Sprinkles on the hat band add a festive texture and a splash of color. Sometimes, I toss on edible glitter for a little witchy sparkle that drives the kids wild!
Side Dishes
These cupcakes are a sweet enough treat on their own, but I often serve them with a simple side of fresh fruit or a small glass of cold milk to balance the rich chocolate flavors. They’re also fantastic alongside warm apple cider or hot chocolate for a cozy autumn gathering.
Creative Ways to Present
I’ve presented these Sugar Ice Cream Cone Witch Hat Cupcakes (Dipped in Chocolate) Recipe on black trays with faux spider webs draped artfully around for Halloween parties. Another favorite is arranging them in a circular “witches’ brew” formation with colorful napkins underneath – it’s a conversation starter guaranteed! You could even place them on mini cauldrons or decorative plates for themed décor.
Make Ahead and Storage
Storing Leftovers
I keep leftover cupcakes in an airtight container in the fridge — they last beautifully for 3 to 4 days. Before storing, I recommend letting the hats set well to avoid damage during transport. When you want to serve them again, just take them out about 30 minutes ahead to bring back that soft frosting texture.
Freezing
I have frozen these cupcakes successfully by freezing the cupcakes and hats separately. Wrap cupcakes in plastic wrap, and store hats in a sealed container to keep chocolate texture intact. When ready to serve, thaw slowly in the fridge overnight for the best results—this keeps your frosting from melting or weeping.
Reheating
Since these are cupcakes with frosting, heating isn’t really necessary—in fact, I avoid it to keep the chocolate hats from melting. If you want a softer cake texture after refrigeration, just let them sit at room temperature for about 20-30 minutes. Easy and foolproof!
FAQs
-
Can I use homemade cupcakes instead of cake mix for this recipe?
Absolutely! Homemade cupcakes work wonderfully in this recipe and often add a special touch. Just make sure they’re completely cooled before decorating to prevent melting the frosting or destabilizing the witch hats.
-
How do I prevent the chocolate from cracking on the cones and cookies?
Using vegetable shortening mixed with your chocolate creates a flexible, shiny coating that’s less prone to cracking. Also, avoid rapid temperature changes—allow chocolate to set at room temperature or chill gently, rather than freezing immediately.
-
Can I make these cupcakes gluten-free?
Yes, you can substitute the cake mix with a gluten-free version and choose gluten-free cookies for the hat brims. Make sure all your candies and sprinkles are certified gluten-free to keep it safe.
-
What’s the best way to transport these cupcakes without breaking the hats?
I recommend chilling the cupcakes after assembly so the chocolate hats harden fully. Use a cupcake carrier or a box with dividers to keep each cupcake in place and avoid jostling.
Final Thoughts
These Sugar Ice Cream Cone Witch Hat Cupcakes (Dipped in Chocolate) Recipe have become a favorite in my household because they bring that perfect mix of creativity, taste, and seasonal fun to our kitchen. Making them feels like a little celebration every time, and I love how the kids get involved with decorating their own witches. If you want to impress your guests and fill your home with smiles, these cupcakes are a total win. So grab those cones, melt some chocolate, and start crafting the cutest witch hats ever—you won’t be disappointed!
Print
Sugar Ice Cream Cone Witch Hat Cupcakes (Dipped in Chocolate) Recipe
- Prep Time: 60 min
- Cook Time: 20 min
- Total Time: 80 min
- Yield: 24 cupcakes
- Category: Dessert
- Method: Baking
- Cuisine: American
Description
These Sugar Ice Cream Cone Witch Hat Cupcakes are a delightful and festive treat perfect for Halloween parties. Featuring rich chocolate cupcakes topped with colorful frosting and decorated with sugar cones dipped in chocolate to resemble witch hats, these cupcakes are as fun to make as they are to eat. With candy eyeballs, jelly beans, and sprinkles adding whimsical details, they’re sure to be a hit with kids and adults alike.
Ingredients
Chocolate Cake Mix
- Chocolate cake mix (to prepare 24 cupcakes)
Witch Hat Decorations
- 24 Sugar ice cream cones (one for each cupcake)
- 24 flat round cookies (one for each cupcake)
- 10-12 oz Chocolate (for melting and dipping)
- 1-2 tablespoons Vegetable shortening (to thin chocolate)
Frostings and Decorations
- Purple frosting
- Green frosting
- Gray frosting
- Sprinkles (for hat bands)
- Candy eyeballs
- Jelly beans (for noses)
Instructions
- Bake the Cupcakes: Prepare and bake the chocolate cupcakes according to the cake mix recipe instructions. Once baked, cool the cupcakes completely before decorating.
- Melt Chocolate for Dipping: In a microwave-safe bowl or double boiler, melt the chocolate along with the vegetable shortening. This helps thin the chocolate for smooth dipping. Stir until fully melted and combined.
- Dip Cones and Cookies: Dip each sugar ice cream cone and round cookie into the melted chocolate, coating them evenly. Place them on parchment paper or a cooling rack. Optionally refrigerate to help chocolate set faster.
- Pipe Frosting on Cupcakes: Using purple and green frosting, pipe swirls or designs onto the cooled cupcakes, alternating colors to your preference for a vibrant look.
- Assemble Witch Hats: Pipe a line of frosting around the opening of each dipped cone, then place it centrally on top of the dipped cookie, creating the witch hat shape.
- Add Hat Band and Sprinkles: Pipe frosting all around where the cookie and cone meet to secure them, then sprinkle sprinkles over the frosting band to decorate.
- Pipe Hair Decoration: Using gray frosting, pipe strands of hair on one side of each cupcake to complete the witch character look.
- Place Hat on Cupcake: Carefully position the assembled witch hat (cookie + cone) on top of the frosted cupcake.
- Add Facial Decorations: Attach candy eyeballs to the cupcake face and place a jelly bean for the nose, securing them with a dab of frosting if needed.
Notes
- These cupcakes make a fantastic Halloween party treat that’s both cute and delicious.
- Use vegetable shortening to ensure the chocolate coating is smooth and easy to dip.
- You can customize the frosting colors to match your party theme.
- For faster chocolate setting, refrigerate dipped items before assembly.
- Supervise kids during assembly for a fun family activity.
Nutrition
- Serving Size: 1 cupcake
- Calories: 65
- Sugar: 6 g
- Sodium: 2 mg
- Fat: 5 g
- Saturated Fat: 3 g
- Unsaturated Fat: 3 g
- Trans Fat: 1 g
- Carbohydrates: 7 g
- Fiber: 1 g
- Protein: 1 g
- Cholesterol: 5 mg


