
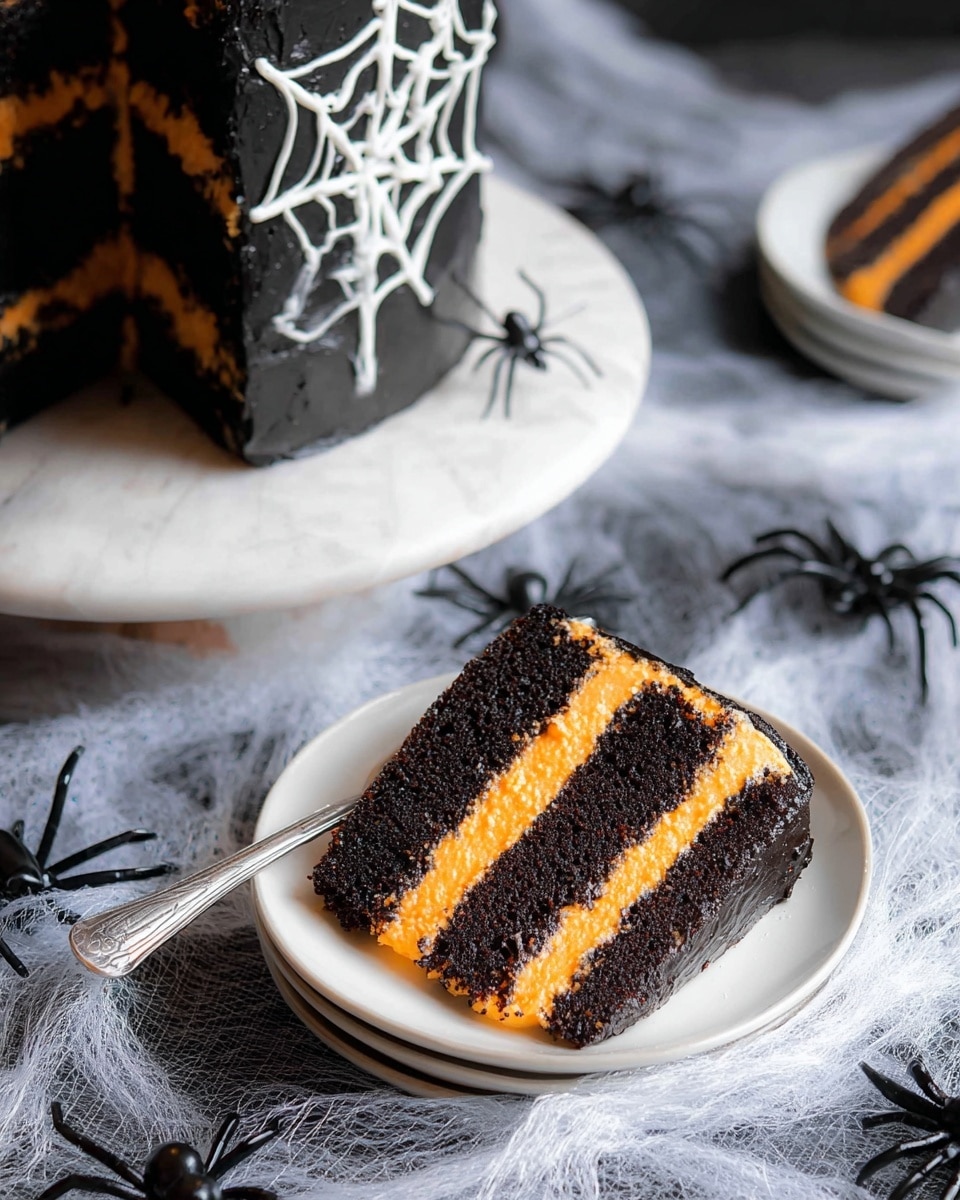
If you’re looking for a show-stopping dessert that’s just bursting with flavor and perfect for a spooky occasion, you’ve got to try this Spiderweb Cake Recipe. I absolutely love how rich and moist the black cocoa cake turns out, paired with a vibrant, orange-infused buttercream frosting that not only tastes amazing but also creates the coolest spiderweb design on top. Trust me, once you make this cake, it’ll be your go-to for Halloween or any time you want a fun and impressive treat to share.
Why You’ll Love This Recipe
- Rich, Deep Chocolate Flavor: Using black cocoa powder gives the cake that striking dark color and intense cocoa taste that makes this cake stand out.
- Vibrant Orange Buttercream: The orange extract in the frosting adds a perfect pop of citrus that balances the chocolate beautifully.
- Eye-Catching Design: The spiderweb icing technique is easier than you think and makes this cake a crowd-pleaser.
- Great for Any Skill Level: Whether you’re a confident baker or just starting, you’ll find this recipe straightforward and rewarding.

Ingredients You’ll Need
I’ve put together a list of ingredients that work perfectly together to build this stunning spiderweb cake. You’ll notice the combination of black cocoa and Dutch-processed cocoa for that unique color and flavor. Plus, the buttermilk and coffee help keep the cake incredibly moist and tender.
- All-purpose flour: This is the base of your cake, providing structure, so make sure to measure properly.
- Granulated sugar: Sweetens and helps with cake’s texture; I like to sift it for even mixing.
- Black cocoa powder: The secret to that dramatic black color and rich chocolate taste.
- Dutch-processed cocoa powder: Adds depth, but be sure to sift it to avoid clumps.
- Baking soda and baking powder: Work together to get that perfect rise and light crumb.
- Salt: Balances the sweetness and enhances chocolate flavor.
- Vegetable oil: Makes the cake moist; I never skip this for softness.
- Buttermilk: Adds moisture and a subtle tangy note that brightens the flavor.
- Strong brewed coffee (or hot water): Coffee intensifies the chocolate notes without overpowering.
- Large eggs: Provide structure and richness.
- Vanilla extract: Enhances all the flavors subtly.
- Unsalted butter (room temperature): For the buttercream—room temperature makes for the smoothest frosting.
- Powdered sugar: Sweetens and thickens the frosting to perfect consistency.
- Heavy whipping cream: Adds creaminess to the frosting.
- Orange extract: The key flavor twist that makes this cake unique and delicious.
- Electric Orange Americolor Gel Color (optional): Gives your frosting that vibrant Halloween orange glow.
- Shortening: Helps stabilize the frosting for piping the spiderweb design.
- Clear vanilla extract (optional): Keeps the frosting pure white if desired, without tinting it brown.
- Milk: Adjusts frosting consistency for smooth spreading and piping.
Variations
I love how flexible this Spiderweb Cake Recipe is—there’s plenty of room to tweak it based on your mood or dietary needs. Don’t hesitate to make it your own and experiment with different flavors or frosting options!
- Chocolate Ganache Twist: Sometimes I replace the buttercream with a glossy chocolate ganache for a richer, more decadent version that everyone raves about.
- Vegan Version: I’ve experimented with vegan substitutes like flax eggs and coconut cream, and it comes out wonderfully moist and flavorful.
- Spiced Orange Flavor: Adding a pinch of cinnamon or pumpkin spice to the frosting amps up the autumn vibe and complements the chocolate beautifully.
- Mini Cakes: Instead of a large one, I’ve made cupcakes with the spiderweb design on top—perfect for parties and easy to serve.
How to Make Spiderweb Cake Recipe
Step 1: Prep Your Ingredients and Oven
Start by preheating your oven to 350°F (175°C) and greasing your cake pans well. I usually line the bottoms with parchment paper to help the cakes release easily. Gather all your ingredients measured out—it helps keep the process smooth and stress-free. Make sure your butter and eggs are at room temperature for the best mixing results.
Step 2: Mix the Dry Ingredients
In a large bowl, whisk together the all-purpose flour, granulated sugar, black cocoa powder, Dutch-processed cocoa powder, baking soda, baking powder, and salt. Sifting the cocoa powders and flour helps avoid lumps and ensures a silky cake texture.
Step 3: Combine Wet Ingredients Separately
In another bowl, whisk together the vegetable oil, buttermilk, hot brewed coffee (or water), eggs, and vanilla extract. The hot coffee might sound odd, but trust me, it enhances the chocolate flavor amazingly without making the batter taste like coffee.
Step 4: Blend Wet and Dry to Form Your Batter
Slowly pour the wet mixture into the dry ingredients and stir until just combined—don’t overmix or you’ll end up with a dense cake. The batter will be thin, and that’s perfectly fine. This helped me avoid a dry crumb when I first made it.
Step 5: Bake the Cake Layers
Divide the batter evenly into your prepared pans. Bake for about 30-35 minutes, or until a toothpick inserted in the center comes out clean. I like to start checking at 30 minutes to make sure they don’t overbake. Let them cool completely before frosting.
Step 6: Make the Orange Buttercream Frosting
Using room temperature butter and shortening, beat until smooth. Gradually add powdered sugar, then heavy whipping cream and orange extract. I add gel food coloring at this point to achieve that perfect vibrant orange. Beat on high until the frosting is light and fluffy. Adjust the thickness with a little milk if needed.
Step 7: Assemble and Decorate Your Cake
Place one cake layer on your serving plate, spread a generous layer of frosting, then top with the second layer. Cover the whole cake with a smooth crumb coat first, chill for 15 minutes, then apply the final layer of buttercream. Use a piping bag with a round tip to pipe concentric circles of frosting on top, then drag a toothpick from the center outwards repeatedly to create the iconic spiderweb pattern. It’s incredibly satisfying to do—like drawing but edible!
Pro Tips for Making Spiderweb Cake Recipe
- Use Black Cocoa Powder: For that intense black color, regular cocoa won’t cut it—black cocoa is your best friend here.
- Hot Coffee Trick: Adding hot brewed coffee to the batter deepens the chocolate flavor without adding bitterness; it’s a game changer.
- Chill Before Decorating: A quick chill after crumb coating helps the final frosting layer go on smooth and prevents crumbs from showing through.
- Spiderweb Technique: Don’t rush dragging your toothpick for the spiderweb—make slow, steady pulls for clean lines and sharp contrast.
How to Serve Spiderweb Cake Recipe
Garnishes
I usually keep the garnishes simple to highlight the spiderweb design. Sometimes, I add a few edible black spiders or plastic ones for fun—perfect for that creepy Halloween vibe. A sprinkle of crushed candied orange peel around the edges adds a lovely citrus note and pretty touch.
Side Dishes
This cake is rich enough to stand alone, but if you want to add something, a small scoop of vanilla ice cream or a dollop of freshly whipped cream works beautifully. For drinks, I love serving it with a cup of spiced chai tea or an espresso to complement the chocolate.
Creative Ways to Present
For parties, I’ve placed this cake on a rustic wooden cake stand surrounded by little pumpkins and fall leaves. Another fun idea is to cut the cake into individual slices, pipe small spiderwebs on each slice, and serve on themed plates—guaranteed to impress your guests!
Make Ahead and Storage
Storing Leftovers
Store any leftover cake covered loosely with plastic wrap or in an airtight container in the refrigerator. I find that the cake stays moist for up to 4 days. Just let the cake come to room temperature before serving to get the frosting nice and soft again.
Freezing
If you want to freeze it, wrap the cake tightly in plastic wrap and then foil before freezing. It freezes well for up to two months. When you’re ready to enjoy, thaw the cake overnight in the fridge to preserve the frosting’s texture.
Reheating
I don’t recommend reheating this cake in the microwave since the frosting can melt, but if you want a warm slice, pop it briefly (10-15 seconds) in the microwave and then let it sit for a minute—it’s delightful with softened buttercream!
FAQs
-
Can I use regular cocoa powder instead of black cocoa?
While you can substitute regular cocoa powder, the cake won’t have the characteristic black color or the same bold depth of flavor. Black cocoa powder is specially processed to give that intense dark color and a slightly different flavor profile that’s key to this recipe’s look and taste.
-
Why add coffee to the cake batter?
Adding hot brewed coffee enhances the chocolate flavor without making the cake taste like coffee. It helps to bring out those rich cocoa notes and keeps the cake moist. If you prefer, you can substitute hot water, but coffee really elevates the taste.
-
How do I make the spiderweb pattern on top of the cake?
After frosting the top smooth, pipe concentric circles of frosting across the surface. Then, use a clean toothpick or skewer to drag lines from the center out toward the edges. This simple back-and-forth dragging creates the classic spiderweb effect. Taking your time with steady strokes will give the best results.
-
Can I prepare parts of this cake ahead of time?
Absolutely! You can bake the cake layers a day or two before, wrap them well, and store them at room temperature or refrigerated. Make the frosting and assemble the day of serving for best freshness. Alternatively, you can assemble and refrigerate it overnight to let the flavors meld together beautifully.
Final Thoughts
This Spiderweb Cake Recipe has become one of my favorites to make, especially during the fall and Halloween season. It always gets compliments not just for how it looks but for that wonderful balance of rich chocolate and bright orange flavors. I recommend giving it a try—you won’t believe how simple it is to create something this fun and delicious. Whether for your family or friends, I promise this cake will bring smiles and maybe a few impressed gasps around your table!
Print
Spiderweb Cake Recipe
- Prep Time: 180 min
- Cook Time: 35 min
- Total Time: 215 min
- Yield: 12 servings
- Category: Dessert
- Method: Baking
- Cuisine: American
Description
The Spiderweb Cake is a delightfully rich and festive dessert perfect for Halloween celebrations. Featuring a moist, dark chocolate cake made with black cocoa powder and infused with the warmth of brewed coffee, it’s paired with a creamy orange-flavored buttercream frosting that brings a vibrant contrast both in flavor and color. The cake’s unique spiderweb design makes it a striking centerpiece for any spooky-themed gathering.
Ingredients
Cake Ingredients
- 1 1/2 cups all-purpose flour
- 1 1/2 cups granulated sugar
- 1/2 cup black cocoa powder
- 1/4 cup Dutch-processed cocoa powder (sifted)
- 1 1/2 tsp baking soda
- 1 tsp baking powder
- 1 tsp salt
- 1/4 cup vegetable oil
- 3/4 cup buttermilk
- 3/4 cup strong brewed coffee (or water), hot
- 2 large eggs
- 2 tsp vanilla extract
Orange Buttercream Frosting Ingredients
- 1 cup unsalted butter, room temperature
- 2 1/2 cups powdered sugar, adjust for desired sweetness
- 1 Tbsp heavy whipping cream
- 1/4 tsp orange extract
- 1/2 tsp Electric Orange Americolor Gel Color (optional)
Spiderweb Frosting Ingredients
- 1/2 cup shortening
- 2 cups powdered sugar
- 1 tsp clear vanilla extract (optional, avoid regular vanilla to prevent tinting)
- 3 Tbsp milk (adjust as needed to thin frosting)
Instructions
- Preheat and Prepare Pans: Preheat your oven to 350°F (175°C). Grease and flour your cake pans or line them with parchment paper to prevent sticking.
- Mix Dry Ingredients: In a large bowl, sift together all-purpose flour, granulated sugar, black cocoa powder, Dutch-processed cocoa powder, baking soda, baking powder, and salt. Whisk until evenly combined.
- Combine Wet Ingredients: In another bowl, whisk together vegetable oil, buttermilk, hot brewed coffee, eggs, and vanilla extract until smooth and well mixed.
- Make the Batter: Gradually pour the wet ingredients into the dry ingredients, mixing with a hand mixer or stand mixer on low speed until just combined. Avoid overmixing to keep the cake tender.
- Bake the Cake Layers: Divide the batter evenly between the prepared pans. Bake in the preheated oven for about 30-35 minutes or until a toothpick inserted into the center comes out clean. Remove from oven and allow cakes to cool in pans for 10 minutes before transferring to wire racks to cool completely.
- Prepare Orange Buttercream Frosting: Using a mixer, beat the room temperature unsalted butter until creamy. Gradually add powdered sugar, mixing slowly to avoid a sugar cloud. Add the heavy whipping cream, orange extract, and optional gel color. Beat at medium-high speed until fluffy and smooth. Adjust consistency by adding more powdered sugar or cream as needed.
- Prepare Spiderweb Frosting: In a separate bowl, beat shortening until smooth. Gradually add powdered sugar and clear vanilla extract. Slowly mix in milk, a tablespoon at a time, until the frosting reaches a pipeable consistency suitable for intricate designs.
- Assemble the Cake: Place one cake layer on the serving plate. Spread an even layer of orange buttercream on top. Add the second cake layer and cover the entire outside with the remaining orange buttercream, smoothing it evenly.
- Create the Spiderweb Design: Using a piping bag fitted with a small round tip, pipe concentric circles of the spiderweb frosting onto the top of the cake. Using a toothpick or skewer, draw straight lines from the center outward through the circles to create the spiderweb pattern.
- Chill and Serve: Refrigerate the cake for at least 30 minutes to set the frosting. Serve at room temperature and enjoy your festive Spiderweb Cake!
Notes
- This Spiderweb Cake is an ideal festive treat for Halloween celebrations with its rich black cocoa and striking orange frosting.
- Using hot brewed coffee intensifies the chocolate flavor without adding a strong coffee taste.
- The Electric Orange Americolor Gel Color is optional but recommended for a vibrant orange frosting color.
- Clear vanilla extract prevents the frosting from turning brown, keeping colors bright for the spiderweb design.
- Adjust the sweetness of the frosting according to your preference by varying powdered sugar quantities.
- Allow the cake to cool completely before frosting to avoid melting.
Nutrition
- Serving Size: 1 serving
- Calories: 620 kcal
- Sugar: 70 g
- Sodium: 384 mg
- Fat: 31 g
- Saturated Fat: 16 g
- Unsaturated Fat: 13 g
- Trans Fat: 0 g
- Carbohydrates: 86 g
- Fiber: 2 g
- Protein: 4 g
- Cholesterol: 75 mg


