
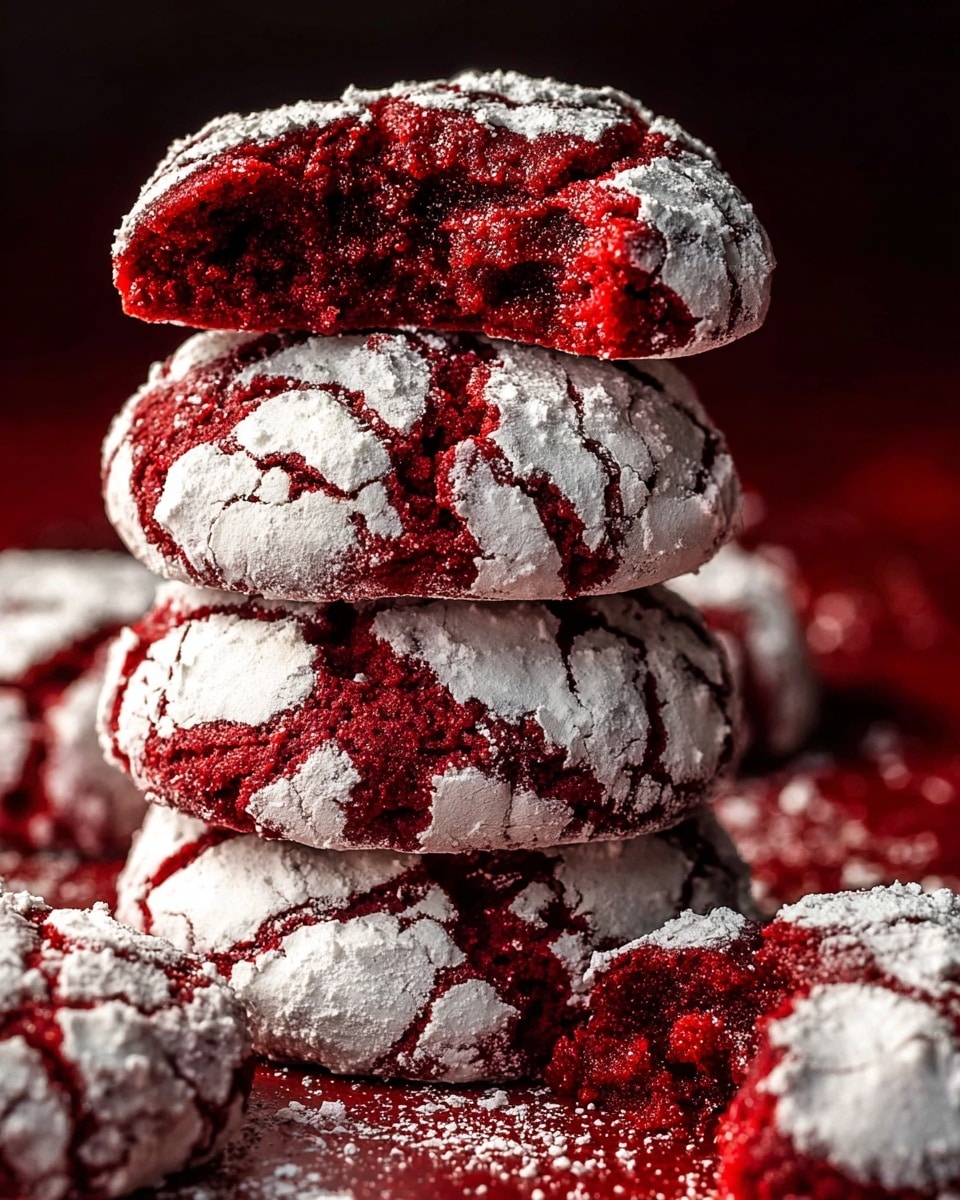
I absolutely love this Red Velvet Cookies Recipe because it combines the rich, velvety flavor of classic red velvet cake with the chewy, soft texture of a cookie. Whenever I make these, they’re an instant hit—perfect for cozy afternoons or as a festive treat to share with friends and family. What makes this recipe stand out is the unique combination of ingredients: olive oil and butter together create a cookie that’s tender but not greasy, and the vinegar gives it that subtle tang that balances perfectly with the sweetness.
When I first tried this Red Velvet Cookies Recipe, I was pleasantly surprised by how easy it was to pull off such a stunning, bakery-quality cookie at home. Whether you’re craving something special for Valentine’s Day, a holiday party, or just want to satisfy that chocolate craving with a twist, these cookies deliver every time. Plus, they’re adorable dusted with powdered sugar, making them look as good as they taste!
Why You’ll Love This Recipe
- Unique Texture: The olive oil and butter combo makes these cookies wonderfully tender and chewy.
- Simple Ingredients: You likely have everything you need in your pantry already to whip these up fast.
- Striking Appearance: That vibrant red color coupled with powdered sugar dusting makes each cookie a showstopper.
- Perfect Portion: Small batch recipe yields just 8 cookies, perfect for a personal treat or to share without leftover overload.

Ingredients You’ll Need
The ingredients for this Red Velvet Cookies Recipe are super straightforward, but each one plays a special role in getting the perfect flavor and texture. I always recommend using good quality unsalted butter and real vanilla extract—it really makes a difference in those subtle background flavors.
- Granulated sugar: Sweetens the dough and helps create a lovely soft crumb.
- Unsalted butter: Adds richness and moisture without the salt, so you control the seasoning.
- Extra-virgin olive oil: Keeps the cookies tender and adds depth—you won’t taste “olive oil” here, promise.
- Large egg: Binds everything together and adds to the cookie’s chewy texture.
- Kosher salt: Balances sweetness and enhances other flavors.
- Red food coloring: This recipe calls for a tablespoon, giving that classic red velvet charm.
- Vinegar: Any mild vinegar works to give that subtle tang and activate baking soda for lift.
- Pure vanilla extract: Essential for rounding out the flavor profile.
- All-purpose flour: Forms the structure of the cookie; measure it carefully for best results.
- Unsweetened cocoa powder: Gives that signature red velvet chocolate hint without overpowering.
- Baking soda: Leavens the dough to keep the cookies light and soft.
- Powdered sugar: For dusting and giving the cookies a pretty, finished look.
Variations
I love how versatile the Red Velvet Cookies Recipe is—it’s easy to tweak it to your personal tastes or dietary needs. Feel free to get creative with mix-ins or toppings to make it feel fresh every time you bake.
- White Chocolate Chips: Adding a handful of white chocolate chips gives a creamy contrast that my family absolutely goes crazy for.
- Nutty Twist: Chopped pecans or walnuts add a lovely crunch and nuttiness that complements the cocoa and vinegar notes well.
- Dairy-Free Option: Swap butter for a plant-based margarine and use a flax egg to make it vegan-friendly without sacrificing texture.
- Less Food Coloring: If you’re not a fan of intense red, you can use half the amount of food coloring and still get a pretty pinkish cookie that’s just as tasty.
How to Make Red Velvet Cookies Recipe
Step 1: Prep and Mix the Wet Ingredients
Start by heating your oven to 350°F (180°C), so it’s ready when your dough is! In a large bowl—or better yet, the bowl of your stand mixer—cream together the granulated sugar, softened butter, olive oil, egg, and kosher salt until the mixture looks fluffy and pale yellow. This step is key because it incorporates air that helps lighten the cookies. Then add in the red food coloring, vinegar, and vanilla extract. Mix just until everything is combined and you have a beautifully bright, silky batter ready for the dry ingredients.
Step 2: Combine Dry Ingredients Carefully
In a separate bowl, whisk together the all-purpose flour, unsweetened cocoa powder, and baking soda. This ensures they’re evenly mixed and helps avoid clumps of baking soda or flour pockets in your cookies. Gradually add this dry mix to the wet ingredients, then gently fold it all together. Be careful not to overmix here; you want just enough to combine everything smoothly. Overdoing it can make the cookies tough, and that’s not what we’re after at all.
Step 3: Chill and Coat the Cookie Dough
I discovered a handy trick by freezing the scooped dough balls for 10 minutes before rolling them—this makes them easier to handle and helps the cookies hold their shape in the oven. Scoop about 8 equal portions using a medium ice cream scoop onto a plate, freeze, then roll each into a neat ball with your hands. After that, toss them around in a generous bowl of powdered sugar. This coating not only adds a lovely sweetness but also creates that signature crackled look on the baked cookies.
Step 4: Bake and Cool
Place your sugar-coated dough balls on a parchment-lined half sheet pan, giving them some space to spread. Bake for 20 minutes—try not to open your oven too often during baking since the temperature drop can affect how they rise. After pulling them out, let the cookies cool completely on the pan to firm up. This waiting game is tough, believe me, but it’s worth it! Once cool, they’re ready to enjoy.
Pro Tips for Making Red Velvet Cookies Recipe
- Use Room Temperature Butter: This helps the sugar cream properly, essential for that light, fluffy texture.
- Don’t Skip the Freezing Step: Chilling the dough slightly makes rolling easier and keeps cookies from flattening too much while baking.
- Powdered Sugar Coating: This not only adds sweetness but also creates a beautiful crackled surface that looks professional.
- Handle Dough Gently: Overmixing once flour is added can toughen the cookies, so fold just until combined.
How to Serve Red Velvet Cookies Recipe
Garnishes
I usually keep it simple with a dusting of powdered sugar, but I also love topping these cookies with a tiny dollop of cream cheese frosting for a decadent twist—a nod to classic red velvet cake flavors. If you’re serving these for a party, a sprinkle of festive red and white nonpareils adds an irresistible pop of color and fun texture.
Side Dishes
These cookies are perfect alongside a fresh cup of coffee or a creamy hot chocolate, especially on chilly days. I also find they pair beautifully with a scoop of vanilla ice cream or a glass of milk to balance the cocoa richness and slight tang from the vinegar.
Creative Ways to Present
For special occasions, I like arranging these Red Velvet Cookies Recipe treats in a festive stack tied with twine, or placed in a pretty tin lined with parchment paper. You can sprinkle edible glitter or decorate them with a drizzle of melted white chocolate for an extra wow factor—perfect if you’re gifting cookies or setting out a dessert table.
Make Ahead and Storage
Storing Leftovers
These cookies keep well at room temperature in an airtight container for up to 4 days. I always place a slice of bread inside the container to help maintain moisture so they don’t dry out—it’s a little trick I learned early on that really makes a difference.
Freezing
You can freeze the raw dough balls in a single layer on a baking sheet, then transfer them to a freezer bag for up to 3 months. When you’re ready to bake, just pop them straight into the oven—add an extra minute or two to baking time if they’re still frozen. I also freeze baked cookies by wrapping each one individually in plastic wrap and storing them in a freezer-safe container.
Reheating
To freshen up leftover cookies, I reheat them in a warm oven at 300°F for 5 minutes, or microwave for about 10 seconds. This brings back their soft, chewy texture and warm cocoa aroma, making them taste as if they just came out of the oven.
FAQs
-
Can I substitute the red food coloring with natural alternatives?
Absolutely! You can try using beet juice or powder for a natural red tint, but keep in mind the color may be less vibrant and could slightly alter the cookie flavor. It’s a great option if you prefer avoiding artificial dyes.
-
What’s the purpose of adding vinegar in this Red Velvet Cookies Recipe?
The vinegar reacts with the baking soda to create a subtle leavening effect, which helps make the cookies light and tender. It also adds a faint tang that balances the sweetness, a hallmark of red velvet flavor.
-
Can these cookies be made dairy-free?
Yes! Swap the unsalted butter for a vegan butter substitute and use a flax or chia egg instead of a chicken egg. The olive oil helps keep the texture moist, so the cookies still turn out soft and delicious.
-
Why do you recommend freezing the dough before baking?
Freezing the dough helps it hold together better when rolling in powdered sugar and prevents the cookies from spreading too much in the oven. It also enhances the crackled appearance on the cookie surface after baking.
Final Thoughts
This Red Velvet Cookies Recipe has become one of my go-to favorites whenever I want a cookie that feels a little extra special but is still humble and easy to make. I hope you’ll enjoy the process of creating these tender, chewy, and beautifully red treats as much as I do. Trust me, once you try this recipe, it’ll quickly become a classic in your baking repertoire too—perfect for sharing, gifting, or simply treating yourself.
Print
Red Velvet Cookies Recipe
- Prep Time: 30 Minutes
- Cook Time: 20 Minutes
- Total Time: 50 Minutes
- Yield: 8 cookies
- Category: Dessert
- Method: Baking
- Cuisine: American
Description
These Red Velvet Cookies are a delightful twist on the classic red velvet cake, featuring a rich cocoa flavor with a hint of vinegar and a vibrant red hue. Soft and chewy with a dusting of powdered sugar, they make a perfect treat for any occasion.
Ingredients
Wet Ingredients
- 1 1/4 cup (250 grams) granulated sugar
- 4 tablespoon (½ stick or 57 grams) unsalted butter, room temperature
- 3 tablespoon extra-virgin olive oil
- 1 large egg
- 1 teaspoon kosher salt
- 1 tablespoon red food coloring
- 1 tablespoon vinegar (any kind like red, white, rice, or apple cider; not balsamic)
- 1 teaspoon pure vanilla extract
Dry Ingredients
- 1 3/4 cup (219 grams) all-purpose flour
- 1/4 cup (21 grams) unsweetened cocoa powder
- 1/2 teaspoon baking soda
Topping
- Powdered sugar, for dusting
Instructions
- Preheat Oven: Heat the oven to 350°F (180°C) to prepare for baking the cookies.
- Cream Wet Ingredients: In a large bowl or stand mixer with paddle attachment, beat together sugar, softened butter, olive oil, egg, and kosher salt until the mixture is fluffy and pale yellow. Then add red food coloring, vinegar, and vanilla extract; mix until well combined.
- Combine Dry Ingredients: In a separate medium bowl, whisk together all-purpose flour, unsweetened cocoa powder, and baking soda until fully blended.
- Mix Wet and Dry: Gently stir the dry ingredients into the wet mixture until just combined to avoid overmixing, ensuring a tender cookie.
- Scoop and Chill Dough: Using a medium ice cream scoop, portion the dough onto a plate to create about 8 cookie dough balls. Freeze the dough balls for 10 minutes to firm them up.
- Form and Coat Cookies: After chilling, roll each dough ball with your hands into a smooth ball, then toss thoroughly in powdered sugar to coat completely.
- Bake Cookies: Place the powdered sugar-coated cookie balls on a half sheet pan spaced evenly and bake for 20 minutes at 350°F (180°C).
- Cool and Serve: Allow the cookies to cool on the pan before transferring to a container or enjoying directly warm from the baking sheet.
Notes
- Freezing the cookie dough balls helps maintain shape and achieves the classic crackled powdered sugar appearance.
- Any vinegar type except balsamic can be used; it activates the baking soda adding to the classic red velvet tang.
- Using extra-virgin olive oil adds moisture and a subtle flavor twist compared to traditional vegetable oil.
- Red food coloring is essential for achieving the signature red velvet color.
- Store cookies in an airtight container at room temperature for up to 3 days, or freeze for longer storage.
Nutrition
- Serving Size: 1 cookie
- Calories: 230
- Sugar: 18g
- Sodium: 170mg
- Fat: 12g
- Saturated Fat: 4g
- Unsaturated Fat: 7g
- Trans Fat: 0g
- Carbohydrates: 29g
- Fiber: 1g
- Protein: 2g
- Cholesterol: 25mg


