
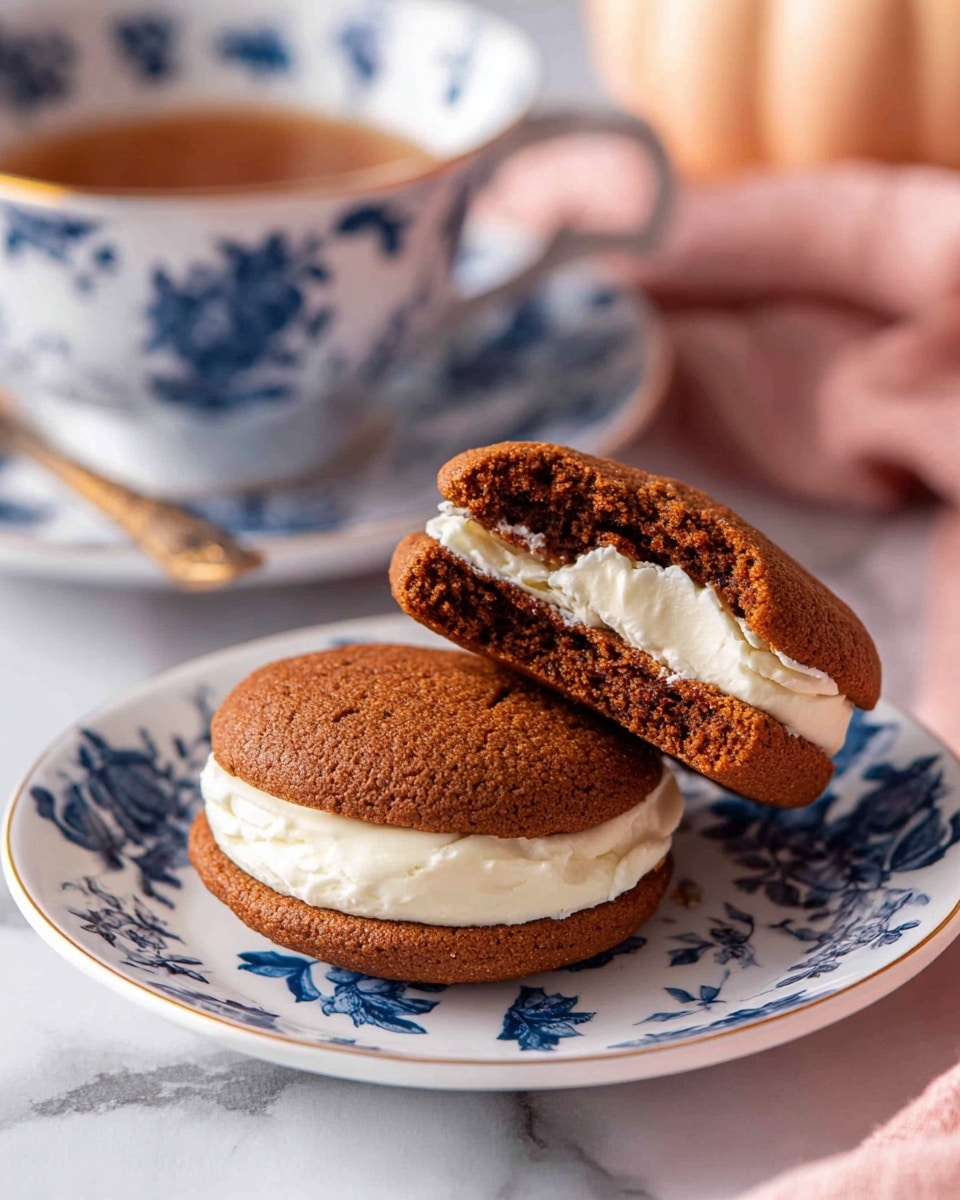
I absolutely love this Pumpkin Whoopie Pies Recipe because it combines the warm, cozy flavors of fall with a soft, cakey cookie sandwich that’s just bursting with creamy cinnamon filling. When I first tried it, I was amazed at how the pumpkin adds moisture without weighing down the cake, making each bite tender and flavorful. These pies are perfect for a holiday party, a fun weekend baking project, or just when you want a sweet treat with a seasonal twist.
You’ll find that these Pumpkin Whoopie Pies are incredibly easy to make, even if you’re new to baking. The spices harmonize beautifully and the cream cheese frosting adds that irresistible tang that balances the sweetness perfectly. Whether you’re serving them for dessert or packing them for a cozy picnic, this Pumpkin Whoopie Pies Recipe has become one of my go-to fall favorites, and I think you’ll love it just as much.
Why You’ll Love This Recipe
- Deliciously Moist: The pumpkin puree keeps the whoopie pies soft and extra tender.
- Perfect Seasonal Flavors: A cozy blend of cinnamon, ginger, and cloves for that fall vibe.
- Simple to Make: No fancy techniques required, just great results every time.
- Creamy Filling: The cream cheese frosting adds that perfect tangy sweetness that keeps you coming back for more.

Ingredients You’ll Need
The ingredients in this Pumpkin Whoopie Pies Recipe are straightforward and complement each other perfectly to give you that classic fall taste. Here are some tips to keep in mind as you gather your shopping list:
- All-purpose flour: Make sure to spoon and level for accurate measurement to keep the texture just right.
- Ground cinnamon: Fresh cinnamon will shine, but ground cinnamon from the spice rack works beautifully, too.
- Baking powder & baking soda: Both are needed to give these pies their perfect rise and lightness.
- Ground ginger, allspice, cloves, nutmeg: Use fresh spices if you can – it really boosts that warm pumpkin spice flavor.
- Dark brown sugar: This adds a subtle molasses note that deepens the flavor and keeps things moist.
- Unsalted butter: Room temperature butter creams better for a smoother batter and filling.
- Eggs: Bring to room temperature for better mixing and fluffier results.
- Pumpkin puree: Use pure pumpkin, not pumpkin pie filling, for the best flavor and texture.
- Vegetable or neutral oil: Adds extra moisture without overpowering the spices.
- Pure vanilla extract: Use real vanilla for authentic, rich flavor.
- Cream cheese: Softened and full-fat gives that luscious, tangy filling.
- Confectioners’ sugar: For a smooth, sweet frosting without any graininess.
- Honey: Adds natural sweetness and a hint of floral warmth in the filling.
Variations
One of the best things about this Pumpkin Whoopie Pies Recipe is how easily you can tweak it to fit your tastes or dietary needs. I love experimenting with a few different ideas, and you should definitely try what feels fun for you!
- Gluten-Free: I swapped the all-purpose flour for a gluten-free blend once and the texture was surprisingly spot on—just make sure it includes xanthan gum for structure.
- Spice Level: Feel free to boost or dial down the spices depending on your family’s preferences – my kids love it a little milder, but I add extra ginger for more zing.
- Filling Variations: For a dairy-free option, try a coconut cream or cashew-based filling; it’s luscious and still pairs wonderfully with the pumpkin.
- Mini Whoopie Pies: Make smaller ones for bite-sized treats at parties—just reduce baking time slightly.
How to Make Pumpkin Whoopie Pies Recipe
Step 1: Mix the Dry Ingredients
Start by preheating your oven to 350°F. In a medium bowl, whisk together the flour, cinnamon, baking powder, baking soda, ginger, salt, allspice, cloves, and nutmeg until everything is evenly combined. This step is key to ensuring those spices are distributed well through the dough, bringing out a balanced flavor in every bite.
Step 2: Cream Butter and Sugar, Then Add Wet Ingredients
In your stand mixer fitted with the whisk attachment, beat the dark brown sugar and softened butter on medium-high until fully combined and fluffy. Next, add the eggs one at a time, mixing after each addition. Then mix in pumpkin puree, vegetable oil, and vanilla extract until smooth. Reducing the speed to medium-low, gradually add the dry ingredients and mix just until combined. The batter should be sticky but smooth — don’t overmix or your whoopie pies will be tough.
Step 3: Pipe and Bake the Whoopie Pies
Transfer your batter to a large piping bag or a gallon freezer bag with one corner snipped off. Pipe 2-inch rounds onto parchment-lined baking sheets, spacing them about 2 inches apart. If you don’t have a piping bag, spoon the batter and smooth each round lightly with a wet finger or the back of a spoon for even shapes. Bake for 15 to 20 minutes, until the tops spring back when gently pressed. Let them cool slightly before transferring to a wire rack to cool completely.
Step 4: Whip Up the Cream Cheese Filling
While the pies cool, beat cream cheese and softened butter in your stand mixer on medium-high until smooth and creamy. Add the confectioners’ sugar, cinnamon, vanilla extract, and honey, then continue beating until light and fluffy. Chill the filling if you need to, to make it easier to spread between the pies.
Step 5: Assemble Your Pumpkin Whoopie Pies
Flip half of the whoopie pies so the flat side is facing up. Spread a generous dollop of filling on each with a butter knife or spatula. Press the domed half gently on top to create a sandwich. If you like, refrigerate them for 30 minutes to set the filling before serving.
Pro Tips for Making Pumpkin Whoopie Pies Recipe
- Use Room Temperature Ingredients: Butter, eggs, and cream cheese all mix more smoothly when room temp, giving a better texture to dough and frosting.
- Don’t Overmix Dough: Mix just until the dry ingredients disappear to keep your pies tender and light.
- Piping Helps With Consistency: Piping rounds ensures evenly sized whoopie pies that bake uniformly—this little extra effort really pays off.
- Bake Until Slightly Springy: Don’t overbake; a gentle touch test helps keep the pies soft and fluffy instead of dry.
How to Serve Pumpkin Whoopie Pies Recipe
Garnishes
I usually keep it simple with a light dusting of powdered sugar or a sprinkle of cinnamon on top of the finished pies. If you’re feeling fancy, a drizzle of melted dark chocolate or a few chopped toasted pecans on the edges add a lovely crunch and visual appeal. It’s one of my favorite ways to elevate the rustic charm of this treat.
Side Dishes
These Pumpkin Whoopie Pies pair wonderfully with a warm cup of coffee or chai tea. For a heartier fall gathering, I like serving them alongside caramel apple slices or a glass of spiced cider—everything balances so well together.
Creative Ways to Present
For special occasions, I like stacking the whoopie pies on a tiered dessert stand decorated with fresh fall leaves and tiny pumpkins. Another fun idea is wrapping each one in parchment paper tied with twine, perfect for gifting or party favors. These little touches really make the Pumpkin Whoopie Pies Recipe feel festive and inviting.
Make Ahead and Storage
Storing Leftovers
Once assembled, store your Pumpkin Whoopie Pies in an airtight container in the refrigerator. They keep beautifully for up to 4 days and the flavors actually mature and meld together, making them even tastier the next day.
Freezing
I’ve frozen these pies both assembled and unassembled. For the best texture, freeze the cookie rounds on a tray first, then transfer to a zip-top bag. Freeze the filling separately if you aren’t assembling right away. When you’re ready, thaw the rounds and filling overnight in the fridge and assemble fresh for a like-new taste.
Reheating
If you want to slightly warm your whoopie pies, I recommend a gentle microwave blast (10-15 seconds) or a few minutes in a low oven (300°F) just to soften them up without melting the filling too much. This prevents drying out and keeps that rich pumpkin flavor front and center.
FAQs
-
Can I use canned pumpkin pie filling instead of pumpkin puree?
I don’t recommend using pumpkin pie filling because it’s already sweetened and spiced, which throws off the recipe’s balance. Using plain pumpkin puree gives you control over the sweetness and spice level.
-
How long do Pumpkin Whoopie Pies stay fresh?
When stored in an airtight container in the fridge, they stay fresh for about 3 to 4 days. The flavor actually improves after resting overnight!
-
Can I make the whoopie pies ahead of time?
Absolutely! You can bake the cookie rounds a few days ahead and keep them in an airtight container. Make the filling the day you plan to serve for best texture. Or freeze the components separately for longer storage.
-
What can I substitute for cream cheese in the filling?
You can try whipped coconut cream or a vegan cream cheese alternative to make a dairy-free version. Just adjust the sweetness to taste and chill well for spreading consistency.
Final Thoughts
This Pumpkin Whoopie Pies Recipe has truly won a place in my heart—and my kitchen—because it’s simple to make, irresistibly tasty, and perfect for sharing with friends and family. I hope you’ll give this recipe a try and enjoy the cozy fall flavors as much as I do. Trust me, once you make these, they’ll become a seasonal classic you’ll keep coming back to year after year. Happy baking!
Print
Pumpkin Whoopie Pies Recipe
- Prep Time: 15 mins
- Cook Time: 20 mins
- Total Time: 45 mins
- Yield: 12 servings
- Category: Dessert
- Method: Baking
- Cuisine: American
Description
Delightfully soft and spiced pumpkin whoopie pies filled with a creamy cinnamon-vanilla cream cheese frosting, perfect for autumn gatherings and festive celebrations.
Ingredients
PIES
- 3 cups (360 g) allpurpose flour
- 1 Tbsp ground cinnamon
- 1 tsp baking powder
- 1 tsp baking soda
- 1 tsp ground ginger
- 1 tsp kosher salt
- 1/2 tsp ground allspice
- 1/2 tsp ground cloves
- 1/4 tsp ground nutmeg
- 2 cups (430 g) packed dark brown sugar
- 1/2 cup (1 stick) unsalted butter, softened
- 2 large eggs
- 1 cup pumpkin puree
- 1/4 cup vegetable or neutral oil
- 1 1/2 tsp pure vanilla extract
FILLING & ASSEMBLY
- 1 (8-oz) block cream cheese, softened
- 1/2 cup (1 stick) unsalted butter, softened
- 2 cups (230 g) confectioners’ sugar
- 2 tsp ground cinnamon
- 2 tsp pure vanilla extract
- 1 tsp honey
Instructions
- Preheat and Mix Dry Ingredients: Preheat your oven to 350°F (175°C). In a medium bowl, whisk together the allpurpose flour, ground cinnamon, baking powder, baking soda, ground ginger, kosher salt, ground allspice, ground cloves, and ground nutmeg until evenly combined.
- Cream Sugar and Butter; Add Wet Ingredients: Using a stand mixer fitted with a whisk attachment, beat the dark brown sugar and softened butter on medium-high speed until combined. Add eggs, pumpkin puree, vegetable oil, and vanilla extract, then beat until the mixture is smooth and homogenous. Reduce the mixer speed to medium-low, gradually add the dry ingredient mixture, and mix until just combined. The dough should be smooth and sticky.
- Pipe the Dough: Transfer the dough into a gallon-sized freezer bag or a piping bag. Cut about a 1-inch opening at the corner of the bag. Pipe dough rounds approximately 2 inches wide onto two large baking sheets lined with parchment paper, spacing them about 2 inches apart. Smooth the tops of the rounds gently with the back of a spoon or a wet finger to achieve even surfaces.
- Bake the Whoopie Pies: Bake in the preheated oven for 15 to 20 minutes, or until the whoopie pies spring back when gently pressed. Remove from oven and allow to cool slightly on the baking sheets before transferring to a wire rack to cool completely.
- Prepare the Filling: In the large bowl of a stand mixer fitted with a whisk attachment, beat softened cream cheese and unsalted butter on medium-high speed until smooth and creamy. Add confectioners’ sugar, ground cinnamon, vanilla extract, and honey, then continue beating until the filling is light and fluffy. Chill the filling until ready to use.
- Assemble the Whoopie Pies: Turn half of the whoopie pies so their domed sides face down. Spread a generous amount of the cream cheese filling over the smooth sides. Top with the remaining whoopie pies, domed side up, to form sandwich cookies. Serve immediately or refrigerate until serving.
Notes
- Ensure the pumpkin puree is well drained if too watery to avoid soggy dough.
- For easier piping, chill the dough briefly before piping if it is too sticky.
- Whoopie pies can be stored in an airtight container in the refrigerator for up to 3 days.
- Allow cakes to cool completely to prevent filling from melting.
- For a dairy-free version, substitute butter and cream cheese with non-dairy alternatives.
Nutrition
- Serving Size: 1 whoopie pie (approximately 85 g)
- Calories: 320
- Sugar: 28 g
- Sodium: 230 mg
- Fat: 14 g
- Saturated Fat: 7 g
- Unsaturated Fat: 6 g
- Trans Fat: 0 g
- Carbohydrates: 44 g
- Fiber: 2 g
- Protein: 3 g
- Cholesterol: 45 mg


