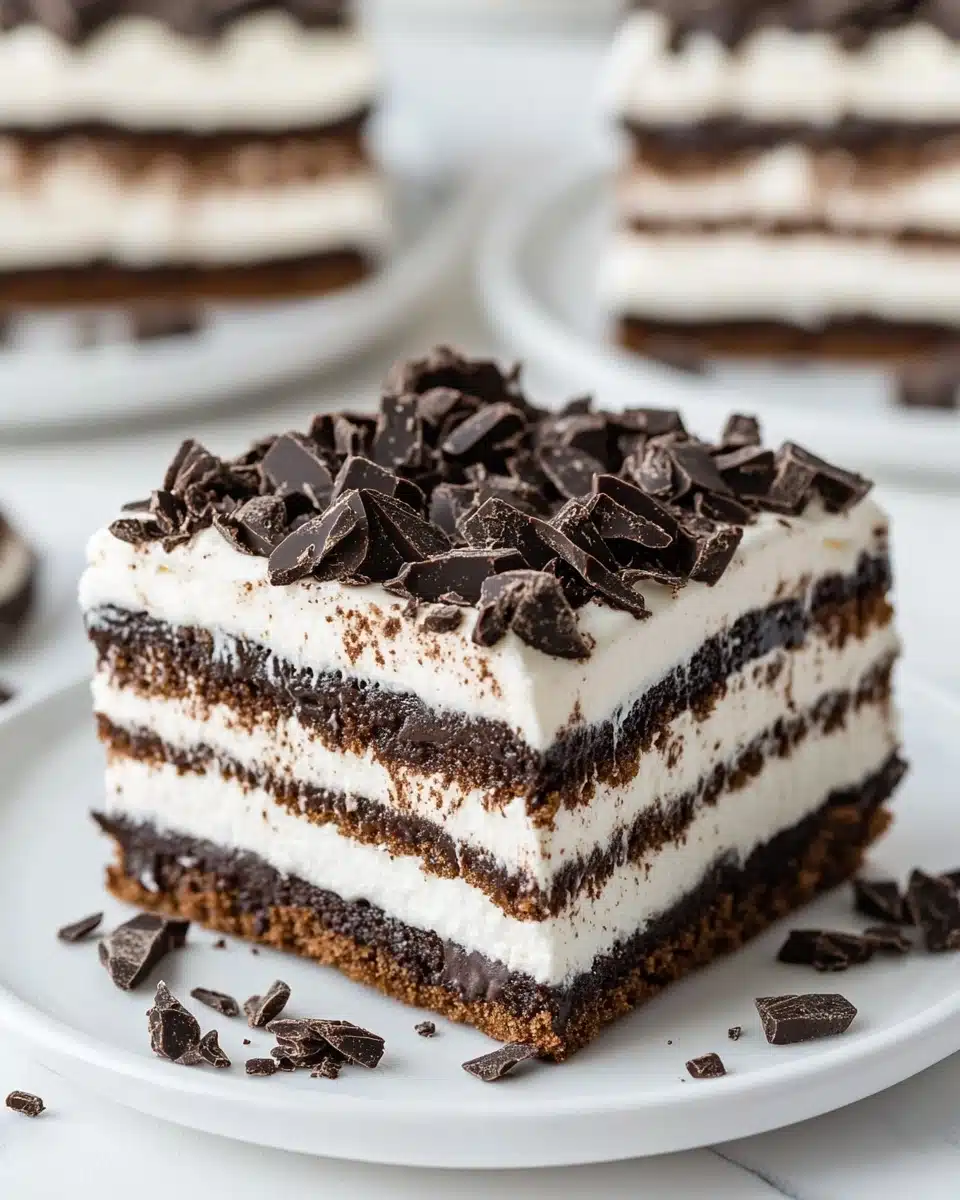
If you’re craving the most effortless, crowd-pleasing dessert imaginable, this No Bake Ice Cream Sandwich Cake is your new summer obsession. Layers of chocolatey ice cream sandwiches, rich hot fudge, fluffy whipped topping, and a shower of crushed Oreos combine in a chilled treat that takes almost no prep work—but tastes like something from your favorite ice cream shop!
Why You’ll Love This Recipe
- Five-Minute Assembly: Seriously—there’s nothing to mix, bake, or measure. Stack, spread, sprinkle, and freeze!
- Ultimate Summer Crowd-Pleaser: Both kids and adults go crazy for the classic flavors in this No Bake Ice Cream Sandwich Cake, so it’s perfect for BBQs, birthdays, or anytime you need dessert on short notice.
- Make-Ahead Magic: You can prepare this dessert days in advance—just pop it in the freezer and pull it out when you need sweet, frosty perfection!
- Endless Customization: Switch up the ice cream flavors, cookies, or toppings to make it your own (and it’s so easy, even little helpers can assist).

Ingredients You’ll Need
Good news: this No Bake Ice Cream Sandwich Cake only calls for a handful of familiar ingredients, but each plays a key part in making it taste and look incredible. Here’s why you need every component for the ultimate creamy, chocolatey treat!
- Ice Cream Sandwiches (21): These form the “cake” layers—classic, nostalgic, and ultra-convenient. Go with your favorite brand for best results.
- Hot Fudge (11.75 oz jar): Warm, gooey ribbons of chocolate that add fudgy richness between every layer. Microwave it just until spreadable for easy assembly.
- Cool Whip (16 oz, thawed): Fluffy, sweet whipped topping keeps the cake light and adds that nostalgic ice cream-shop vibe. Make sure it’s thawed so it’s easy to spread.
- Oreos (18, crushed): Crushed cookies provide the perfect bit of chocolate crunch and a pretty, dramatic finish on top. You can crush them finely or leave a few larger pieces for texture.
Variations
The beauty of a No Bake Ice Cream Sandwich Cake is just how easy it is to play with flavors, toppings, and textures. Use what you have, try new combinations, or tweak it for allergies—all without fuss or stress!
- Go Nuts: Sprinkle chopped peanuts, walnuts, or pecans in between the layers or over the top for nutty flavor and crunch.
- Caramel Drizzle: Swap some or all of the hot fudge for caramel sauce, or zigzag extra caramel over the whipped topping for a sweet twist.
- Fruit-Lover’s Adventure: Scatter fresh sliced strawberries, bananas, or raspberries between layers for a burst of juicy, tangy color.
- Gluten-Free Swap: Use gluten-free ice cream sandwiches and cookies to make this cake totally gluten-free (and just as delicious).
How to Make No Bake Ice Cream Sandwich Cake
Step 1: Lay Down the First Layer
Start by unwrapping your ice cream sandwiches and quickly arranging a layer on the bottom of a 9×13 inch pan. You’ll usually need about 7 sandwiches per layer; trim one or two to make them fit snugly in the corners if needed. Work fast—the sandwiches melt quickly on summer days!
Step 2: Add Fudge and Whipped Topping
Gently warm the hot fudge in the microwave just until it’s pourable, then spread about a third of it evenly over the ice cream sandwich layer. Next, swoosh on half the Cool Whip, smoothing it right to the edges for full coverage and a creamy bite in every forkful.
Step 3: Repeat the Layers
Pop down a second layer of ice cream sandwiches, then repeat with another third of hot fudge, and the rest of the Cool Whip. Each layer creates more dreamy, chilly deliciousness!
Step 4: Oreo Crunch and Final Touch
Generously scatter the crushed Oreos over the top of the cake and finish with a final drizzle of the last of the hot fudge. The crunchy cookies and glossy fudge turn this into a true celebration treat.
Step 5: Freeze and Slice
Cover your cake with foil or plastic wrap and freeze for at least 4 hours, or until firm enough to slice easily. When you’re ready, let it sit for a couple minutes, then cut into squares and serve up the smiles!
Pro Tips for Making No Bake Ice Cream Sandwich Cake
- Sandwich Strategy: Unwrap your ice cream sandwiches right before assembling—even just a minute or two on the counter makes them easier to trim and fit without turning to mush.
- Fudge Spreading Secret: Microwave the fudge in short bursts until pourable, but not hot—you want it spreadable so it doesn’t melt straight through the layers.
- Make Ahead Like a Pro: Assembled cakes can be frozen for up to a week. Just cover tightly in the pan to prevent freezer burn for the freshest flavor every time.
- Easy Slicing: For neat squares, dip a sharp knife in hot water, dry it, and slice through while the cake is still very cold—repeat as needed for clean cuts!
How to Serve No Bake Ice Cream Sandwich Cake

Garnishes
This cake is already a visual treat, but if you want to dial up the fun, scatter extra mini chocolate chips, a few bright maraschino cherries, or colorful sprinkles over the Oreo layer just before serving. A dollop of whipped cream on each slice is always welcome, too—especially for birthday celebrations!
Side Dishes
Pair your No Bake Ice Cream Sandwich Cake with a bowl of fresh summer berries or a zippy fruit salad for a refreshing, tangy contrast to all the creamy chocolate goodness. For a backyard cookout, icy lemonade and grilled fruits complement the cake beautifully.
Creative Ways to Present
Try serving individual cake squares in decorative cupcake liners for a playful touch—perfect for parties and easy clean-up. For fancier occasions, arrange cake pieces on a pretty platter and drizzle extra hot fudge or caramel just before guests arrive. If you’re feeling extra crafty, layer the ingredients in mason jars for cute, portable parfaits!
Make Ahead and Storage
Storing Leftovers
Leftover No Bake Ice Cream Sandwich Cake stores perfectly in the freezer for several days. Cover the pan tightly with foil or plastic wrap, or transfer individual pieces into airtight containers to keep everything fresh and delicious.
Freezing
This cake loves the freezer! You can make and store it up to a week ahead; just make sure it’s tightly covered to avoid picking up any freezer flavors. If you want to prep even farther ahead, consider wrapping individual pieces for a quick, sweet grab-and-go treat.
Reheating
No reheating needed—simply let the cake sit at room temperature for 5–10 minutes to soften slightly before serving. This way, each bite is perfectly creamy and easy to slice. (And if you’re in a hurry, a warm knife helps, too!)
FAQs
-
Can I use different flavors of ice cream sandwiches?
Yes! Vanilla, chocolate, Neapolitan, or even cookies & cream ice cream sandwiches all work deliciously in this No Bake Ice Cream Sandwich Cake. Feel free to mix and match based on your favorites or what’s available.
-
How can I make this dessert gluten-free?
Simply swap in gluten-free ice cream sandwiches and gluten-free cookies for the Oreos. There are several tasty options available in most grocery stores, so everyone can enjoy a slice!
-
What’s the best way to crush the Oreos?
Place the cookies in a zip-top bag and crush gently with a rolling pin or the bottom of a glass. You can go for coarse chunks or fine crumbs depending on your desired texture for the cake’s topping.
-
Can I freeze the cake for longer than a week?
Absolutely. The No Bake Ice Cream Sandwich Cake can be frozen for up to a month. Just make sure it’s well wrapped to prevent freezer burn and enjoy within 30 days for best flavor and texture.
Final Thoughts
Go ahead—treat yourself and your loved ones to a pan of No Bake Ice Cream Sandwich Cake! With its layers of creamy, fudgy, chocolatey nostalgia, this dessert is too easy (and too fun) not to try. I know you’ll be making it on repeat all summer long!
Print
No Bake Ice Cream Sandwich Cake Recipe
- Prep Time: 10 minutes
- Total Time: 4 hours 10 minutes
- Yield: 12 servings
- Category: Dessert
- Method: No-Bake
- Cuisine: American
- Diet: Vegetarian
Description
Indulge in the deliciousness of this no-bake ice cream sandwich cake that’s a perfect treat for any occasion. Layers of ice cream sandwiches, hot fudge, Cool Whip, and crushed Oreos create a decadent dessert that’s sure to impress.
Ingredients
Ice Cream Sandwiches:
- 21 ice cream sandwiches
Oreo Layer:
- 18 Oreos (or similar, crushed)
Hot Fudge Layer:
- 11.75 ounces hot fudge
Cool Whip Layer:
- 16 ounces tub Cool Whip (thawed and divided)
Instructions
- Arrange Ice Cream Sandwiches: Place a layer of ice cream sandwiches on the bottom of a 9×13 inch pan.
- Add Hot Fudge and Cool Whip: Spread ⅓ of the hot fudge over the ice cream sandwiches, then top with half of the Cool Whip.
- Repeat Layers: Create another layer with sandwiches, hot fudge, and Cool Whip.
- Add Oreos and Remaining Hot Fudge: Sprinkle the crushed Oreos over the top layer and drizzle the remaining ⅓ of hot fudge.
- Freeze: Place the pan in the freezer for at least 4 hours to set.
Nutrition
- Serving Size: 1 slice
- Calories: 320
- Sugar: 24g
- Sodium: 190mg
- Fat: 14g
- Saturated Fat: 9g
- Unsaturated Fat: 4g
- Trans Fat: 0g
- Carbohydrates: 45g
- Fiber: 1g
- Protein: 3g
- Cholesterol: 15mg


