
If you’ve been hunting for the perfect Juicy Roast Turkey Recipe, something that guarantees tender meat with crispy golden skin every single time, you’re in the right place. I absolutely love how this recipe turns out, and I promise you’ll find it both simple and foolproof—no buckets of liquid brine, just good old dry brining and a bit of technique that brings out the best in your turkey. So, let me walk you through everything you need to know to make your next roast turkey a star at the table.
Why You’ll Love This Recipe
- Juicy, Tender Meat: Dry brining locks in moisture, so your turkey never dries out.
- Crispy, Golden Skin: Starting the roast breast-side down helps crisp up the skin beautifully.
- Simple and Foolproof: No complicated liquid brines or fancy equipment—just straightforward steps.
- Time-Saving: Your turkey cooks faster and easier with this method, perfect for busy holidays.

Ingredients You’ll Need
These ingredients come together beautifully to enhance natural turkey flavor without overpowering it. I always suggest using fresh herbs when possible—it really elevates the aroma and taste. Also, choosing a good quality unsalted butter makes a noticeable difference in richness.
- Whole turkey: A fresh or fully thawed plain turkey works best; pre-brined turkeys can throw off the salt balance.
- Kosher salt: The key to dry brining; it penetrates gently for moist, seasoned meat.
- Dried thyme: Adds subtle earthiness, but feel free to swap for rosemary or your favorite herbs.
- Paprika: Gives a lovely warm color and mild flavor to the skin.
- Garlic powder: Optional, but enhances depth without burning like fresh garlic can.
- Black pepper: Freshly ground for best flavor.
- Heads of garlic: Halved to infuse flavor during roasting.
- Onion: Including skin on adds extra aroma and moisture.
- Mixed fresh herbs: Sage, rosemary, thyme, parsley—you can’t go wrong with a fresh herb bunch for aroma.
- Unsalted butter: Melted and brushed generously for crisp skin and rich flavor.
- Freshly chopped herbs and garlic: Added near the end to avoid burning but pack a punch.
- Dry white wine: Or water if you prefer, helps keep the pan juicy for gravy later.
- Chicken broth: Low sodium to build a flavorful base for gravy.
- Flour: Plain flour for thickening the gravy.
Variations
One of the things I love about this Juicy Roast Turkey Recipe is how easy it is to make it your own. Whether you want to dial up herbs for extra flavor or swap out ingredients to suit dietary needs, there’s room for creativity here.
- Herb Variations: I often swap thyme for rosemary and add a little lemon zest in the butter mixture for a bright twist—guests always ask for seconds!
- Garlic-Free: If fresh garlic isn’t your thing, just skip the minced garlic at the end but keep the halved heads roasting inside the cavity for subtle flavor.
- Vegetarian Broth Option: Use vegetable broth instead of chicken stock if you want a lighter gravy or have dietary restrictions.
- Spicy Kick: Try adding a pinch of cayenne or smoked paprika to the rub for a smoky warmth that wakes up the palate.
How to Make Juicy Roast Turkey Recipe
Step 1: Dry Brine Your Turkey
This is where the magic starts! I like to do this at least two days ahead—you rub the turkey all over with kosher salt mixed with the dried thyme, paprika, garlic powder, and black pepper. Make sure you get under the skin and inside the cavity too. Then pop it into the fridge uncovered, on a rack, so that air can circulate and dry out the skin. This dry brine is what guarantees juicy meat because the salt draws out moisture initially, then reabsorbs it, seasoning the turkey all the way through.
Step 2: Prep and Prepare for Roasting
On roasting day, take the turkey out about an hour before cooking so it reaches room temperature—this helps it cook evenly. Stuff the cavity with halved garlic heads, a halved onion (skin-on is fine), and your fresh herbs bunch. Then brush the turkey all over with melted butter. Here’s my trick: start the turkey breast-side down in a very hot oven (about 230°C/450°F) for 30–40 minutes. This cooks the thighs and makes the skin crispy without drying out the breast.
Step 3: Flip, Baste & Finish Roasting
After those first 40 minutes, carefully flip the turkey breast-side up. Lower the oven temperature to 160°C/320°F, then roast for another 1–1.5 hours, depending on size—generally under 2 hours for a 10 lb (5 kg) bird. About 20 minutes before it’s done, brush on the remaining butter mixed with fresh minced garlic and chopped herbs—add these at the end so they don’t burn but still infuse that wonderful flavor. Keep an eye on it, and cover with foil if the skin starts getting too dark.
Step 4: Rest & Make Gravy
Once your turkey hits 165°F (75°C) in the thickest part of the breast, take it out and let it rest for at least 20–30 minutes—this helps the juices redistribute so each slice is moist and flavorful. Meanwhile, use the roasting pan drippings to make a simple gravy: mix 5 tablespoons of flour with chicken broth and white wine, then whisk into the pan juices over medium heat until thickened.
Pro Tips for Making Juicy Roast Turkey Recipe
- Brine Early: Start your dry brine 48 hours before roasting for max flavor and moisture.
- Oven Temperature Trick: Roasting breast-side down first crisps skin and keeps breast juicy.
- Butter Baste Timing: Add fresh garlic and herbs in the last 20 minutes to prevent burning while locking in aroma.
- Rest is Essential: Don’t skip resting—it makes slicing easier and keeps the meat tender and moist.
How to Serve Juicy Roast Turkey Recipe
Garnishes
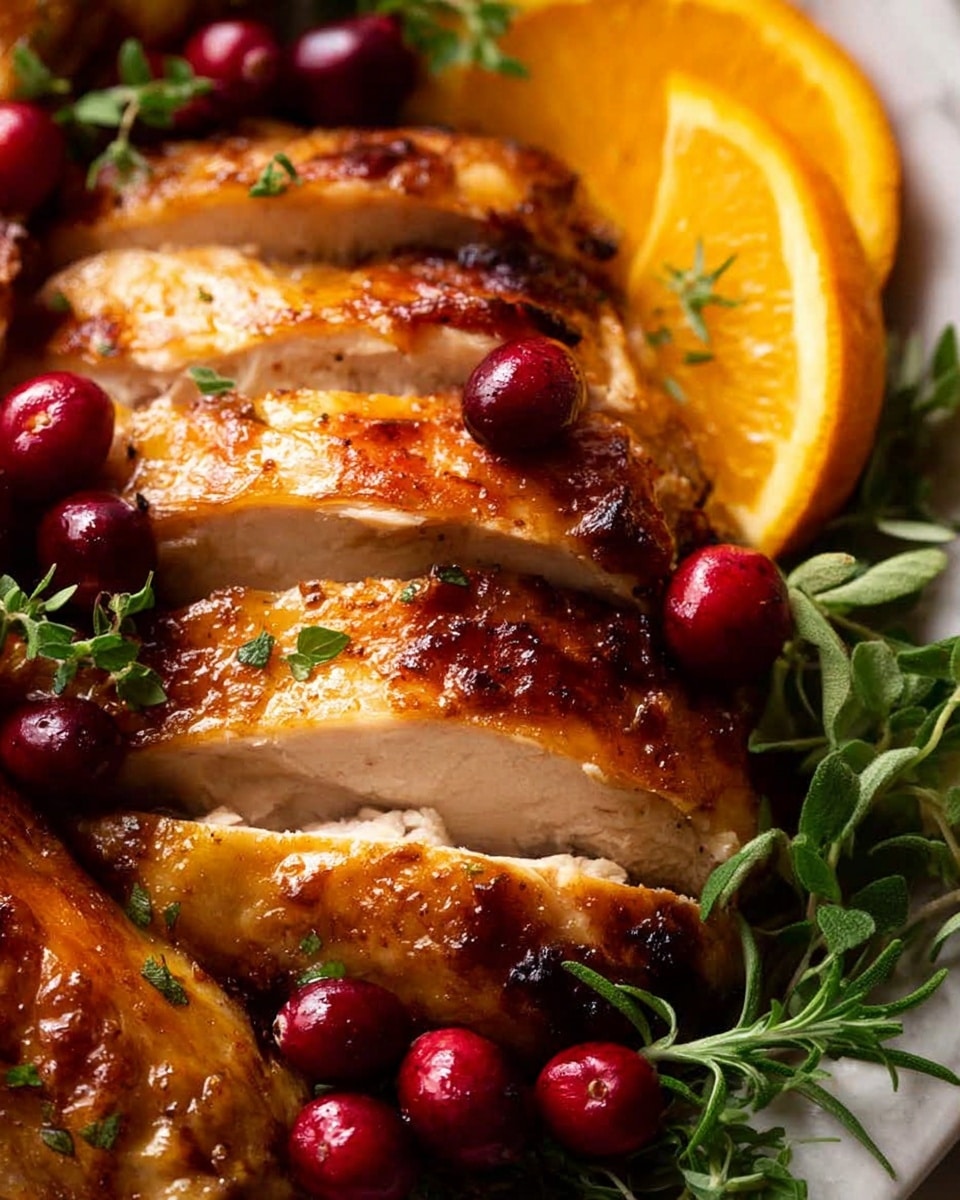
I love garnishing my turkey platter with a few sprigs of fresh rosemary, some bright orange slices, and a handful of cranberries. It adds festive color and a fresh citrus aroma that cuts through the richness beautifully. Plus, those herbs keep the plate looking inviting while subtly perfuming the air.
Side Dishes
My family goes crazy for classic sides like buttery mashed potatoes, roasted root vegetables, green bean almondine, and a tangy homemade cranberry sauce. You’ll find that these pair perfectly with the juicy turkey, balancing comfort and freshness on every plate.
Creative Ways to Present
For special occasions, I like to carve the turkey into large slices and arrange them on a wooden board surrounded by fresh herbs, mini roasted potatoes, and colorful veggies. It’s not only elegant but also makes it easy for guests to serve themselves. Sometimes adding a drizzle of pan gravy on top just before serving makes it feel extra special.
Make Ahead and Storage
Storing Leftovers
I always store leftover turkey in airtight containers in the fridge, slicing it thin first to make it easier to reheat evenly later. It usually keeps well for up to 4 days when stored properly, which is great for quick sandwiches or salads during the week.
Freezing
Freezing roasted turkey works well as long as you slice it beforehand. I wrap portions tightly in foil and then place them inside freezer bags to avoid freezer burn. It keeps nicely for about 2–3 months, perfect if you want to prep ahead or save leftovers for a rainy day.
Reheating
When reheating, I prefer warming slices gently in the oven covered with foil or in a skillet over low heat with a splash of broth to keep them moist. Microwaving can dry it out quickly, so slow and steady is the trick to maintaining that juiciness.
FAQs
-
Can I use this Juicy Roast Turkey Recipe for frozen turkey?
Yes! One of the things I love about this recipe is that you can actually start the dry brining process as the turkey is thawing in the fridge. The salt helps draw out moisture and seasons the meat even as it defrosts, which saves you time without sacrificing texture or flavor.
-
How do I know when my turkey is fully cooked?
The safest and most reliable method is to use a meat thermometer. Insert it into the thickest part of the breast without touching bone—it should read 165°F (75°C). This ensures the turkey is cooked through but still juicy. Overcooking is what causes dryness, so keep a close eye near the end.
-
Why do I roast the turkey breast-side down first?
Roasting breast-side down allows the juices to flow into the breast meat, keeping it moist during that initial high-temperature phase. It also crisps the skin on the thighs and legs first, which would take longer if you began breast-side up. Then flipping it over lets the breast finish cooking and brown beautifully.
-
Can I prepare the gravy without the wine?
Absolutely! If you prefer not to use wine, simply substitute with water or extra chicken broth. The gravy will still be flavorful thanks to the pan drippings and herbs—it’s a flexible recipe that adjusts to your pantry.
Final Thoughts
This Juicy Roast Turkey Recipe has become my go-to for every holiday and special gathering. I used to struggle with dry, flavorless turkey for years until I discovered dry brining and the technique of roasting breast-side down first. Now, it’s become a highlight of the meal, with everyone complimenting the juicy meat and crispy skin. Trust me, once you try this, you won’t want to go back. Give it a shot—you’re going to love the results, and so will your family and friends!
Print
Juicy Roast Turkey Recipe
- Prep Time: 20 min
- Cook Time: 120 min
- Total Time: 140 min
- Yield: 10 – 12 servings
- Category: Main Course
- Method: Baking
- Cuisine: American
Description
This Juicy Roast Turkey recipe offers a foolproof way to achieve a perfectly golden, crispy-skinned, and juicy turkey. The method involves a dry brine with seasoned salt, starting the cooking process in a hot oven upside down, then finishing it right side up at a lower temperature. Butter, garlic, and fresh herbs are added towards the end to enhance flavor without burning. This practical technique avoids liquid brine and reduces cooking time, making it ideal for busy holiday preparations.
Ingredients
Main Ingredients
- 10 lb / 5 kg whole turkey, thawed (plain, not pre-brined)
- 2 1/2 tbsp kosher salt / cooking salt
- 2 tsp dried thyme (or other herb of choice)
- 1 tsp paprika (sweet or ordinary)
- 1 tsp garlic powder (optional)
- 1/2 tsp black pepper
- 2 heads of garlic, halved horizontally (4 halves)
- 1 onion, halved (skin on is fine – brown, yellow, or white)
- 2 small bunches mixed herbs (sage, rosemary, thyme, parsley – optional)
- 10 tbsp (150g) unsalted butter, melted
- 1 tbsp sage, rosemary, and thyme, finely chopped (equal amounts of each)
- 3 garlic cloves, minced
- 1 1/2 cups dry white wine (or water)
- Salt and pepper to taste
- 4 cups chicken broth / stock, low sodium
- 5 tbsp plain / all-purpose flour
- Additional salt and pepper for seasoning
Instructions
- Dry Brine: Start by evenly rubbing the kosher salt, dried thyme, paprika, garlic powder (if using), and black pepper all over and inside the thawed turkey. Place the turkey in a refrigerator uncovered or loosely covered for up to 2 days to dry brine and enhance flavor and moisture retention.
- Prepare Aromatics: Halve the garlic heads and onion, leaving skins on the onion. Prepare small bunches of fresh mixed herbs like sage, rosemary, thyme, and parsley. These aromatics will be used to infuse flavor during roasting.
- Preheat Oven and Position Turkey: Preheat your oven to a high temperature (around 220°C / 425°F). Place the turkey upside down (breast side down) on a roasting rack inside a roasting pan, with halved garlic heads, onion, and herb bunches stuffed inside or placed around it.
- Start Roasting: Roast the turkey breast side down at the high temperature for approximately 40-45 minutes. This initial stage helps to brown and crisp the skin on the backside and begin rendering fat.
- Flip and Continue Roasting: Carefully flip the turkey right side up. Decrease oven temperature to about 165°C / 325°F and continue roasting for another 75 to 80 minutes, or until the internal temperature reaches 75°C (165°F) in the thickest part of the thigh. Use a meat thermometer to ensure safety and doneness.
- Butter and Herb Finish: About 20 minutes before the turkey finishes cooking, brush the melted unsalted butter over the surface. Mix the finely chopped sage, rosemary, thyme, and minced garlic, then gently brush this mixture onto the turkey to prevent burning and add fresh aroma.
- Rest the Turkey: Once cooked, remove the turkey from the oven and tent loosely with foil. Let it rest for at least 20 minutes to allow juices to redistribute and keep the meat moist.
- Make the Gravy: Pour drippings from the roasting pan into a saucepan. Add chicken broth and bring to a simmer. Whisk in the flour gradually to form a smooth gravy. Add the white wine or water to adjust consistency. Season with salt and pepper to taste.
- Serve: Carve the rested turkey and serve with freshly made gravy and your preferred side dishes for a delicious, moist holiday centerpiece.
Notes
- This recipe benefits from starting the dry brine up to 2 days before cooking but no longer than 3 days for food safety.
- Use the recipe scaler to adjust ingredient quantities based on your turkey’s weight.
- Butter mixed with fresh herbs and minced garlic is added toward the end of cooking to avoid burning and preserve fresh flavors.
- Dry brining reduces overall cooking time compared to wet brining, making it more convenient for busy cooking days.
- You can start the process while the turkey is still partially frozen; it will brine as it thaws.
- The turkey takes under 2 hours to cook for a 5 kg / 10 lb bird, which is faster than many traditional roasting methods.
- Use low sodium chicken broth to control the salt level in the gravy.
Nutrition
- Serving Size: 1 slice (about 3 oz / 85 g) cooked meat with skin
- Calories: 280
- Sugar: 0.5 g
- Sodium: 450 mg
- Fat: 18 g
- Saturated Fat: 5 g
- Unsaturated Fat: 12 g
- Trans Fat: 0 g
- Carbohydrates: 2 g
- Fiber: 0 g
- Protein: 24 g
- Cholesterol: 85 mg

