
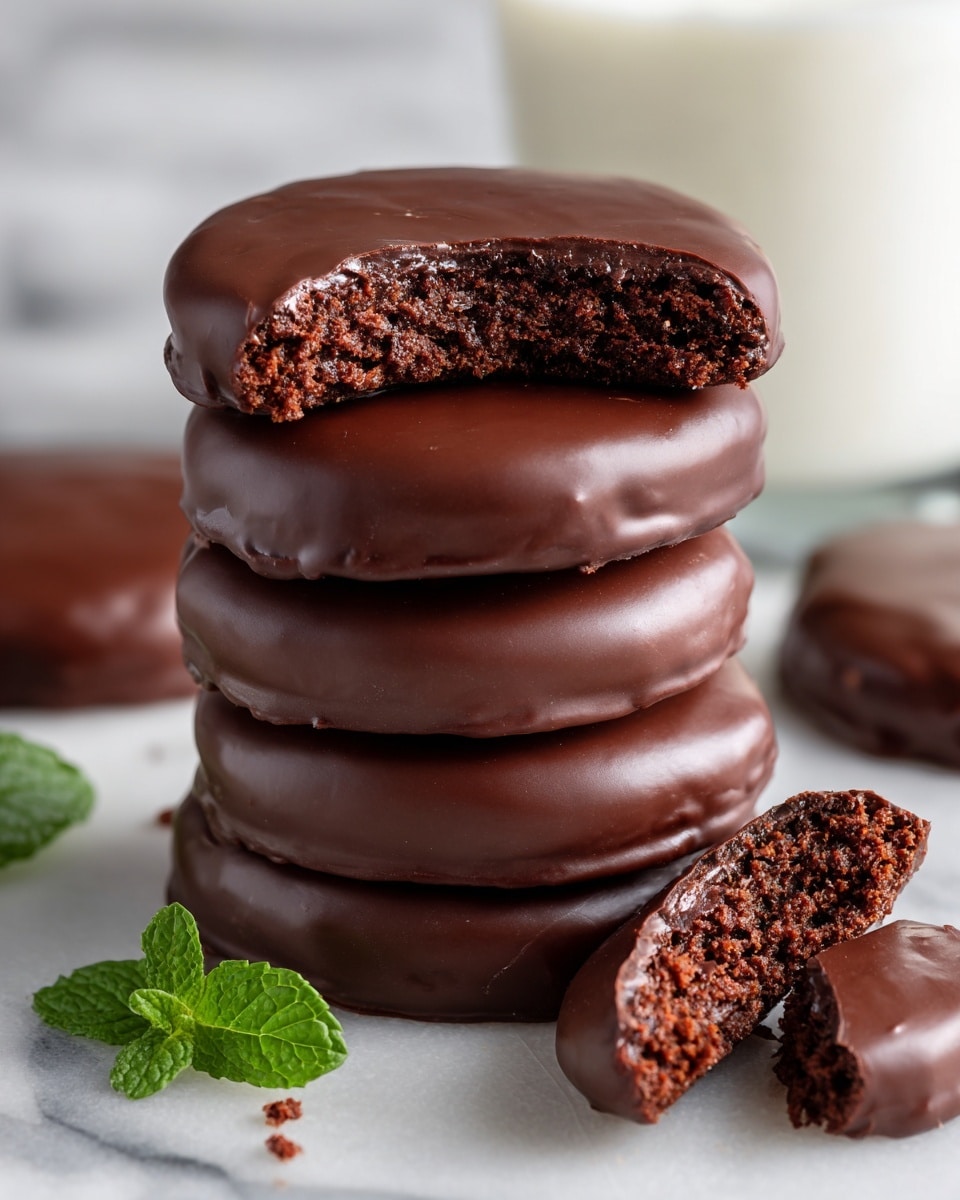
I absolutely love this Homemade Thin Mint-Inspired Cookies Recipe because it captures that classic mint-chocolate combo we all crave, but you get the satisfaction of making it from scratch. There’s something so rewarding about biting into these crisp, chocolatey cookies with that refreshing hint of peppermint, especially when you know exactly what went into them. Whether it’s a cozy winter day or a special treat for a party, these cookies never fail to impress.
When I first tried replicating Thin Mints at home, I was amazed at how much better they tasted compared to store-bought versions—you can adjust the mint intensity just the way you like it. Plus, making them yourself means fresh, perfectly coated chocolate every time, and the best part? You can enjoy them without the fuss of preservatives or weird additives. This Homemade Thin Mint-Inspired Cookies Recipe is absolutely worth the little effort, and once you try it, I bet your family will go crazy for it too!
Why You’ll Love This Recipe
- Authentic Flavor: You’ll enjoy a rich chocolate and refreshing peppermint balance that’s just like the classic Thin Mint.
- Customizable Mint Intensity: Adjust the peppermint extract to suit your taste, from subtly minty to boldly refreshing.
- Homemade Perfection: No preservatives or mystery ingredients—just wholesome, simple components.
- Fun to Make: The dipping process adds a hands-on, chocolaty touch that’s really satisfying and impressive to serve.

Ingredients You’ll Need
These ingredients come together beautifully to create the crisp texture and that signature chocolate-mint flavor. Buying good-quality cocoa powder and chocolate will really elevate your final cookies.
- Flour: The backbone of the cookie dough for structure; all-purpose works perfectly.
- Unsweetened cocoa powder: Adds deep chocolate flavor without extra sweetness—choose Dutch-processed if available for a smoother taste.
- Baking soda: Helps the cookies rise just enough, keeping them tender but crisp.
- Salt: Enhances the chocolate and balances sweetness.
- Unsalted butter: Make sure it’s at room temperature for easy creaming and rich flavor.
- Sugar: Provides subtle sweetness; I find granulated sugar works best here.
- Peppermint extract: Critical for that refreshing mint flavor; start with a little and adjust to taste.
- Dark chocolate: For dipping—choose good quality with at least 60% cacao for best flavor and smooth coating.
Variations
Feel free to get creative with this recipe! I often experiment with different chocolate types or add a sprinkle of sea salt on top for a fun twist. Making these your own is part of the joy.
- Milk Chocolate Dipping: I tried swapping dark chocolate for milk chocolate once—my kids loved the sweeter, creamier coating.
- Extra Mint Punch: If you’re a big mint fan like me, adding a bit more peppermint extract in both dough and chocolate takes it to the next level without overpowering.
- Gluten-Free: You can use a 1:1 gluten-free flour blend; just be gentle when mixing to keep the right texture.
- Double Chocolate: Mix mini chocolate chips into the dough before chilling for an extra chocolate hit.
How to Make Homemade Thin Mint-Inspired Cookies Recipe
Step 1: Prepare Your Oven and Baking Sheets
Preheat your oven to 350°F (175°C) and line two baking sheets with parchment paper or silicone mats. This step is super important—without the right lining, the cookies might stick or bake unevenly.
Step 2: Mix Dry Ingredients Together
In a medium bowl, whisk together the flour, cocoa powder, baking soda, and salt. This keeps the dry ingredients evenly distributed and makes the dough easier to work with later.
Step 3: Cream Butter and Sugar with Peppermint
Using a stand mixer or hand mixer, beat the room temperature butter and sugar until light and fluffy—this takes about 5 minutes. Don’t skip this step; it’s what creates a soft, tender crumb. Then, add in the peppermint extract and mix until blended.
Step 4: Combine Dry Ingredients with Wet
Add the flour mixture to the butter in two batches, mixing just until combined. The dough will be a bit crumbly—that’s okay! Gather it gently into a ball, flatten it slightly, wrap in plastic wrap, and chill for 30 minutes. Chilling helps the dough firm up so it’s easier to roll and cut.
Step 5: Roll and Cut Your Cookies
On a floured surface, roll the dough to about 1/4-inch thick. Use a small round cutter—if you want to get close to the iconic Thin Mint look, try one with fluted edges. Don’t forget to flour the cutter lightly between uses to avoid sticking. Gather scraps and reroll once; this should give you about two dozen cookies.
Step 6: Bake and Cool Completely
Place the cookies on your prepared sheets and bake for 20 minutes. They’ll look quite fragile when they come out but trust me—they firm up completely as they cool. Very important: let them cool fully on the pan before moving to the dipping step to avoid breakage.
Step 7: Melt Chocolate and Add Peppermint
Set up a double boiler and melt your chopped dark chocolate gently until smooth. Stir in the peppermint extract—start with 1 teaspoon and adjust to taste. This chocolate is the magic that gives the cookies their signature glossy, minty coating.
Step 8: Dip Cookies and Let Them Set
Using a fork, dip each cookie into the melted chocolate, covering both sides completely and letting excess drip off. Place cookies on a wire rack so the chocolate can set evenly and avoid pooling underneath. Once dry, store them in an airtight container—though I doubt they’ll last that long!
Pro Tips for Making Homemade Thin Mint-Inspired Cookies Recipe
- Use Room Temperature Butter: It creams smoother and traps air better, helping your cookies stay light while crisp.
- Don’t Skip Chilling the Dough: This step prevents spreading, keeping the cookies perfectly shaped and crisp.
- Work Quickly During Chocolate Dipping: Melted chocolate firms up fast; keep it warm by briefly reheating if needed for smooth dipping.
- Avoid Overbaking: The cookies might seem soft when you pull them out, but they’ll set during cooling—overbaking dries them out.
How to Serve Homemade Thin Mint-Inspired Cookies Recipe
Garnishes
I like to sprinkle a tiny pinch of crushed peppermint candies or a few flakes of sea salt on top of the wet chocolate coating before it sets—it adds a lovely texture and highlights the mint flavor. Plus, it makes the cookies look extra festive!
Side Dishes
These cookies are fantastic alongside a cup of hot cocoa or peppermint tea. I’ve also served them with vanilla ice cream for a simple dessert party star. A glass of cold milk is a classic pairing, especially for kiddos.
Creative Ways to Present
For parties, I like arranging these Homemade Thin Mint-Inspired Cookies Recipe in a festive tin layered with parchment paper. Adding a little sprig of fresh mint or rosemary next to the cookies creates a charming, aromatic touch. Gift-wrapping small batches with a colorful ribbon makes for a thoughtful homemade gift!
Make Ahead and Storage
Storing Leftovers
To keep these cookies fresh and crisp, I store them in an airtight container layered between sheets of parchment paper. They’ll keep well at room temperature for up to a week without losing their texture or flavor.
Freezing
I’ve frozen the baked cookies before dipping in chocolate, and also frozen the fully coated ones. Just thaw at room temperature when ready; if freezing fully dipped cookies, wrap individually in parchment to protect the chocolate coating.
Reheating
If you find your cookies have softened after storage, a quick 3-5 minute blast in a 300°F oven crisps them right back up without melting the chocolate. Just keep an eye so you don’t warm them too long!
FAQs
-
Can I substitute peppermint extract with peppermint oil or fresh mint?
While peppermint oil is much stronger, you can use it but reduce the quantity drastically—start with just a drop and taste as you go. Fresh mint won’t give the same intense flavor since it lacks the concentrated peppermint oils found in extracts, so I don’t recommend it for this recipe.
-
Why do my Thin Mint-Inspired Cookies turn out soft instead of crisp?
These cookies get crisp from proper chilling and baking time. If your dough isn’t chilled or you bake them for less than recommended, they may stay soft. Also, storing cookies in humid conditions can make them lose crispness. Try the quick oven reheat trick if that happens!
-
Can I skip dipping the cookies in chocolate?
Absolutely! The cookies will still taste fantastic on their own with that cocoa-mint flavor baked in. The chocolate dip just adds the signature Thin Mint look and extra richness, but they are wonderful plain or sprinkled with powdered sugar too.
-
How do I store these cookies to keep the chocolate coating from melting or blooming?
Keep the cookies in a cool, dry place away from direct sunlight and heat. Storing them in a single layer with parchment paper between helps prevent sticking. Avoid refrigeration, as moisture can cause the chocolate coating to become dull or develop white streaks called bloom.
Final Thoughts
This Homemade Thin Mint-Inspired Cookies Recipe is truly one of my all-time favorites to make and share. It brings back sweet memories of Girl Scout cookie season but with the pride of homemade goodness. I hope you give this recipe a try—you’ll find the process relaxing and the results utterly delicious. Once you taste these crisp, chocolaty mint delights fresh from your own kitchen, I promise you won’t want to buy the store-bought ones again!
Print
Homemade Thin Mint-Inspired Cookies Recipe
- Prep Time: 15 minutes
- Cook Time: 20 minutes
- Total Time: 1 hour 5 minutes
- Yield: Approximately 24 cookies
- Category: Dessert
- Method: Baking
- Cuisine: American
- Diet: Vegetarian
Description
Delight in these homemade Thin Mint-inspired cookies featuring a rich cocoa base infused with refreshing peppermint extract, perfectly coated in dark chocolate. Crispy yet tender, these cookies are a nostalgic treat that are easy to bake at home and ideal for enjoying with tea or coffee.
Ingredients
For the Cookies
- 1 3/4 cups all-purpose flour
- 3/4 cup unsweetened cocoa powder
- 1/2 teaspoon baking soda
- 1 teaspoon salt
- 1 cup unsalted butter, at room temperature
- 1/2 cup granulated sugar
- 2 teaspoons peppermint extract
For Dipping
- 12 ounces dark chocolate, chopped
- 1 to 2 teaspoons peppermint extract (adjust to taste)
Instructions
- Preheat and Prepare Pans: Preheat your oven to 350°F (177°C). Line two baking sheets with parchment paper or nonstick baking mats to prevent sticking and ensure even baking.
- Mix Dry Ingredients: In a medium bowl, whisk together the flour, unsweetened cocoa powder, baking soda, and salt until well combined to make sure your dry ingredients are evenly distributed.
- Cream Butter and Sugar: Using a stand mixer, beat the room temperature unsalted butter and granulated sugar on medium-high speed until the mixture is light and fluffy, about five minutes. Scrape down the bowl sides to ensure even mixing.
- Add Peppermint Extract: Mix in the peppermint extract to the creamed butter and sugar, blending thoroughly for that classic mint flavor.
- Combine Wet and Dry: Gradually add the dry flour and cocoa mixture to the butter mixture in two additions, mixing until just incorporated. The dough will be slightly crumbly. Gather it into a ball, flatten it slightly, and wrap in plastic wrap.
- Chill the Dough: Refrigerate the wrapped dough for 30 minutes to firm it up, which makes rolling easier and improves texture.
- Roll and Cut Cookies: On a well-floured surface, roll the dough to 1/4-inch thickness. Use a small round cookie cutter with fluted edges to mimic Thin Mint cookies. Gather scraps and reroll as needed to create approximately two dozen cookies.
- Bake Cookies: Place the cut cookies on the prepared baking sheets and bake in the preheated oven for about 20 minutes. Allow them to cool completely on the pans—they will be crumbly when warm but will firm as they cool.
- Melt Chocolate and Flavor: Melt the chopped dark chocolate using a double boiler until smooth. Stir in 1 to 2 teaspoons of peppermint extract, adjusting to taste to enhance the mint flavor.
- Dip Cookies in Chocolate: Using a fork, dip each cooled cookie in the melted chocolate, coating both sides and letting excess drip off. Set cookies on a wire rack to dry and set the chocolate coating completely.
- Storage: Once dry, store the cookies in an airtight container for up to one week to maintain freshness.
Notes
- Make sure the butter is at room temperature for easier creaming with sugar.
- Use high-quality dark chocolate for a richer coating and flavor.
- Adjust the peppermint extract in the chocolate dip to your personal taste for more or less mint intensity.
- Keep cookies refrigerated if your home is warm to prevent the chocolate from melting.
- For a gluten-free version, experiment with gluten-free flour blends.
Nutrition
- Serving Size: 1 cookie
- Calories: 110
- Sugar: 7g
- Sodium: 120mg
- Fat: 7g
- Saturated Fat: 4g
- Unsaturated Fat: 3g
- Trans Fat: 0g
- Carbohydrates: 12g
- Fiber: 1g
- Protein: 1g
- Cholesterol: 15mg


