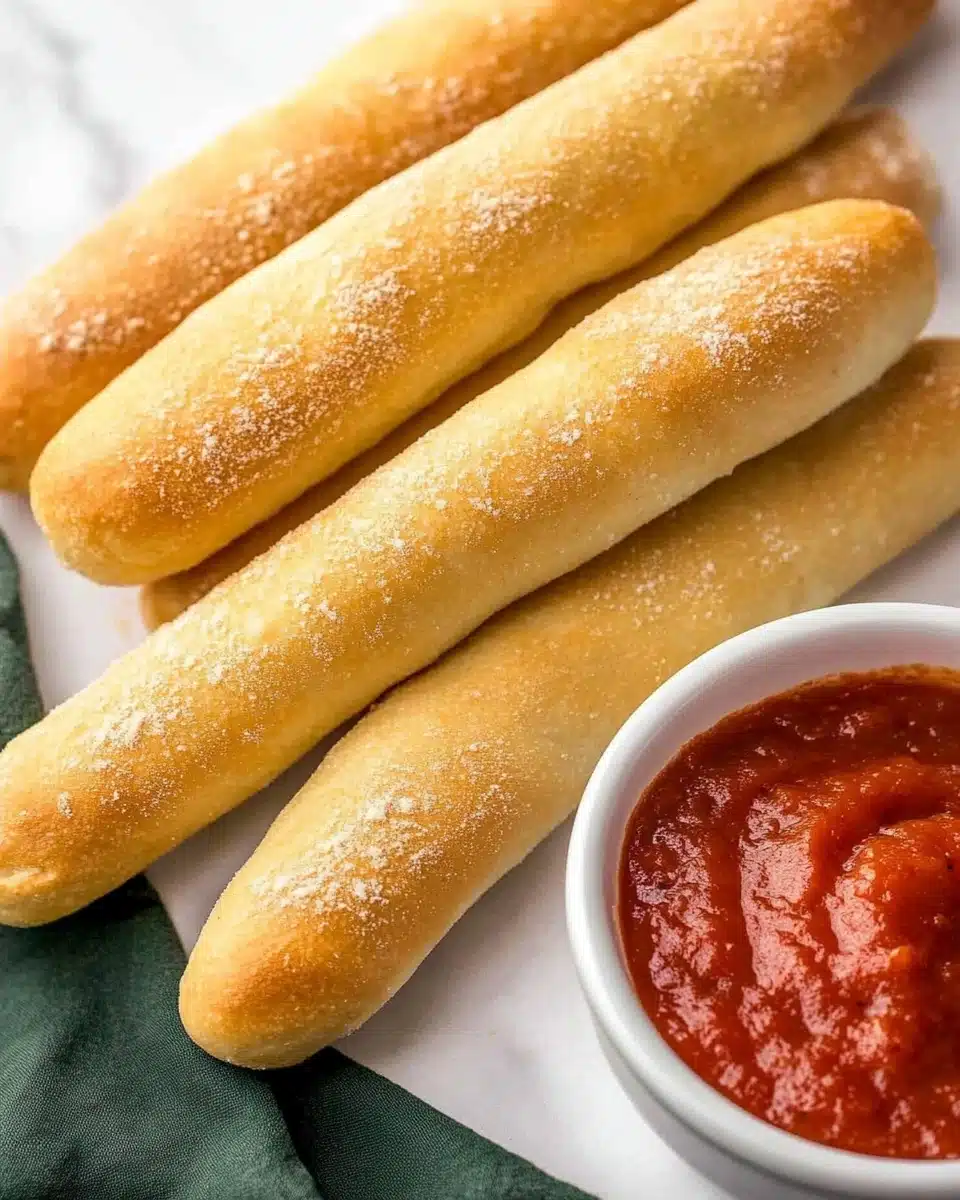
Warm, pillowy, buttery Homemade Olive Garden-Style Breadsticks are the ultimate comfort treat! With their irresistible aroma and that signature soft bite, these breadsticks will transport you straight to your favorite Italian restaurant—only now, you can enjoy them fresh from your own oven.
Why You’ll Love This Recipe
- Unbeatable Freshness: Enjoy that unforgettable just-baked softness and aroma you only get from Homemade Olive Garden-Style Breadsticks straight out of the oven.
- Simple Ingredients: Every item is easy to find and comes together to create breadsticks with perfect flavor and texture.
- Customizable Toppings: Sweet, savory, or herby—play around with toppings to match your favorite flavors or any meal.
- Restaurant-Quality Results: These breadsticks achieve that classic buttery sheen and pillowy bite that make them truly irresistible!

Ingredients You’ll Need
The beauty of Homemade Olive Garden-Style Breadsticks is how simple the ingredient list really is. Each component plays a starring role, from creating that plush crumb to producing the classic golden finish everyone craves.
- Warm water: Jumpstarts the yeast and helps form the dough—make sure it’s not too hot, or you’ll risk deactivating the yeast.
- Granulated sugar: Feeds the yeast for a pillowy rise and brings a subtle hint of sweetness.
- Dry yeast: The magic behind the breadsticks’ lift and airy texture—instant or rapid rise yeast works quickest!
- Bread flour: The secret to chewy, fluffy breadsticks, thanks to its higher protein content.
- Salt: Balances the flavor for that perfectly seasoned bite.
- Unsalted butter: Lends richness and classic buttery flavor—from inside the dough to the final brush on top.
- Garlic granules: Key to that signature savory, garlicky finish.
Variations
Part of the fun of Homemade Olive Garden-Style Breadsticks is making them your own! Whether you’re feeling savory, spicy, or sweet, these easy variations let you customize every batch to fit your cravings or dietary needs.
- Plain breadsticks: Skip the garlic and brush with egg wash for simple, classic soft breadsticks.
- Everything bagel breadsticks: Add an egg wash and a sprinkle of everything bagel seasoning for a zesty twist.
- Italian herb breadsticks: Dust with dried oregano or Italian herbs before baking for an extra burst of flavor.
- Sweet cinnamon breadsticks: After baking, brush with butter and roll in cinnamon sugar for a dessert-worthy treat.
How to Make Homemade Olive Garden-Style Breadsticks
Step 1: Activate the Yeast
Start by mixing the warm water, sugar, and yeast in a small bowl. Let this mixture sit until the yeast becomes frothy and bubbly—usually about 10 minutes. If your yeast doesn’t foam, it might be old, so it’s best to grab a fresh packet for that essential lift!
Step 2: Make and Knead the Dough
In a larger bowl, combine the bread flour with melted butter and salt. Pour in the yeast mixture and stir until a shaggy dough forms. Now, turn it out onto a floured surface and knead for a solid 7 minutes—your dough should end up smooth, elastic, and just slightly tacky.
Step 3: Shape Your Breadsticks
Divide the dough into 12 equal portions. Roll each into a rope—aim for about 7 inches in length for that classic Olive Garden look. Uniform size helps them bake evenly and look bakery-perfect!
Step 4: Proof for Fluffiness
Arrange the shaped breadsticks on a parchment-lined baking sheet. Drape them loosely with a clean towel and let them rise for about 1 hour in a warm spot. When they have doubled in size and look puffy, they’re ready for the oven.
Step 5: Bake, Brush, and Finish
Preheat your oven to 390°F (200°C) near the end of the rise. Bake breadsticks for 15 minutes, until golden. As soon as they come out, brush generously with melted butter and sprinkle with your garlic-salt mixture. Serve warm for maximum deliciousness—just like in the restaurant!
Pro Tips for Making Homemade Olive Garden-Style Breadsticks
- Water Wisdom: Keep your water just warm to the touch (up to 130°F)—hotter, and you’ll accidentally kill your yeast.
- Don’t Skimp on Kneading: Knead for a genuine 7 minutes to achieve that signature Olive Garden-style pillowy crumb.
- Watch the Rise: On warm days, dough may rise faster—check after 30 minutes to avoid over-proofed, flat breadsticks.
- Brush While Hot: For the shiniest, butteriest breadsticks, brush with melted butter and sprinkle with the garlic salt mixture as soon as they come out of the oven.
How to Serve Homemade Olive Garden-Style Breadsticks
Garnishes
A classic finish for Homemade Olive Garden-Style Breadsticks is a generous brush of melted butter immediately after baking, followed by a sprinkle of garlic granules and salt. For a herby twist, add a dash of dried parsley or Italian seasoning for color and extra flavor.
Side Dishes
These breadsticks were made for dunking! Pair with a warm marinara sauce, Alfredo, or a simple bowl of herbed olive oil. They’re also perfect alongside homemade soups, fresh salads, or as an accompaniment to your favorite pasta dishes for a true restaurant experience at home.
Creative Ways to Present
Stack your Homemade Olive Garden-Style Breadsticks in a lined bread basket with a checkered towel for that authentic trattoria feel. For parties, stand them upright in a mason jar, or slice diagonally and serve with a trio of dips for a chic, shareable appetizer.
Make Ahead and Storage
Storing Leftovers
Keep any leftover breadsticks in an airtight container or zip-top bag at room temperature for up to 2 days. If you brushed them with butter and garlic, add a sheet of parchment paper between layers to prevent sticking.
Freezing
Once cooled completely, freeze breadsticks in a single layer on a baking sheet, then transfer to a freezer bag. They’ll stay delicious for up to 2 months—ready for those last-minute cravings!
Reheating
To revive that fresh-baked magic, reheat breadsticks in a 350°F oven for 5–7 minutes, covered loosely with foil to keep them soft. You can also microwave briefly, but the oven will restore that perfect bite best.
FAQs
-
Can I use all-purpose flour instead of bread flour for these Homemade Olive Garden-Style Breadsticks?
Yes! While bread flour gives a slightly chewier texture, all-purpose flour works well and still produces soft, delicious breadsticks—just expect them to be a bit less chewy overall.
-
How do I know if my yeast is still good?
After mixing your yeast with warm water and sugar, it should become foamy and bubbly within 10 minutes. If it doesn’t activate, it’s likely expired or inactive, and using a fresh package will guarantee fluffy breadsticks.
-
Can I make these breadsticks dairy-free?
Absolutely—just swap the butter for your favorite plant-based alternative. You’ll still get that signature soft crumb and delicious golden finish!
-
What’s the best way to get that signature shine and flavor on Homemade Olive Garden-Style Breadsticks?
Brush them with melted butter the moment they leave the oven, then immediately sprinkle with the garlic-salt blend—this not only gives them a beautiful sheen, but also locks in all that savory goodness!
Final Thoughts
Now you’re just one batch away from the ultimate comfort—Homemade Olive Garden-Style Breadsticks, golden, soft, and full of that familiar garlicky warmth. Gather your ingredients, invite someone over, and let your kitchen fill with that irresistible bakery-fresh aroma. You’re going to love every bite!
Print
Homemade Olive Garden-Style Breadsticks Recipe
- Prep Time: 20 minutes
- Cook Time: 15 minutes
- Total Time: 1 hour 35 minutes
- Yield: 12 breadsticks
- Category: Bread
- Method: Baking
- Cuisine: Italian
- Diet: Vegetarian
Description
Learn how to make delicious Olive Garden-style breadsticks at home with this easy recipe. These breadsticks are soft, buttery, and perfect for dipping in marinara sauce!
Ingredients
Dough:
- 1 and 1/2 cups warm tap water (up to 130°F)
- 2 tablespoons granulated sugar
- 2 teaspoons dry yeast
- 4 and 1/2 cups bread flour
- 2 teaspoons salt
- 3 tablespoons unsalted butter, melted
Topping:
- 1 tablespoon unsalted butter
- 1/4 teaspoon salt
- 1/2 teaspoon garlic granules
Instructions
- Activate Yeast: Mix water with sugar and yeast in a small bowl. Let it sit for 10 minutes until bubbly.
- Mix Dough: Combine flour, melted butter, salt, and yeast mixture. Knead on a floured surface for 7 minutes.
- Shape Dough: Divide into 12 balls, roll each into a rope, and place on a baking pan. Let rise for 1 hour.
- Bake: Preheat oven to 390°F. Bake breadsticks for 15 minutes.
- Finish: Brush warm breadsticks with melted butter and sprinkle with garlic salt. Serve warm.
Notes
- Water temperature is crucial for yeast activation.
- Use instant yeast for best results.
- Watch dough closely on hot days.
Nutrition
- Serving Size: 1 breadstick
- Calories: 169 kcal
- Sugar: 1g
- Sodium: 389mg
- Fat: 1g
- Saturated Fat: 1g
- Unsaturated Fat: 0g
- Trans Fat: 0g
- Carbohydrates: 34g
- Fiber: 1g
- Protein: 6g
- Cholesterol: 7mg

