
If you’re looking for a Halloween dessert that’s cute, creepy, and downright delicious, then you have to try this Halloween Dirt Cups Recipe. I absolutely love how quickly it comes together and how it never fails to bring smiles (and a little playful shudder) from both kids and adults alike. Stick around because I’m going to share everything you need to make these spoooky treats your next party hit!
Why You’ll Love This Recipe
- Easy to Make: Even if you’re not a dessert pro, these come together quickly with few ingredients.
- Perfect for Halloween: The “dirt” and edible worms nail that spooky vibe without being scary for kids.
- Crowd-Pleaser: I’ve yet to meet anyone who doesn’t go crazy for these at parties.
- Customizable: You can tweak it easily with different toppings or make it your own twist.

Ingredients You’ll Need
These ingredients work like a charm together, giving you creamy, chocolatey mousse with that classic Oreo crunch. Pro tip: When you’re picking Oreos, grab the original kind – the cream filling adds that perfect richness.
- Oreos: Grind some finely and crush others for texture variety – don’t skip the crumbs!
- Instant chocolate pudding mix: The base for your creamy mousse, makes the dessert smooth and chocolatey.
- Milk: Use cold milk for the pudding to set perfectly.
- Cool Whip: Adds lightness to the mousse; you can use homemade whipped cream if you prefer.
- Milano cookies: These become your edible “tombstones” — cut them carefully!
- Gummy worms: Classic creepy-crawly touch for the dirt cups.
- Black writing gel icing: Perfect for writing “RIP” on the tombstones.
- Edible candy eyes: Adds a fun Halloween vibe and makes the cups pop visually.
Variations
I love tweaking this recipe for different occasions or to suit my mood — and you might find yourself wanting to change things up too. The beauty here is the flexibility!
- Using homemade whipped cream: When I swapped Cool Whip for freshly whipped cream once, the mousse tasted even lighter and fresher.
- Nutty twist: Adding chopped nuts between layers adds a satisfying crunch that my family really enjoyed.
- Using different cookies: Try chocolate chip cookies or ginger snaps for a fun spin on this classic dirt cup.
- Vegan version: Use dairy-free pudding mix, non-dairy milk, and whipped topping alternatives for a plant-based option.
How to Make Halloween Dirt Cups Recipe
Step 1: Crush and Prepare the Oreos
Start by pulsing 12 Oreos in your food processor until they become fine crumbs — this will be your “dirt” base. Then, toss the remaining Oreos into a large Ziploc bag and carefully smash them with something heavy, like a rolling pin, until they break into smaller chunks. Keep these separate, since the crumbs go at the bottom and the chunks add yummy texture inside the mousse.
Step 2: Make the Chocolate Pudding
In a medium bowl, whisk together your instant chocolate pudding powder and cold milk until smooth with no lumps. Pop it in the fridge for about 10 minutes to let it set — you’ll notice it go from liquid to a nice, thick chocolate base almost like mousse.
Step 3: Fold in Whipped Cream and Crushed Oreos
Once your pudding is set, gently fold in the Cool Whip until mostly combined. Then, add the crushed Oreos (the big chunks, not the fine crumbs!) and fold them through to keep that crunchy texture. This mousse is the star filling, so take your time folding to keep it light and airy.
Step 4: Make the Tombstones
Carefully slice each Milano cookie in half with a sharp knife. Using your black writing gel icing, write “RIP” on each half to create your edible tombstones. This little detail takes your dirt cups to the next level and never fails to get laughs and “ooohs.”
Step 5: Assemble Your Halloween Dirt Cups
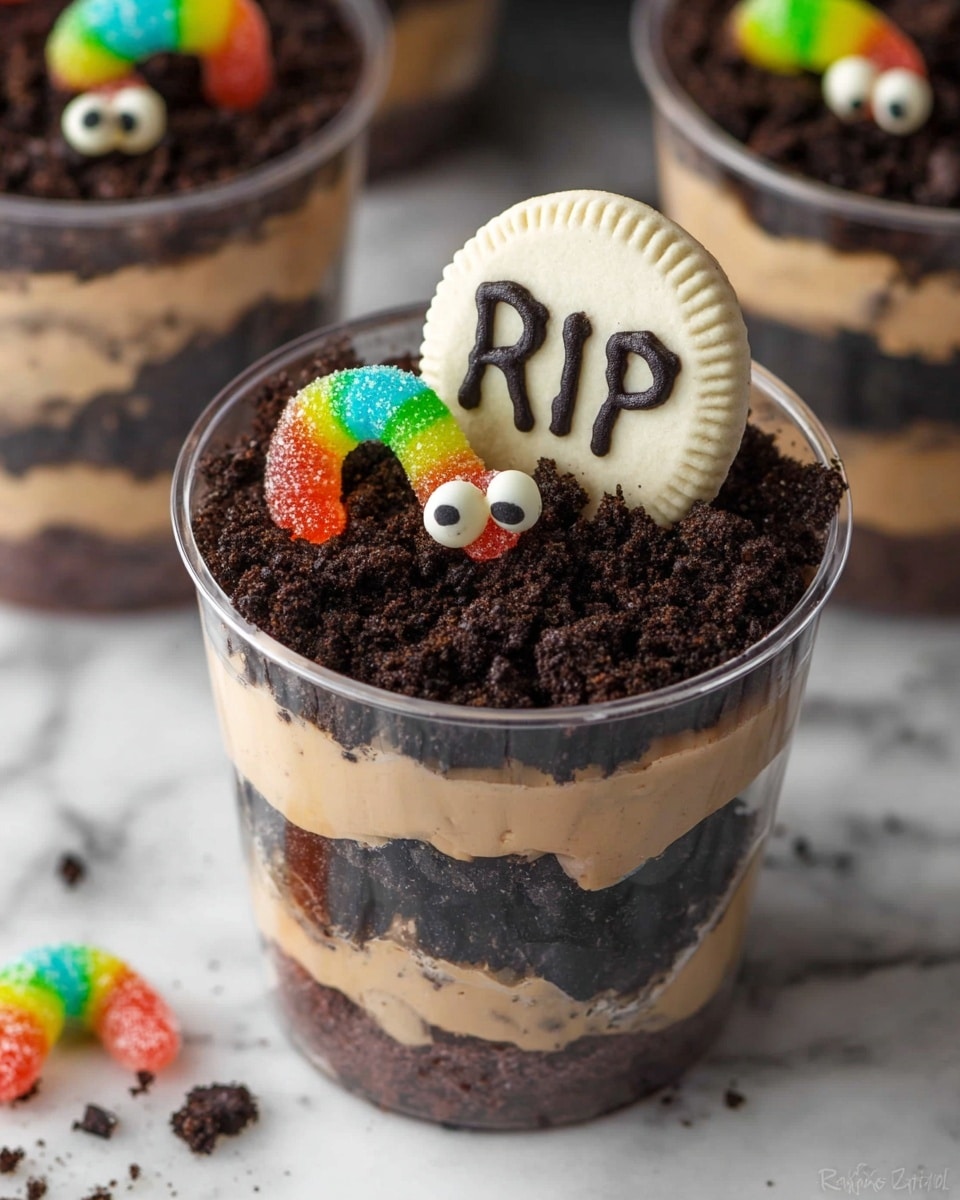
Layer time! Start with a tablespoon of the fine Oreo crumbs at the bottom of each cup (that dirt layer), then add one or two large scoops of the Oreo mousse and smooth it out with a spoon. Repeat with another tablespoon of crumbs and mousse, topping off with a final layer of crumbs. Finally, decorate with a tombstone cookie, a couple of gummy worms, and the edible candy eyes poking around — it’s Halloween fun on a plate.
Pro Tips for Making Halloween Dirt Cups Recipe
- Use Cold Milk: Always use cold milk when mixing pudding for a smooth texture and quicker setting.
- Gentle Folding: Fold the Cool Whip carefully to keep the mousse light and fluffy instead of dense.
- Chill Well: Chilling your mousse for 1-2 hours makes the taste more intense and texture perfect.
- Cut Tombstones Slowly: Using a sharp knife and slow steady cuts helps keep those Milano cookie halves neat and intact.
How to Serve Halloween Dirt Cups Recipe
Garnishes
I’m obsessed with topping these dirt cups with gummy worms that look like they’re wriggling from the “soil.” The edible candy eyes peek out just right to add character, and the “RIP” tombstones give your cups that perfect Halloween vibe. Sometimes, I add a sprinkle of mini chocolate chips or colored sugar crystals for a little extra sparkle!
Side Dishes
This Halloween Dirt Cups Recipe pairs wonderfully with simple sweet popcorn or caramel apples to round out a festive spread. I like serving a batch alongside warm cider or hot chocolate for that cozy, fun Halloween touch.
Creative Ways to Present
Try serving your dirt cups in small clear plastic cauldrons or mason jars for an extra spooky touch. I once arranged them on a platter surrounded by fake spider webs and plastic spiders — it totally wowed my Halloween guests! Adding a mini plastic shovel or spoon brings a whimsical vibe kids love.
Make Ahead and Storage
Storing Leftovers
I keep leftover Halloween dirt cups covered tightly in the fridge—they stay fresh and delicious for up to 3 days. The mousse softens the cookie crumbs a bit over time, but I still find them perfect for enjoying later or packing for a spooky snack.
Freezing
I’ve tried freezing these, but I don’t recommend it because the texture changes — the pudding can separate and the cookie crumbs get soggy. If you really want to prep ahead, I’d suggest freezing just the pudding mousse before assembly and adding the fresh toppings after thawing.
Reheating
No need to reheat—these are best served chilled! Just take the dirt cups out of the fridge about 10 minutes before serving to take the chill off for the best creamy, melt-in-your-mouth experience.
FAQs
-
Can I make Halloween Dirt Cups Recipe without a food processor?
Absolutely! If you don’t have a food processor, place the Oreos in a sturdy ziplock bag and crush them using a rolling pin or a heavy pan. It takes a bit more elbow grease but works just as well for making the fine crumbs.
-
Is there a way to make this recipe dairy-free?
Yes! Use dairy-free instant chocolate pudding, plant-based milk like almond or oat milk, and a dairy-free whipped topping alternative. Be sure to check your cookie labels, as some may contain dairy ingredients.
-
How far ahead can I prepare the Halloween dirt cups?
You can make the mousse and crush the Oreos a day in advance, and assemble the cups the same day you’re serving them for the freshest look and texture. Fully assembled, they’ll keep in the fridge for about 3 days.
-
Can I use fresh whipped cream instead of Cool Whip?
Definitely! Homemade whipped cream adds a fresh, slightly richer flavor, and keeps the mousse light and fluffy. Just make sure to whip it to soft peaks so it folds in smoothly.
Final Thoughts
When I first tried this Halloween Dirt Cups Recipe, I was amazed at how simple yet fun a dessert could be. It’s become a tradition in my house because it’s so irresistibly good and easy to customize. I can’t recommend it enough if you want a Halloween treat that’s as cute as it is delicious — your family and friends will thank you! So go ahead, grab those Oreos and gummy worms, and get ready to make some spooky memories.
Print
Halloween Dirt Cups Recipe
- Prep Time: 20 minutes
- Cook Time: 0 minutes
- Total Time: 1 hour 30 minutes
- Yield: 6-8 servings
- Category: Dessert
- Method: No-Cook
- Cuisine: American
Description
Halloween Dirt Cups are a fun and festive dessert perfect for Halloween parties. These no-bake treats feature layers of creamy Oreo chocolate mousse and crushed Oreos, topped with fun edible decorations like gummy worms, candy eyes, and Milano cookie tombstones. Easy to prepare and kid-friendly, they combine chocolate pudding, whipped topping, and crunchy cookie textures to create a spooky yet delicious treat.
Ingredients
Crust and Topping
- 1 bag (14 oz / 305 g) Oreos (12 finely ground, remaining crushed)
Mousse
- 1 pkg (3.4 oz) instant chocolate pudding mix
- 1 ½ cups milk
- 1 container (8 oz) Cool Whip (or homemade whipped cream, see notes)
Decorations
- 4 Milano Cookies (halved for tombstones)
- Gummy Worms
- Black writing gel icing
- Edible candy eyes
Instructions
- Prepare Oreo Crumbs: Using a food processor, grind 12 Oreo cookies into fine crumbs. Place these crumbs aside. Crush the remaining Oreos by placing them in a large Ziploc bag and smashing with a heavy object until smaller pieces form. Set these crushed cookies aside separately.
- Make Chocolate Pudding: In a medium bowl, whisk together the instant chocolate pudding mix and milk until the powder is fully dissolved. Refrigerate the mixture for about 10 minutes until it sets and thickens.
- Combine Pudding with Whipped Cream and Crushed Oreos: Once the pudding has set, gently fold in the whipped cream until mostly combined. Then fold in the crushed Oreo pieces (not the fine crumbs) to create a mousse with texture. Refrigerate the mousse for 1-2 hours to chill for best flavor and consistency. You may refrigerate either before or after assembly.
- Make Tombstones: Cut each Milano cookie in half carefully with a sharp knife. Use black writing gel icing to write “RIP” on each cookie half to create tombstones.
- Assemble the Dirt Cups: In each serving cup, place 1 tablespoon of the finely ground Oreo crumbs as the base layer. Add one or two generous scoops of Oreo mousse on top and smooth with a spoon. Add another tablespoon of Oreo crumbs followed by additional mousse, and finish with a final layer of Oreo crumbs on top.
- Decorate: Place a Milano cookie tombstone in the center of each cup. Arrange gummy worms around the tombstone and add edible candy eyes for a spooky graveyard effect.
Notes
- For a homemade whipped cream alternative, whip 1 cup of heavy cream with 2 tablespoons of sugar until stiff peaks form.
- Chilling the mousse before assembly helps it set and improves the texture of the dessert.
- These cups are great for kids’ parties and Halloween gatherings, adding a fun thematic touch to any celebration.
- Decorations can be customized with other Halloween-themed candies if desired.
Nutrition
- Serving Size: 1 cup
- Calories: 222
- Sugar: 25.6 g
- Sodium: 345.6 mg
- Fat: 8 g
- Saturated Fat: 4.4 g
- Unsaturated Fat: 3.2 g
- Trans Fat: 0 g
- Carbohydrates: 35.2 g
- Fiber: 0.6 g
- Protein: 2.7 g
- Cholesterol: 1.2 mg


