If you’re looking to impress your guests with a festive and fun spread this autumn, you’re going to want to try this **Halloween Charcuterie Board Recipe**. It’s a total showstopper that’s both spooky and delicious, perfect for any Halloween party or cozy night in. I absolutely love how this board brings together creepy-themed snacks and elegant flavors all in one place—trust me, your friends and family will be talking about it for days. Keep reading, and I’ll walk you through how to create a Halloween charcuterie board that’s as tasty as it is eye-catching.
Why You’ll Love This Recipe
- Perfectly Themed: Every item is picked to fit the Halloween vibe, creating a spooky, gorgeous board.
- Easy to Customize: You can swap ingredients based on what you like or have on hand—flexibility is key.
- Crowd Pleaser: My family goes crazy for this combination of salty, sweet, and savory bites.
- No Stress Setup: It’s all about assembling, not cooking—perfect for busy days or last-minute plans.

Ingredients You’ll Need
For the Halloween Charcuterie Board Recipe, I chose ingredients that balance flavor and presentation beautifully. You’ll find familiar charcuterie staples alongside some spooky treats that are easy to find in most grocery stores this time of year.
- Cured Meats: Think salami, pepperoni, and prosciutto—choose a mix of textures and flavors.
- Cheeses: I like a combo of sharp cheddar, creamy brie, and a fun orange-hued cheese to match Halloween colors.
- Crackers and Breadsticks: Offer a variety—thin crackers, crunchy breadsticks, and maybe some artisan bread slices.
- Fresh Fruits: Grapes, apple slices, and blackberries add natural sweetness and help balance savory items.
- Veggies: Baby carrots and cucumber slices make great refreshing bites.
- Spooky Extras: Think candy eyeballs, black olives (for “spiders”), and Halloween-themed gummies or chocolates.
- Nuts and Dried Fruits: Adds crunch and a touch of earthiness; I especially like smoked almonds for this.
- Dips and Spreads: Hummus, honey mustard, or even a pumpkin spice cream cheese.
Variations
The best part about this Halloween Charcuterie Board Recipe is how easy it is to tailor it to your crowd or dietary needs. I’ve had great success swapping out ingredients to keep everyone happy.
- Vegetarian Option: Swap meats for marinated tofu bites, grilled veggies, or roasted chickpeas for a plant-based twist.
- Gluten-Free: Use gluten-free crackers and breadsticks to keep it safe without sacrificing taste or presentation.
- Kid-Friendly: Add mini sandwiches or bite-sized quesadillas alongside fun candies and colorful fruit.
- Extra Spooky: Incorporate themed props like fake spider rings, dry ice for smoky effect, or carved mini pumpkins to amp up the Halloween vibe.
How to Make Halloween Charcuterie Board Recipe
Step 1: Choose a Large, Flat Serving Board
Start with a wooden board, large tray, or platter. I find that a rustic wood surface adds warmth, but any flat surface works. Make sure you have enough room to spread things out without crowding. You want each item to shine on its own and be easy to grab.
Step 2: Arrange Meats and Cheeses First
Place your cured meats and cheeses first because they’re the stars of the show. Fold or roll the meats into little rosettes or ribbons—that technique really ups the presentation. Space out different cheeses across the board, slicing some and leaving others whole for variety. I like to keep some cheese wedges with their rinds because they add visual texture.
Step 3: Fill in with Crackers, Fruits, and Veggies
Now, tuck crackers and breadsticks into every nook you can find to fill gaps. Arrange fresh fruits like grapes and apple slices in clusters—mix colors for a festive feel. Add veggies like baby carrots or cucumber slices in small bowls or piles. This part makes your board look abundant and inviting.
Step 4: Add Halloween-Themed Touches and Extras
This is where the Halloween magic happens! Add candy eyeballs on cheese wedges, black olives to mimic spiders, and scatter a few gummies around. Little bowls of dips or spreads like hummus or a pumpkin-spiced cream cheese add a flavor punch. Don’t forget nuts and dried fruits—they add texture and keep things interesting between bites.
Pro Tips for Making Halloween Charcuterie Board Recipe
- Mix Textures and Colors: Combining crunchy, creamy, sweet, and savory elements keeps your guests interested and allows everyone to find a favorite bite.
- Prep Ahead: You can slice meats and cheeses the day before and assemble the board just before your party starts to save time.
- Use Small Bowls for Dips and Tiny Extras: This prevents soggy crackers and keeps gooey items neat and easy to access.
- Keep It Chilled: Especially in warmer weather, cover with plastic wrap and refrigerate until just before serving to maintain freshness.
How to Serve Halloween Charcuterie Board Recipe
Garnishes
I love garnishing with fresh herbs like rosemary or thyme sprigs—they add a lovely aroma and a pop of green that contrasts beautifully with orange and black hues. For Halloween charm, sprinkle some edible glitter or mini candy pumpkins around the board. These little touches make a big visual impact.
Side Dishes
Pair the board with warming sides like butternut squash soup shots or pumpkin-spiced muffins for a full fall-themed meal. I sometimes serve a small cauldron of chili nearby—super cozy and complements the flavors perfectly.
Creative Ways to Present
One time, I set the charcuterie board inside a hollowed-out pumpkin for a festive centerpiece. Another idea is using black slate or a mirrored tray for a spooky, elegant vibe. Small labels or chalkboard signs naming the items add a personal, playful touch that guests love.
Make Ahead and Storage
Storing Leftovers
If you have leftovers, wrap meats and cheeses tightly in plastic wrap or store in airtight containers in the fridge. Crackers keep best stored separately in a sealed bag to maintain crispness. I usually eat leftover fruit and veggies within a day to keep them fresh.
Freezing
Most charcuterie board ingredients don’t freeze well, especially fresh produce and crackers. Meats and some cheeses can be frozen but I prefer fresh for the best texture and flavor. For party prepping, freeze only what you plan to bake or cook ahead, not the assembled board.
Reheating
Since this is a no-cook assembly, reheating isn’t really needed. If you include warm sides, just reheat those separately. When reheating leftover meats or cheeses, gently warm them in low heat to avoid drying out or melting.
FAQs
-
Can I make the Halloween Charcuterie Board Recipe vegan?
Absolutely! Swap out the cured meats and traditional cheeses for plant-based alternatives like vegan deli slices, nut-based cheeses, and plenty of fresh veggies and fruits. There are some fantastic vegan spreads and dips available that fit perfectly into this board.
-
How far in advance can I prepare the board?
You can prep many components, like slicing meats and cheeses and arranging snacks in bowls, up to 24 hours ahead. However, it’s best to assemble the full board shortly before serving to keep everything fresh and visually appealing.
-
What are some budget-friendly alternatives for this recipe?
Choose less expensive cheese varieties, buy deli meat in bulk, and focus on fresh produce that’s in season. Homemade dips and spreads are also economical and add a personal touch. You don’t have to break the bank to make a stunning Halloween charcuterie board!
-
Can kids enjoy this Halloween Charcuterie Board Recipe?
Definitely! Just add some kid-friendly snacks like mini sandwiches, fruit kebabs, or themed cookies alongside the main board. Avoid anything too spicy or overly strong in flavor to suit their palates.
Final Thoughts
This Halloween Charcuterie Board Recipe has quickly become my go-to for gatherings—they’re simple to put together but look like you spent hours crafting something special. I love how it brings everyone to the table, chatting and nibbling, surrounded by that perfect Halloween atmosphere. If you want to wow your guests without the fuss, give this a try—you’ll enjoy the creativity (and the compliments!) as much as the flavors.
Print
Halloween Charcuterie Board Recipe
- Prep Time: 15 minutes
- Cook Time: 50 minutes
- Total Time: 180 minutes
- Yield: 1 cake (12-cup fluted tube or equivalent in round/rectangular pans)
- Category: Dessert
- Method: Baking
- Cuisine: American
- Diet: Vegetarian
Description
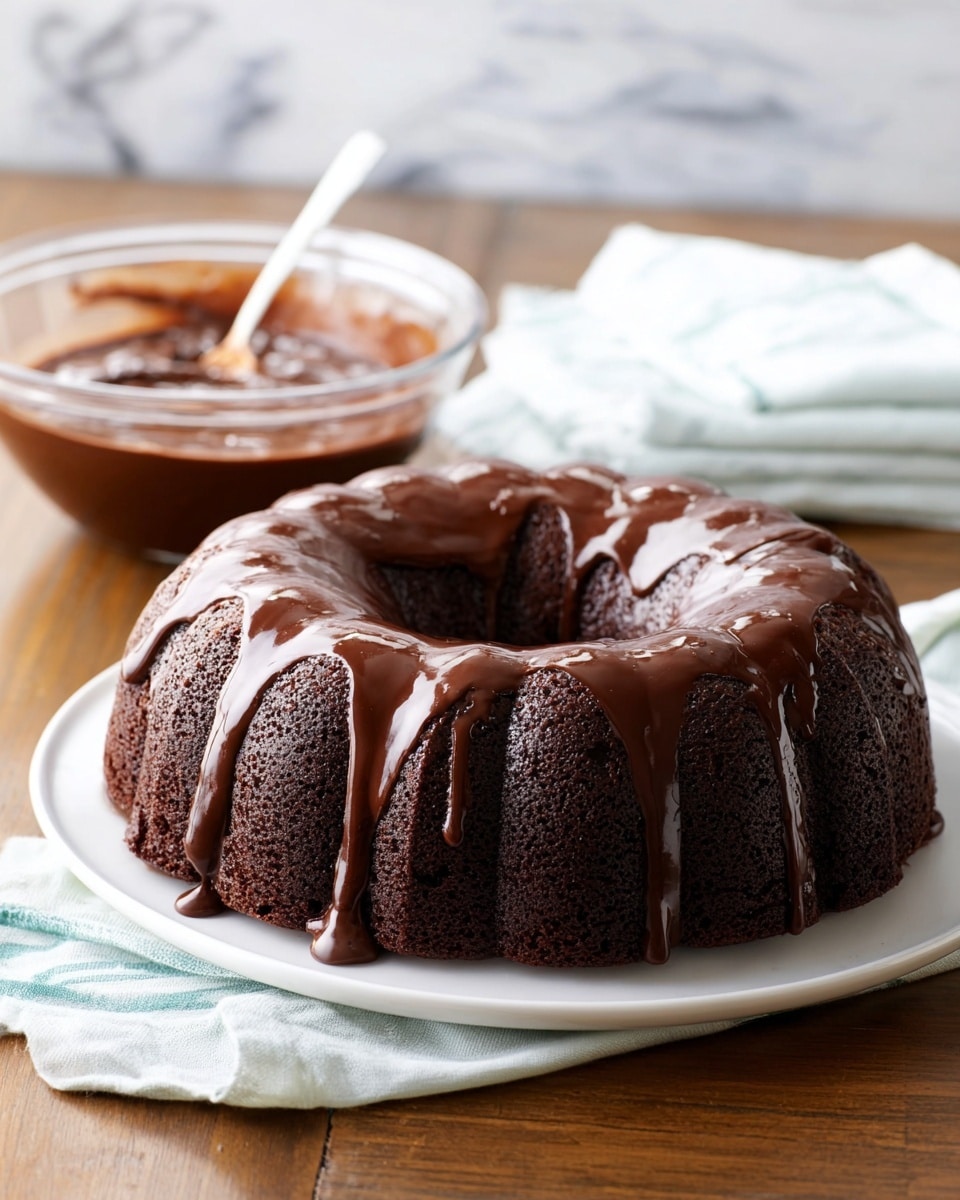
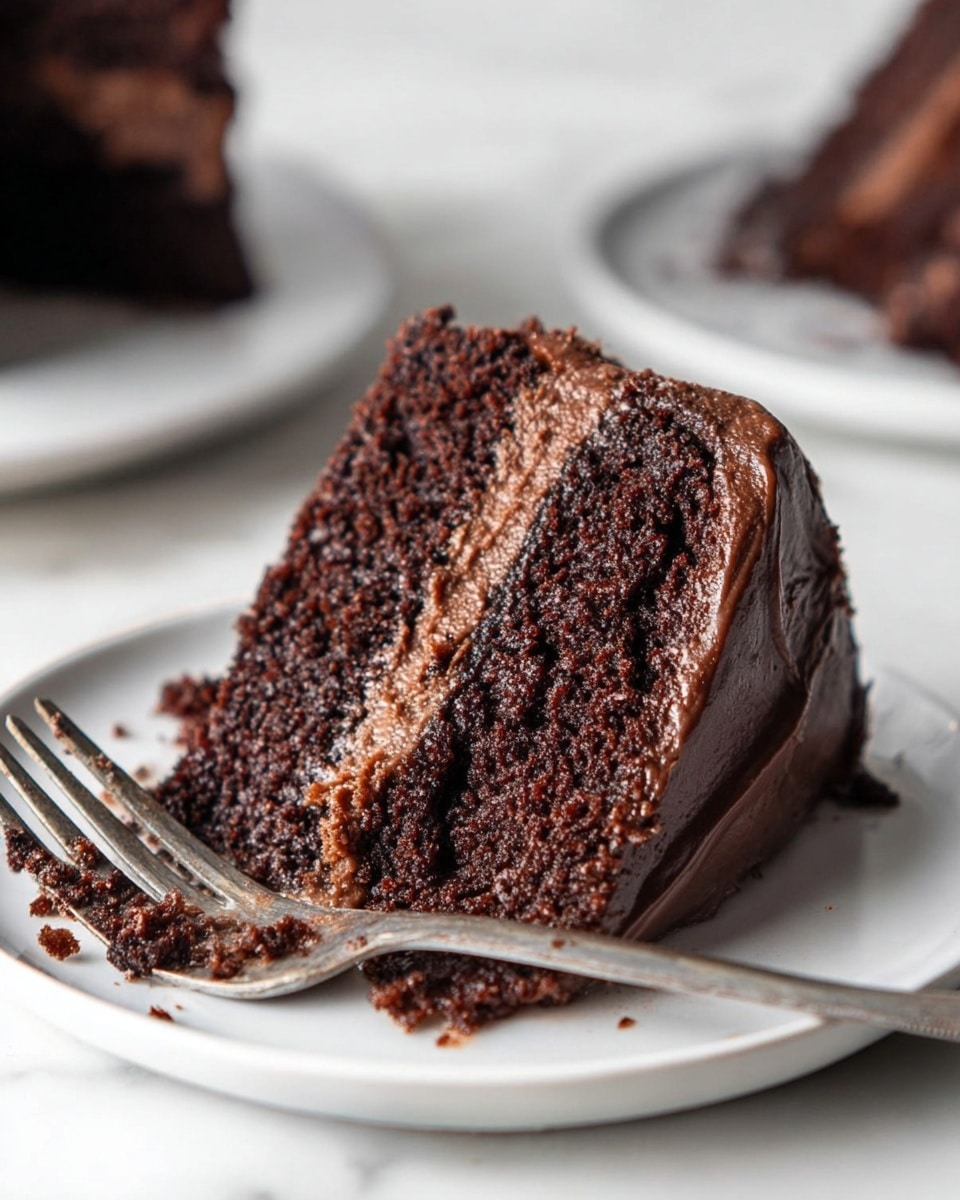
This Black Magic Cake recipe is a rich, moist chocolate cake made with HERSHEY’S Cocoa and enhanced with the bold flavor of coffee. Perfect for beginners, the cake combines simple ingredients like buttermilk and vegetable oil to create a tender crumb and deep chocolate taste. Ideal for any occasion, this cake is customizable with various icings and pans, promising a decadent treat that will have everyone asking for seconds.
Ingredients
Dry Ingredients
- 2 cups sugar
- 1-3/4 cups all-purpose flour
- 3/4 cup HERSHEY’S Cocoa
- 2 teaspoons baking soda
- 1 teaspoon baking powder
- 1 teaspoon salt
Wet Ingredients
- 2 eggs
- 1 cup buttermilk or sour milk
- 1 cup strong black coffee (or 2 teaspoons powdered instant coffee plus 1 cup boiling water)
- 1/2 cup vegetable oil
- 1 teaspoon vanilla extract
Instructions
- Preheat Oven and Prepare Pans: Preheat your oven to 350°F (175°C). Grease and flour your choice of cake pan—either a 12-cup fluted tube pan, two 9-inch round baking pans, or one 13x9x2-inch rectangular baking pan—to prevent sticking.
- Mix Dry Ingredients: In a large bowl, combine the sugar, all-purpose flour, HERSHEY’S Cocoa, baking soda, baking powder, and salt. Stir thoroughly so that all ingredients are evenly distributed.
- Add Wet Ingredients and Beat: To the dry mixture, add the eggs, buttermilk, coffee, vegetable oil, and vanilla extract. Using a mixer on medium speed, beat the ingredients for about 2 minutes until the batter is smooth and slightly thin in consistency.
- Pour Batter and Bake: Pour the batter evenly into your prepared pan(s). Bake according to your pan choice: 50 to 55 minutes for a fluted tube pan, 30 to 35 minutes for 9-inch round pans, or 35 to 40 minutes for a rectangular pan. The cake is done when a wooden pick inserted in the center comes out clean.
- Cool and Frost: Allow the cake to cool for 10 minutes after baking, then gently loosen it from the sides of the pan and transfer it onto wire racks to cool completely. Once cooled, frost as desired with your favorite icing such as buttercream or vanilla bean.
Notes
- This Black Magic Cake is a great alternative to boxed cake mixes, offering a rich homemade flavor with simple ingredients.
- The addition of coffee enhances the chocolate flavor, making it more intense and complex.
- You can use freshly brewed black coffee or instant coffee powder to suit your convenience.
- Experiment with different pan shapes to change the cake’s look and baking times accordingly.
- Try different icings like buttercream, vanilla bean, or espresso-flavored frostings for variety.
- For another coffee-chocolate treat, you might enjoy the Espresso-Filled Mini Cakes recipe.
Nutrition
- Serving Size: 1 slice (87g)
- Calories: 260
- Sugar: 26 g
- Sodium: 500 mg
- Fat: 11 g
- Saturated Fat: 1.5 g
- Unsaturated Fat: 9.5 g
- Trans Fat: 0 g
- Carbohydrates: 41 g
- Fiber: 0 g
- Protein: 4 g
- Cholesterol: 35 mg


