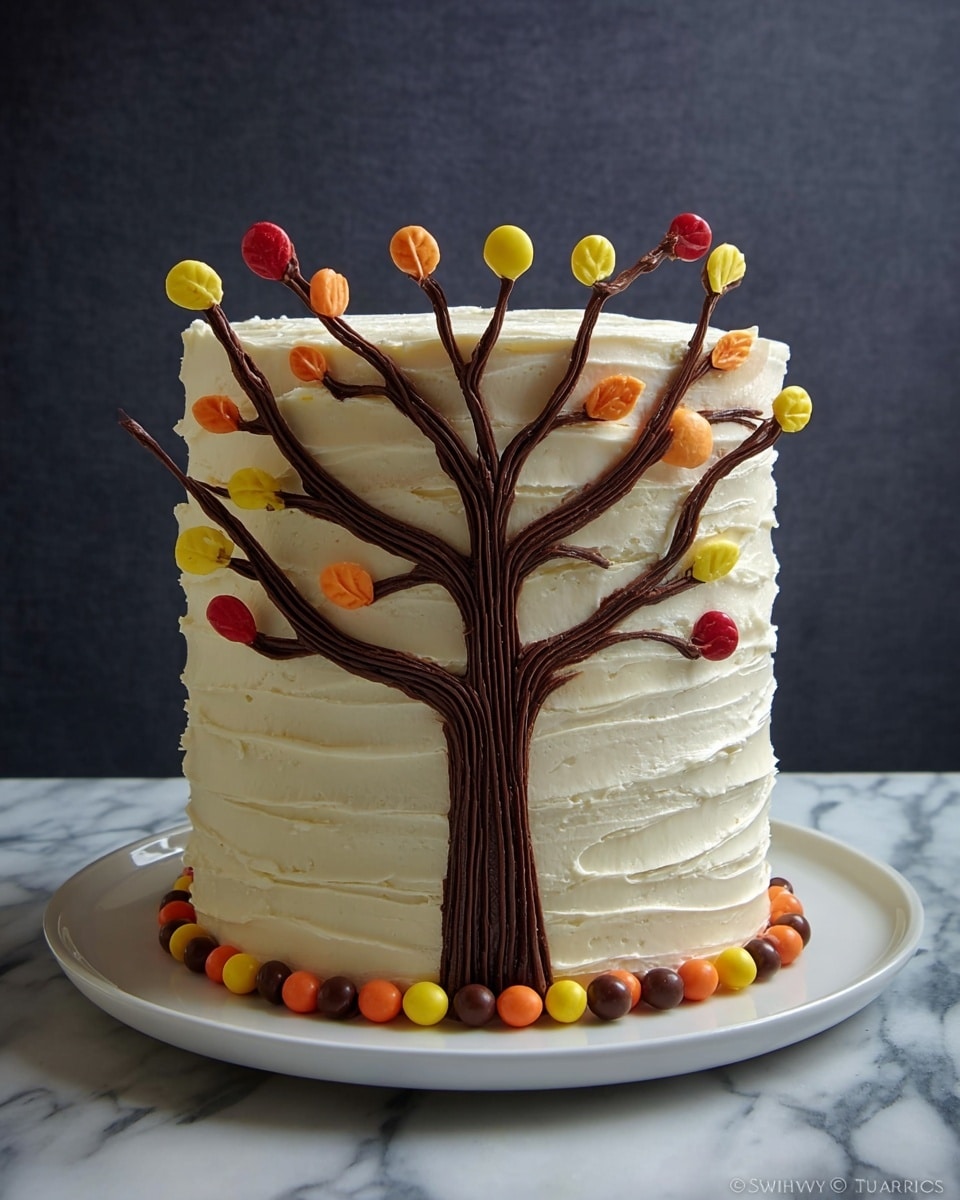
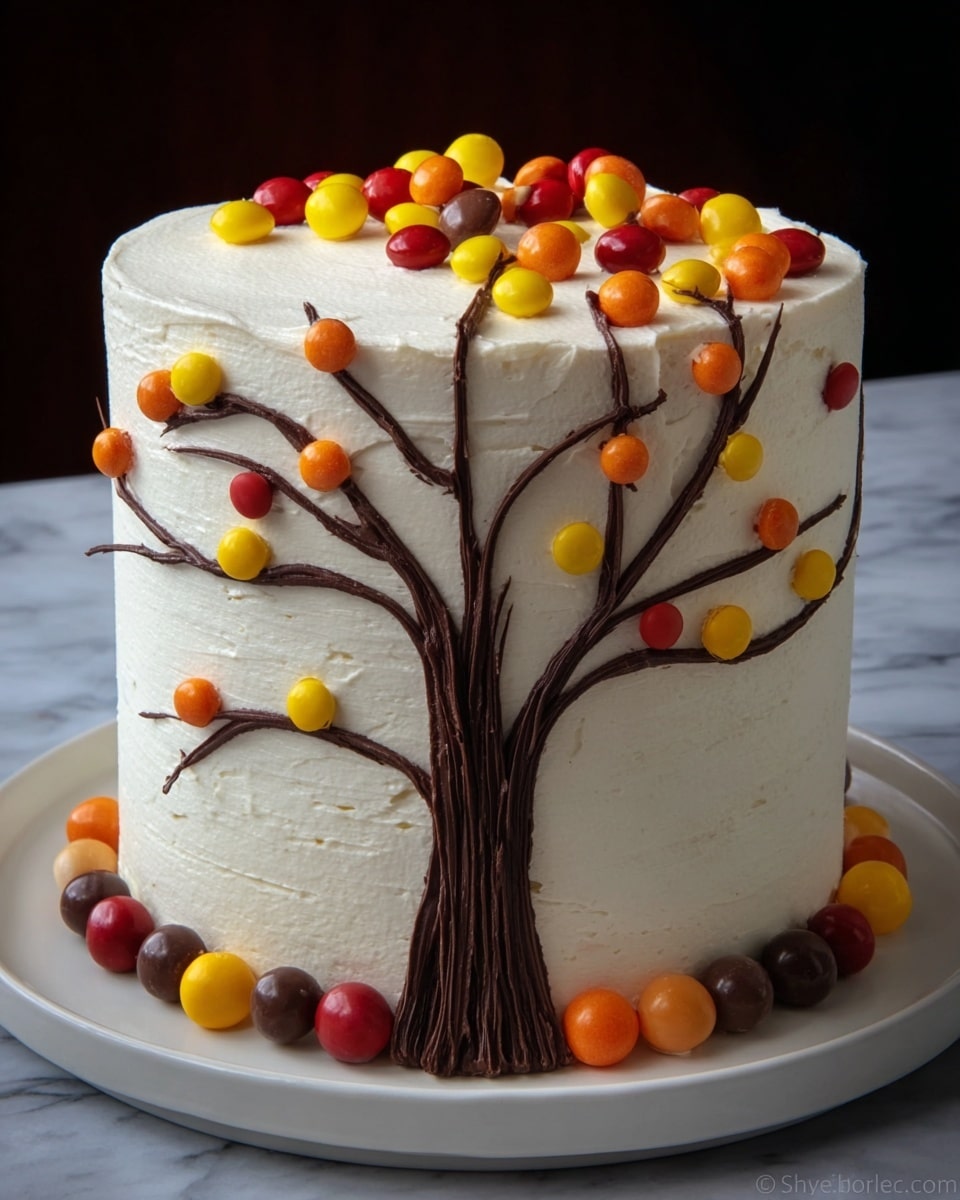
If you’re looking for a showstopper dessert that’s as fun to make as it is to eat, I’ve got just the thing for you: Chocolate Tree Cake with Colorful Candy Leaf Decorations Recipe. This mini chocolate coffee cake, adorned with bright, candy “leaves,” is like bringing a little piece of autumn right to your table. Trust me, once you try this, you’ll love how it turns out—it’s a perfect blend of rich chocolate, crunchy graham cracker texture, and the playful pop of colorful candy decorations that make every bite a delight.
Why You’ll Love This Recipe
- Festive and Fun: The colorful candy leaf decorations bring instant joy and make this cake perfect for fall or any celebration.
- Mini and Manageable: These mini cakes mean you can serve just the right amount without worrying about leftovers.
- Rich, Chocolatey Flavor: Made with chocolate coffee cake and ganache frosting, it’s seriously indulgent without being overwhelming.
- Interactive Decoration: Making the chocolate trees on wax paper is surprisingly easy and adds a homemade charm that your guests will admire.

Ingredients You’ll Need
The magic of this Chocolate Tree Cake comes down to simple ingredients that come together beautifully. Each one elevates the texture or the flavor, making sure you’ll be proud to serve it. Plus, most of these you probably have around, or can easily grab.
- Chocolate coffee cake: I find that mini round cakes about 4×3 inches work perfectly—small enough for individual servings and easy to decorate.
- Chocolate ganache frosting: The richness of ganache complements the cake’s coffee notes and keeps everything luscious.
- Graham crackers (roughly chopped): These add a fantastic rustic crunch when you coat the cake sides—don’t skip this step!
- Dark chocolate (melted): For outlining your tree shapes, use a good quality meltable chocolate so it sets firm and glossy.
- Red candy melts (melted): These vibrant colors are what make your “leaves” pop on the tree branches.
- Yellow candy melts (melted): Perfect for adding a warm, sunshine shade to your candy leaves.
- Orange candy melts (melted): And of course, a final burst of classic autumn color to complete the look.
Variations
Everyone loves putting their spin on recipes, and I’m no exception! For this Chocolate Tree Cake with Colorful Candy Leaf Decorations Recipe, I like to switch up colors or flavors depending on the season, making each version feel fresh and exciting.
- Seasonal Candy Colors: I’ve tried substituting the red, yellow, and orange melts with pastel colors for spring parties — looks adorable and keeps the cake festive year-round.
- Nut Toppings Instead of Graham Crackers: On occasions when I want a nuttier bite, crushed pistachios or toasted almonds add amazing texture and a slightly different flavor.
- Chocolate Types: Use semi-sweet chocolate if you prefer less bitterness, or try white chocolate for the tree outlines for a stark contrast effect.
- Vegan Adaptations: Substitute ganache and cakes with dairy-free versions — I once made this with coconut cream ganache and the result was still an absolute hit!
How to Make Chocolate Tree Cake with Colorful Candy Leaf Decorations Recipe
Step 1: Bake and Prep Your Mini Cakes
First things first, bake your mini chocolate coffee cakes and let them cool completely before moving on. When I first tried this, I didn’t wait long enough and the frosting didn’t spread as smoothly. While the cakes are cooling, this is the perfect time to prepare your ganache frosting so it’s ready to go.
Step 2: Level and Frost Your Cakes
Trim off any domed tops to create a flat surface. This makes frosting easier and helps the decorations adhere better. Ice each mini cake with a smooth layer of ganache frosting, and then gently press chopped graham crackers along the sides to get that rustic, textured look. I love how this adds a little surprise crunch with every bite.
Step 3: Create Chocolate Tree Outlines
Draw a rough tree sketch on a piece of paper and tape it down on a cookie tray. Cover with wax paper and tape that too. Then, using a piping bag filled with melted dark chocolate, carefully outline the tree shape right on the wax paper. Don’t worry if it’s not perfect—the charm is in its handmade look. Make the trunk thicker by piping over it a couple of times for strength, since this part supports your candy leaves later! Pop it into the freezer for 5 minutes to set.
Step 4: Add Colorful Candy Leaf Decorations
Fill three separate piping bags with red, yellow, and orange candy melts, each cut to have very small openings. When your tree outline is firm, pipe the candy leaves randomly on the branches. Squeeze your piping bag at a 45-degree angle, then gently pull away to create a leaf-like shape. This painting-with-chocolate step is really fun—I discovered that a light, quick motion gives the best leaf shapes. Freeze again for 5 minutes.
Step 5: Final Assembly
Carefully peel the wax paper away from your decorated tree. Then, drip some melted dark chocolate on the back of the tree trunk and stick a lollipop stick into it—this creates a sturdy handle. Once set, gently press the stick into the frosted mini cakes. And voila! Your Chocolate Tree Cake with Colorful Candy Leaf Decorations Recipe masterpiece is ready to wow.
Pro Tips for Making Chocolate Tree Cake with Colorful Candy Leaf Decorations Recipe
- Keep Your Candy Melts Smooth: I always microwave candy melts in short bursts and stir frequently to avoid clumps or burning.
- Use a Small Piping Tip: Cutting a tiny hole in the piping bag ensures precision when creating the tree outline and leaf shapes.
- Don’t Rush the Chilling: Freezing for at least 5 minutes solidifies the chocolate quickly and helps it peel off wax paper cleanly.
- Gentle Handling of Finished Trees: These are delicate, so when attaching them to cakes, support the trunk and insert slowly to avoid breaking.
How to Serve Chocolate Tree Cake with Colorful Candy Leaf Decorations Recipe
Garnishes
I like to add a little extra charm with sprinkle of powdered sugar over the top for a frosty autumn morning look. A few fresh berries on the side can add a burst of tartness that balances the rich chocolate beautifully. Sometimes, I even use edible gold dust on the candy leaves for a bit of sparkle—it’s surprisingly simple but adds wow factor.
Side Dishes
This cake goes wonderfully with warm drinks—think freshly brewed coffee, chai latte, or even a creamy hot chocolate for those chilly days. For an extra cozy gathering, I serve it alongside cinnamon roasted nuts or a light whipped cream with a hint of vanilla.
Creative Ways to Present
For holiday parties, I like arranging several mini cakes on a rustic wooden board surrounded by autumn leaves or small pumpkins—instantly festive! You can also gift these individually wrapped in clear boxes tied with twine for charming edible gifts. Another fun idea is placing the mini cakes inside a doughnut pan for stability, then letting guests add their own candy leaf colors for interactive fun.
Make Ahead and Storage
Storing Leftovers
I’ve found storing these mini cakes in an airtight container in the fridge keeps them fresh for up to 3 days. The chocolate trees hold up nicely, though I make sure they don’t get knocked around to avoid chipping. Bringing the cake to room temperature before serving lets the ganache soften beautifully again.
Freezing
You can freeze these mini cakes if you’ve made extras! Wrap them tightly in plastic wrap and place them in a sealed container or freezer bag. When you’re ready to enjoy, thaw overnight in the fridge to avoid condensation that might soften your candy decorations too much.
Reheating
Reheating usually isn’t needed, but if you want to serve the cake a bit warmer, let it sit at room temperature for about 30 minutes. Avoid microwaving, as it melts the ganache unevenly and can ruin your candy leaves. Patience here is key to keeping everything perfect!
FAQs
-
Can I use different cake flavors for the Chocolate Tree Cake with Colorful Candy Leaf Decorations Recipe?
Absolutely! While chocolate coffee cake gives a wonderful rich flavor that pairs beautifully with ganache and candy melts, you can experiment with vanilla or spice cakes too. Just remember the frosting and decorations may contrast differently, which can be fun to try.
-
What if I don’t have candy melts for the colorful leaves?
If candy melts aren’t available, you can use colored white chocolate or even melt gumdrops or colored chocolate chips carefully. Another option is to pipe buttercream leaves tinted with gel food coloring, though this won’t be as firm as candy decorations.
-
How long does the Chocolate Tree Cake with Colorful Candy Leaf Decorations Recipe take to make?
From start to finish, including baking, cooling, frosting, and decorating, expect to spend about an hour. The hands-on decorating is pretty quick once your chocolate melts are ready.
-
Can I prepare the chocolate tree decorations ahead of time?
Definitely! I like to prepare the chocolate trees a day in advance and store them carefully in the fridge, wrapped in parchment paper to prevent sticking. This saves time on the day you want to serve.
Final Thoughts
I have to say, this Chocolate Tree Cake with Colorful Candy Leaf Decorations Recipe has become one of my favorite seasonal treats. It’s one of those recipes that looks like you put a lot of effort into it, but really, it’s easy and rewarding. The bright candy leaves always bring smiles, especially when served at family gatherings or fall parties. Give it a try—I promise you’ll enjoy the process as much as the finished cake, and your guests will be impressed with your festive flair!
Print
Chocolate Tree Cake with Colorful Candy Leaf Decorations Recipe
- Prep Time: 10 min
- Cook Time: 40 min
- Total Time: 60 min
- Yield: 4 mini cakes
- Category: Dessert
- Method: Baking
- Cuisine: American
Description
This delightful Chocolate Tree Cake is a creative and festive dessert perfect for Fall or Thanksgiving celebrations. Featuring mini round chocolate coffee cakes decorated with rich chocolate ganache, crushed graham crackers, and colorful chocolate trees made from melted candy melts, this cake combines visual appeal with indulgent chocolate flavors. The detailed chocolate tree decorations add a playful, seasonal touch to the rustic, nut-covered cake base, making it an impressive yet easy-to-make centerpiece for any occasion.
Ingredients
Cakes
- 4 Chocolate coffee cakes (Round, Mini size, approximately 4×3 inches each)
Frosting and Decoration
- 3 cups Chocolate ganache frosting
- 1 cup Graham crackers, roughly chopped
- 2 cups Dark chocolate, melted
- 1/2 cup Red candy melts, melted
- 1/2 cup Yellow candy melts, melted
- 1/2 cup Orange candy melts, melted
Instructions
- Bake Cakes and Cool: Bake the chocolate coffee cakes according to recipe or package instructions, then allow them to cool completely before decorating.
- Prepare Frosting: While cakes are baking and cooling, prepare the chocolate ganache frosting that will be used to coat each cake.
- Level Cakes: Trim any domed tops from the cakes to create a flat, level surface for easier frosting application.
- Frost Cakes: Place each cake on an individual serving plate and ice them smoothly using the prepared chocolate ganache frosting.
- Coat Cakes: Cover the entire frosted cake with roughly chopped graham crackers to give a rustic, textured appearance.
- Prepare Tree Sketch: Draw a rough tree outline on a sheet of paper and tape it to a cookie tray to use as a guide for making the chocolate tree decorations.
- Set Up Wax Paper: Place a sheet of wax paper over the taped tree sketch and secure it with tape so the design stays in place while piping.
- Outline Tree with Dark Chocolate: Fill a piping bag with melted dark chocolate, cut a small opening at the tip, and carefully pipe the outline of the tree over the sketch on the wax paper. Make the trunk thicker by layering chocolate over it for strength.
- Chill Outline: Place the tray in the freezer for 5 minutes to let the chocolate outline set firmly.
- Prepare Colored Candy Melts: Fill three piping bags with melted red, yellow, and orange candy melts respectively, cutting small openings on each for detailed piping.
- Pipe Leaves: Remove tray from freezer and randomly pipe colorful leaves on the branches of the chocolate tree using all three candy melt colors. Squeeze the candy melts at a 45-degree angle and pull away to create leaf shapes.
- Chill Leaves: Return the tray to the freezer for another 5 minutes to allow the candy melt leaves to set completely.
- Remove Chocolate Tree: Gently peel the wax paper away from the hardened chocolate tree decoration.
- Attach Lollipop Stick: Pour a little melted dark chocolate on the back of the tree’s trunk and insert a lollipop stick. Let this set so the tree can stand.
- Decorate Cakes: Carefully push the finished chocolate trees into the top of each mini cake, creating a charming and festive appearance.
- Serve and Enjoy: The chocolate tree cakes are now ready to be served and enjoyed at your seasonal celebrations!
Notes
- Quick and easy chocolate tree cake with colorful leaves made from simple ingredients.
- Perfect dessert for Fall, Autumn, and Thanksgiving gatherings.
- Use wax paper and a sketch for precise and beautiful chocolate tree decorations.
- Ensure chocolate is sufficiently chilled to avoid breaking when moved.
- The cakes can be prepared ahead and assembled just before serving for convenience.
Nutrition
- Serving Size: 1 mini cake
- Calories: 300 kcal
- Sugar: 124 g
- Sodium: 476 mg
- Fat: 69 g
- Saturated Fat: 31 g
- Unsaturated Fat: 32 g
- Trans Fat: 1 g
- Carbohydrates: 124 g
- Fiber: 12 g
- Protein: 10 g
- Cholesterol: 3 mg


