
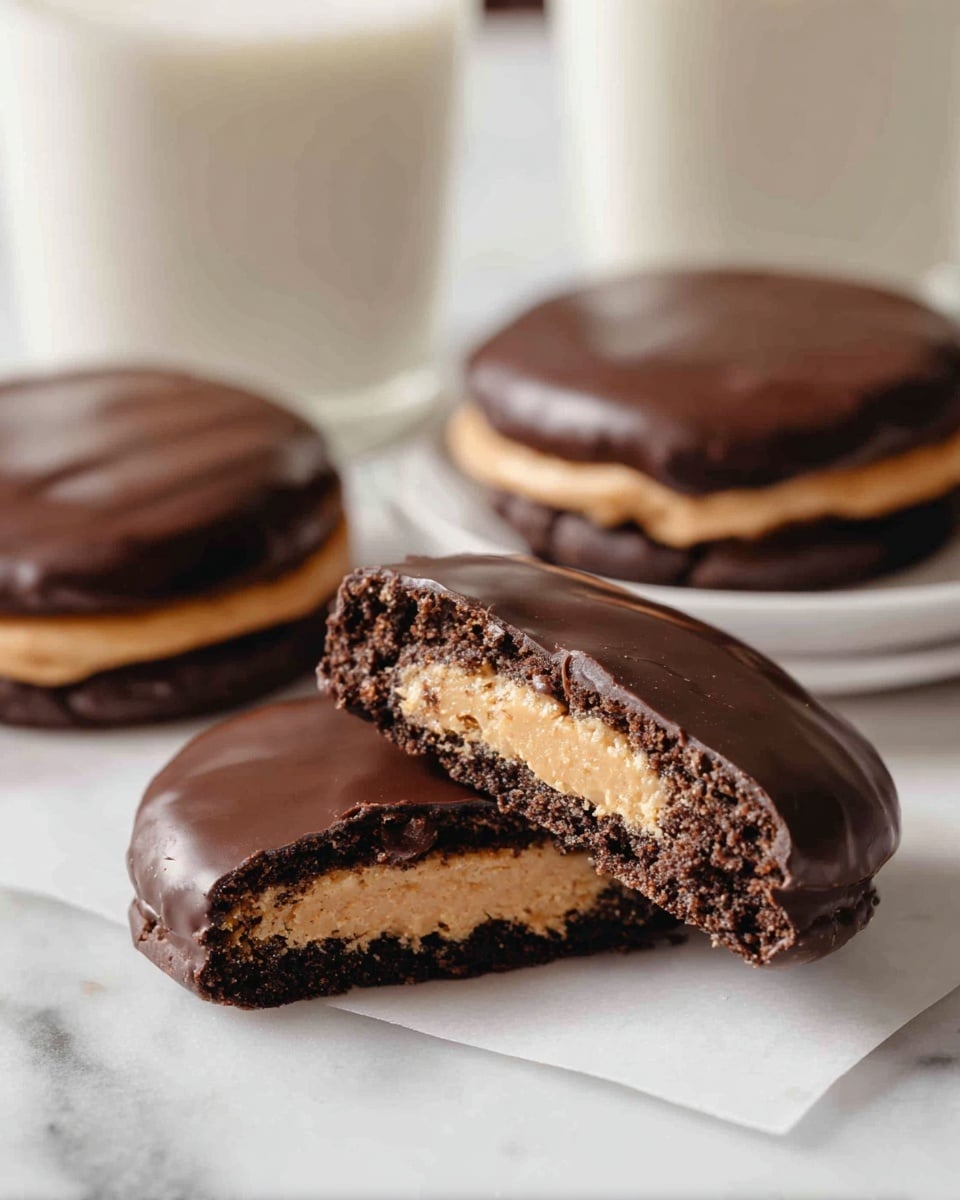
If you’ve ever found yourself daydreaming about that perfect peanut butter and chocolate combo, I’ve got just the thing for you — a seriously amazing Buckeye Cookies Recipe that’s a total showstopper. These cookies are like the better-for-you cousin of the classic Buckeye candy, with a soft chocolate cookie base, a creamy peanut butter layer, and a glossy chocolate topping. When I first tried this recipe, my family went crazy for these treats, and I quickly learned that they’re just as fun to make as they are to eat. Trust me, stick around because you’re about to discover your next favorite cookie.
Why You’ll Love This Recipe
- Perfect Flavor Balance: Sweet chocolate and rich peanut butter come together in a soft, chewy cookie that hits all the right notes.
- Fun, Layered Texture: Between the tender cookie, creamy peanut butter, and smooth chocolate, you’re in for a delightful bite every time.
- Crowd-Pleaser: Whether it’s a holiday party or an everyday treat, these cookies always disappear fast.
- Simple Yet Impressive: No complicated skills needed—just a bit of chilling time and you’re all set to impress friends and family.

Ingredients You’ll Need
Getting the ingredients right really makes the difference in a great Buckeye Cookies Recipe. You’ll find these staples pretty straightforward, and each one plays an important role in texture and flavor.
- Unsalted Butter: Softened butter gives the cookie dough a great texture and richness—make sure it’s not melted.
- Light Brown Sugar: Adds a subtle molasses flavor that deepens the cookie’s taste perfectly.
- Granulated Sugar: Helps balance sweetness and gives a slight crunch on the cookie surface.
- Egg & Egg Yolk: The yolk adds extra moisture for tender cookies while the egg binds everything together.
- Pure Vanilla Extract: Just a splash lends warmth and boosts the chocolate and peanut butter flavors.
- All-Purpose Flour: The cookie’s foundation—spoon and level it to avoid pockets of flour that toughen the dough.
- Unsweetened Cocoa Powder: Use natural cocoa for that rich depth in the chocolate cookie base.
- Baking Powder & Baking Soda: Together they lighten the cookie just enough without over-rising.
- Salt: Essential for bringing out sweetness and balancing flavors.
- Creamy Peanut Butter: Go for the classic Jif or Skippy to get that smooth, sweet peanut butter layer we all love.
- Powdered Sugar: Sweetens and firms up the peanut butter layer perfectly.
- Semi-Sweet Chocolate Chips: Melts beautifully into a silky topping that seals the deal.
Variations
One of my favorite things about this Buckeye Cookies Recipe is how easy it is to tweak depending on your mood or pantry. Feel free to get creative—I’ve tried a few fun twists that I think you’ll enjoy too.
- Crunchy Peanut Butter: If you like a bit of texture, swapping creamy for crunchy peanut butter adds a nice surprise inside the cookie layers.
- Dark Chocolate Topping: Using dark chocolate chips instead of semi-sweet amps up the richness and makes it a bit less sweet.
- Nut-Free Version: Try sunflower seed butter instead of peanut butter to accommodate allergies without losing the creamy texture.
- Mini Buckeye Cookies: Make smaller cookies for cute bite-sized treats—perfect for parties or lunchboxes.
How to Make Buckeye Cookies Recipe
Step 1: Whip Up the Chocolate Cookie Dough
Start by beating the softened butter with brown and granulated sugars until everything’s smooth and creamy, about 1 to 2 minutes. I like to use my stand mixer for this, but a handheld mixer works just fine. Then, add the egg, egg yolk, and vanilla, making sure to scrape down the bowl so everything mixes evenly. In another bowl, whisk together the flour, cocoa powder, baking powder, baking soda, and salt. Slowly add the dry mix into the wet ingredients, stirring just until combined—you don’t want to overmix or your cookies will be tough.
Step 2: Chill the Dough for Best Results
This step is crucial: tightly wrap your dough with plastic wrap and refrigerate for at least 2 hours. I discovered this chill time really helps the cookies hold their shape and develop great flavor. If in a pinch, you can scoop the dough onto the baking sheet and chill for 30 minutes instead, but the longer chill really gives that texture I love.
Step 3: Bake the Cookies
Preheat your oven to 350°F (177°C) and line baking sheets with parchment paper or silicone mats. Scoop the dough with about a 1.5 tablespoon cookie scoop—this gives you uniformly sized cookies that bake evenly. Bake for 10 to 12 minutes, watching for the tops to set but still stay soft. Let them cool on the sheets for 5 to 10 minutes before moving them to a rack—if you try to move them right away, they can be too delicate and break.
Step 4: Make the Creamy Peanut Butter Layer
In a microwave-safe bowl, melt together the peanut butter and sliced butter in 30-second bursts until smooth. Stir in the vanilla and salt, then add the powdered sugar in two parts, mixing after each. You might need to finish kneading it with your hands to get rid of lumps—don’t skip that step, or you’ll notice gritty pockets. Using a tablespoon scoop, dollop the peanut butter layer on each cooled cookie and gently flatten it with your hand or the back of a spoon for neatness.
Step 5: Top with Silky Chocolate
Combine the chocolate chips and sliced butter in a microwave-safe bowl and melt carefully at 50% power in 30-second intervals, stirring well each time until smooth. Spoon the melted chocolate over each peanut butter-topped cookie, spreading gently to cover. Then pop them in the fridge for 30 to 45 minutes to let the chocolate harden—this step takes patience, but the end result is so worth it.
Pro Tips for Making Buckeye Cookies Recipe
- Don’t Skip Chilling: Chilling the dough prevents spreading and keeps your cookies thick and chewy.
- Use Room Temperature Eggs: They blend better, giving your dough a silky texture and more consistent rise.
- Microwave Chocolate Slowly: Melting chocolate gently at half power helps avoid burning and graininess.
- Smooth Peanut Butter Mixture: Knead by hand to eliminate lumps—makes the peanut layer totally velvety.
How to Serve Buckeye Cookies Recipe
Garnishes
I usually keep it simple because the cookies are already pretty rich, but if you want to add some flair, a light sprinkle of flaky sea salt on top of the chocolate right after spreading really takes them over the top. For festive occasions, colored sprinkles or chopped roasted peanuts add a nice crunch and a little pop of color.
Side Dishes
Since Buckeye Cookies are pretty indulgent, I like pairing them with something refreshing like a cold glass of milk or a cup of black coffee to cut through the sweetness. If it’s a party, fresh fruit or a light fruit salad on the side offers a nice contrast and keeps everyone coming back for more cookies!
Creative Ways to Present
For holidays or special get-togethers, I’ve arranged these cookies on a rustic wooden board with some sprigs of fresh mint or rosemary for a pop of green. Another fun idea is to present them in mini cupcake liners stacked on a tiered dessert stand—makes them look like cute little peanut butter chocolate crowns. Kids especially love that presentation!
Make Ahead and Storage
Storing Leftovers
I store these cookies in an airtight container in the fridge to keep that peanut butter layer nice and firm. They stay fresh for about a week, but honestly, mine never last that long! If you want softer cookies, bring them to room temperature before serving.
Freezing
These cookies freeze really well—just layer them between sheets of parchment paper in an airtight container or freezer bag. When you want a sweet fix, thaw them overnight in the fridge. The texture holds up beautifully, and they taste just as good as freshly made.
Reheating
If you want to warm your Buckeye Cookies a bit, I recommend popping them in the microwave for 10 to 15 seconds. It softens the peanut butter layer slightly and makes the chocolate topping a tad melty without losing the beautiful contrast.
FAQs
-
Can I use natural peanut butter in this Buckeye Cookies Recipe?
I recommend sticking with creamy peanut butter like Jif or Skippy because natural peanut butter tends to be oilier and can make your peanut butter layer too runny. The creamy versions help your cookies hold their shape and keep the filling silky.
-
How long should I chill the cookie dough?
For best results, chill the dough at least 2 hours. This not only makes the dough easier to handle but also helps prevent spreading during baking. If you’re in a hurry, a 30-minute chill on the scooped dough will still work.
-
Can I make these Buckeye Cookies ahead of time?
Absolutely! You can make the cookies and the peanut butter layer in advance. Just keep them refrigerated and add the chocolate topping right before serving if you want that fresh “shiny” look. They store well and actually taste better as the flavors meld overnight.
-
What’s the best way to melt chocolate for topping?
Melting chocolate slowly at 50% microwave power in 30-second intervals is key—stir well after each burst to avoid burning. You can also melt it gently over a double boiler for more control.
Final Thoughts
This Buckeye Cookies Recipe has become one of my go-to treats when I want something special but not too complicated. It’s those layers—the chewy chocolate cookie, the creamy peanut butter, and the shiny chocolate topping—that come together like a little gift in every bite. Whether you’re making them for a crowd or just a cozy night in, I know you’ll love how these cookies turn out. Give them a try and watch how fast they disappear—you’ll definitely want to make them again and again!
Print
Buckeye Cookies Recipe
- Prep Time: 60 minutes
- Cook Time: 10 minutes
- Total Time: 100 minutes
- Yield: 27 cookies
- Category: Dessert
- Method: Baking
- Cuisine: American
Description
These Buckeye Cookies are a delightful twist on the classic no-bake buckeye candy, featuring a soft and chewy chocolate cookie base topped with a creamy peanut butter layer and finished with a smooth chocolate topping that hardens to a perfect finish.
Ingredients
Chocolate Cookies
- ¾ cup unsalted butter (softened; 170 grams; 1.5 sticks)
- 1 cup packed light brown sugar (200 grams)
- ⅓ cup granulated sugar (70 grams)
- 1 large egg (room temperature)
- 1 large egg yolk (room temperature)
- 1½ teaspoons pure vanilla extract
- 2 cups all-purpose flour (spooned & leveled; 250 grams)
- ½ cup unsweetened natural cocoa powder (45 grams)
- ½ teaspoon baking powder
- ½ teaspoon baking soda
- ¼ teaspoon salt
Peanut Butter Layer
- 1 cup creamy peanut butter (250 grams; Jif or Skippy recommended, avoid natural peanut butter)
- 5 tablespoons unsalted butter (sliced into pieces; 70 grams)
- ½ teaspoon pure vanilla extract
- ⅛ teaspoon salt
- 1½ cups powdered sugar (180 grams)
Chocolate Topping
- 1⅓ cups semi-sweet chocolate chips (240 grams)
- ½ cup unsalted butter (sliced into tablespoon-size pieces; 115 grams; 1 stick)
Instructions
- Make the chocolate cookies: Using a handheld mixer or stand mixer with the paddle attachment, beat the softened butter, brown sugar, and granulated sugar for 1 to 2 minutes until well combined and creamy. Add the egg, egg yolk, and vanilla extract, mixing well and scraping down the bowl sides as needed.
- Combine dry ingredients: In a separate large bowl, whisk together the all-purpose flour, unsweetened cocoa powder, baking powder, baking soda, and salt until evenly mixed. Gradually add the dry ingredients to the wet ingredients and stir just until combined to form the cookie dough.
- Chill the dough: Cover the dough tightly with plastic wrap and refrigerate for at least 2 hours to firm up. Alternatively, for a quicker method, scoop the dough onto a baking sheet and chill for at least 30 minutes.
- Preheat oven and prepare baking sheets: Set the oven to 350°F (177°C). Line two to three large baking sheets with parchment paper or silicone baking mats to prevent sticking.
- Portion and bake: Remove the dough from the refrigerator and use a 1.5 tablespoon cookie scoop to portion the dough, placing scoops on the prepared sheets spaced evenly. Bake in the preheated oven for 10 to 12 minutes or until the cookie tops are set but still soft.
- Cool the cookies: Allow the cookies to cool on the baking sheets for 5 to 10 minutes before transferring them carefully to wire racks to cool completely.
- Prepare peanut butter layer: In a microwave-safe bowl, combine the peanut butter and sliced butter. Microwave in 30-second intervals, stirring after each, until the mixture is melted and smooth. Stir in vanilla extract and salt. Gradually mix in the powdered sugar in two additions, mixing thoroughly each time. If necessary, knead gently with your hands to eliminate streaks or lumps.
- Top cookies with peanut butter layer: Use a 1 tablespoon cookie scoop or measuring spoon to place the peanut butter mixture evenly atop each cooled cookie. Flatten slightly with your hand or use an angled spatula or spoon to smooth the surface.
- Prepare chocolate topping: Place chocolate chips and sliced butter in a microwave-safe bowl. Microwave at 50% power in 30-second increments, stirring well after each interval, until the chocolate is fully melted and silky smooth.
- Finish cookies with chocolate layer: Spoon melted chocolate over the peanut butter-topped cookies. Smooth the chocolate with an angled spatula or the back of a spoon for even coverage.
- Set the chocolate: Refrigerate the assembled cookies for 30 to 45 minutes, or until the chocolate topping has hardened completely, creating the signature buckeye appearance.
Notes
- These buckeye cookies provide a delicious and easy spin on traditional buckeye candies by incorporating a cookie base for added texture and flavor.
- Use creamy peanut butter brands like Jif or Skippy for the best consistency; natural peanut butter may alter texture.
- Refrigerating the dough is crucial for shape retention and flavor development.
- Microwaving the peanut butter and chocolate mixtures in intervals prevents burning and ensures smooth melting.
- Once assembled and chilled, these cookies should be stored in the refrigerator to maintain the chocolate topping’s firm consistency.
Nutrition
- Serving Size: 1 cookie
- Calories: 220
- Sugar: 20g
- Sodium: 110mg
- Fat: 14g
- Saturated Fat: 7g
- Unsaturated Fat: 6g
- Trans Fat: 0g
- Carbohydrates: 22g
- Fiber: 2g
- Protein: 4g
- Cholesterol: 35mg


