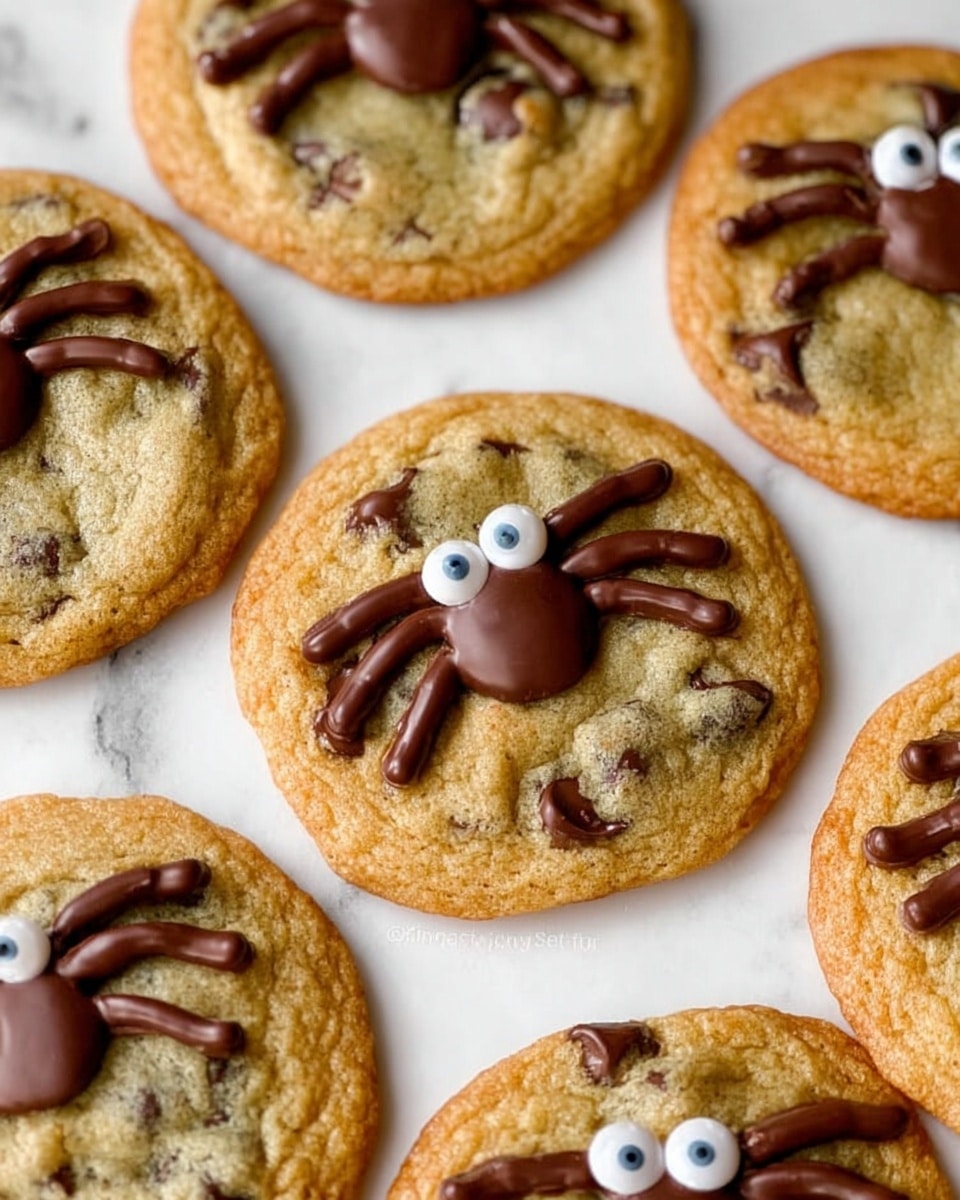
If you’re looking for a fun and festive treat to get into the Halloween spirit, I absolutely love sharing this Halloween Spider Chocolate Chip Cookies Recipe with friends and family. It’s not just about the spooky spider look—it’s the perfect twist on a classic chocolate chip cookie that’s soft, chewy, and delightfully gooey. Whether you’re baking for a party, school event, or just because you want to impress your loved ones, these cookies are fan-freaking-tastic and super easy to make.
Why You’ll Love This Recipe
- Playful and Festive: These cookies turn into cute little spiders that are perfect for Halloween celebrations.
- Classic Chocolate Chip Base: Who can resist chocolate chip cookies? This recipe nails the perfect soft and chewy texture every time.
- Simple Ingredients: You probably already have everything in your pantry, making it easy to whip up even last minute.
- Fun for All Ages: Kids enjoy helping to pipe the spider legs, making it a great family baking project.

Ingredients You’ll Need
Each ingredient in this Halloween Spider Chocolate Chip Cookies Recipe plays an important role, creating a cookie that’s tender inside with just the right crunch around the edges. I particularly love using light brown sugar for that subtle caramel flavor that pairs beautifully with chocolate.
- All-purpose flour: The essential structure builder for the cookies—make sure it’s measured correctly by spooning and leveling.
- Baking soda: Helps the cookies rise and spread, giving you that perfect texture.
- Salt: Balances the sweetness and enhances the chocolate flavor.
- Unsalted butter: Room temperature butter is key for creaming to get that fluffy base with sugar.
- Sugar: Regular granulated sugar for crispness in the cookie.
- Light brown sugar: Packed for moisture and deep flavor; don’t skip it!
- Vanilla extract: Adds warmth and enhances all the other flavors.
- Eggs: Bind everything together and add tenderness.
- Semisweet chocolate chips: The stars of the show inside your cookies, plus extra for decorating.
- Chocolate candy melts: Used to make the spider legs and to attach candy eyes—easy to melt and pipe perfectly.
- Candy eyes: For that cute spider look that will delight kids and guests alike.
Variations
I love how versatile this Halloween Spider Chocolate Chip Cookies Recipe can be. You can definitely play around with add-ins or swap ingredients to suit your cravings or dietary needs.
- Gluten-Free Version: I’ve swapped the all-purpose flour for a 1:1 gluten-free baking blend before with great success—just adjust baking times as needed!
- Nutty Twist: Adding chopped walnuts or pecans gives the cookies a lovely crunch and extra flavor my family can’t get enough of.
- Darker Chocolate Option: Using bittersweet or dark chocolate chips gives the cookie a richer taste; great if you’re not into very sweet desserts.
- White Chocolate Spiders: Try melting white chocolate candy melts for spider legs for a ghostly effect that really pops.
How to Make Halloween Spider Chocolate Chip Cookies Recipe
Step 1: Mix Your Dry Ingredients
Start by whisking together the flour, baking soda, and salt in a medium bowl. I always take a moment here to make sure there are no lumps so the dry ingredients blend evenly into the dough later on.
Step 2: Cream Butter and Sugars
In your stand mixer with the paddle attachment, cream softened butter with both the granulated and brown sugars plus the vanilla extract. This step is crucial—you want it light and fluffy, scraping down the sides a couple of times. That’s what gives these cookies their amazing texture.
Step 3: Add Eggs, then Dry Mixture
Beat in the eggs one at a time, making sure each is fully combined before adding the next. Then, add in the flour mixture and mix just until combined; overmixing can make cookies tough, which we don’t want.
Step 4: Fold in Chocolate Chips and Chill Dough
Stir in 2 cups of semisweet chocolate chips, then cover the dough and pop it in the fridge for at least 2 hours or overnight if you can plan ahead. I’ve learned that this chilling step really improves flavor and helps the cookies spread perfectly while baking.
Step 5: Shape Cookies and Bake
Preheat your oven to 375°F and line two baking sheets with parchment or silicone mats. Use a scoop or two spoons to drop cookie dough mounds spaced about 2 inches apart. Place 2 or 3 extra chocolate chips on top as spider bodies. Bake for 9 to 11 minutes until edges are set but middles still look a little soft—not fully baked through. This gives you that chewy texture we crave.
Step 6: Cool and Decorate Your Spiders
After baking, let the cookies cool on baking sheets for 5 minutes to set before transferring them to wire racks. While they cool, melt your chocolate candy melts according to package instructions, then pipe spider legs coming out from the chocolate chip “body.” Add two little dots of chocolate above the chip to stick on candy eyes, then let it all set before serving. It’s so fun to watch kids light up when they see the spiders come to life!
Pro Tips for Making Halloween Spider Chocolate Chip Cookies Recipe
- Chill That Dough Well: I used to skip chilling, but chilling makes the dough easier to handle and improves flavor and texture.
- Don’t Overbake: Pull the cookies out when edges look set but centers are still soft—cookies firm up as they cool.
- Use Quality Chocolate Candy Melts: They melt smoothly and pipe easily for spider leg designs without clumping.
- Attach Eyes While Chocolate is Wet: For the neatest look, add candy eyes right after piping the dots, so they stick perfectly without sliding.
How to Serve Halloween Spider Chocolate Chip Cookies Recipe
Garnishes
I keep it simple with these cookies—candy eyes are the best garnish for that spooky effect! Sometimes, I like sprinkling just a tiny pinch of orange or black sanding sugar on top before baking for a little shimmer and extra Halloween vibes.
Side Dishes
These spider cookies pair wonderfully with a cold glass of milk or even a hot cup of spiced pumpkin latte for an autumnal treat. For parties, you could set up a “creepy crawlies” snack table with gummy worms and caramel apples alongside.
Creative Ways to Present
One Halloween, I arranged the cookies on a platter lined with black lace paper and added spider web doilies for an extra festive feel. You could also stack them in clear cellophane bags tied with orange and black ribbon as great party favors or classroom treats.
Make Ahead and Storage
Storing Leftovers
I store these cookies in an airtight container at room temperature for up to 4 days—just keep a slice of bread inside the container to keep them soft and fresh longer. They tend to get a bit firm without it.
Freezing
I’ve frozen the dough portions shaped into balls—just arrange them on a tray and freeze, then transfer to a freezer-safe bag. Bake straight from frozen, adding a minute or two to the bake time. The decorated finished cookies don’t freeze well because the candy melts can crack.
Reheating
If you want to enjoy these cookies warm again, I gently reheat them in a 300°F oven for about 5 minutes. It revives that fresh-baked softness perfectly and the chocolate gets deliciously melty.
FAQs
-
Can I use chocolate chips other than semisweet?
Absolutely! I’ve used milk chocolate, dark chocolate, and even white chocolate chips for a fun twist. Just keep the quantity the same for best results.
-
Do I have to chill the dough?
Chilling is highly recommended because it enhances the flavor and texture of the cookies and helps them bake without spreading too thin. But if you’re short on time, you can bake right away—just expect slightly thinner cookies.
-
What if I don’t have candy eyes?
You can draw eyes with a tiny dab of melted white chocolate and a dot of dark chocolate on top, or skip eyes altogether—the cookies will still be delicious! You could also use small candies or edible markers for decorating.
-
Can I make these cookies vegan or dairy-free?
Yes, you can swap butter with vegan butter and use egg replacers like flax eggs. Just note that texture might vary slightly from the classic recipe.
Final Thoughts
This Halloween Spider Chocolate Chip Cookies Recipe has become my go-to for spooky gatherings and family fun. I love how it combines the best of classic chocolate chip cookies with a playful twist that delights kids and adults alike. Give it a try—you’ll enjoy the baking process as much as eating these adorable, delicious treats. Trust me, once you make these spiders creep across your cookie tray, they’ll become a Halloween tradition you look forward to every year!
Print
Halloween Spider Chocolate Chip Cookies Recipe
- Prep Time: 15 min
- Cook Time: 11 min
- Total Time: 26 min
- Yield: 26 cookies
- Category: Dessert
- Method: Baking
- Cuisine: American
Description
Celebrate Halloween with these fun and festive Halloween Chocolate Chip Cookies featuring gooey chocolate chips and spooky spider decorations made with candy eyes and chocolate candy melts. Perfectly soft with a slightly underbaked center, these cookies add a delightful twist to a classic favorite, making them ideal for holiday parties or treats.
Ingredients
Dry Ingredients
- 2 1/4 cups all-purpose flour
- 1 teaspoon baking soda
- 1 teaspoon salt
Wet Ingredients
- 1 cup (2 sticks) unsalted butter, at room temperature
- 1/2 cup granulated sugar
- 1 cup packed light brown sugar
- 1 1/2 teaspoons vanilla extract
- 2 large eggs
Mix-ins and Decoration
- 2 cups semisweet chocolate chips, plus more for topping
- Chocolate candy melts (for spider legs)
- Candy eyes (for spider decoration)
Instructions
- Mix Dry Ingredients: In a medium bowl, whisk together the all-purpose flour, baking soda, and salt until well combined. Set aside for later use.
- Cream Butter and Sugars: Using a stand mixer fitted with the paddle attachment, cream together the unsalted butter, granulated sugar, light brown sugar, and vanilla extract. Beat the mixture until it is light and fluffy, making sure to scrape down the sides of the bowl as needed to ensure even mixing.
- Add Eggs and Flour Mixture: Add the eggs one at a time to the creamed butter and sugar, beating between each addition. Then, add the flour mixture to the bowl and beat only until just combined, careful not to overmix.
- Incorporate Chocolate Chips and Chill Dough: Fold in the semisweet chocolate chips until evenly incorporated. Cover the dough and refrigerate for a minimum of 2 hours or up to overnight to develop flavor and texture.
- Preheat Oven and Prepare Baking Sheets: Preheat your oven to 375°F (190°C). Line two baking sheets with parchment paper or silicone baking mats to prevent sticking.
- Portion and Add Toppings: Using two spoons or an ice cream scoop, drop mounds of cookie dough about 2 tablespoons each onto the prepared baking sheets, spacing them at least 2 inches apart. Place 2 to 3 additional chocolate chips on top of each dough mound to serve as the spider’s body.
- Bake the Cookies: Bake the cookies for 9 to 11 minutes until the edges are set but the centers remain slightly underbaked for a soft texture. Remove from the oven and allow the cookies to cool on the baking sheets for 5 minutes before transferring to a wire rack to cool completely.
- Decorate with Spider Legs and Eyes: Once the cookies are fully cooled, melt the chocolate candy melts according to package instructions. Pour the melted chocolate into a piping bag or sealable plastic bag and snip off the tip. Pipe spider legs coming out from the chocolate chip bodies on top of the cookies. Add two small dots of melted chocolate above the chips and attach the candy eyes to complete the spider decoration. Allow the chocolate to set before serving.
Notes
- Add a spooky twist to a classic chocolate chip cookie by decorating with candy eyes and chocolate spiders perfect for Halloween celebrations.
- Chilling the dough before baking improves texture and flavor by allowing the ingredients to meld.
- Using parchment paper or silicone mats ensures easy cookie removal and even baking.
- Adjust baking time slightly depending on your oven for perfect chewy centers.
Nutrition
- Serving Size: 1 cookie
- Calories: 234 kcal
- Sugar: 17 g
- Sodium: 141 mg
- Fat: 12 g
- Saturated Fat: 7 g
- Unsaturated Fat: 4 g
- Trans Fat: 0 g
- Carbohydrates: 27 g
- Fiber: 1 g
- Protein: 2 g
- Cholesterol: 32 mg


