
If you’re looking for a fun, festive treat that’s as adorable as it is delicious, you’ve got to try this Melted Witch Bark Recipe. It’s perfect for Halloween gatherings or just a sweet weekend project with the kids. I absolutely love how quickly it comes together and how everyone goes crazy for these little chocolate witches—complete with pretzel broomsticks and candy hats! Stick with me, and I’ll share some tips and tricks to make your witch bark look amazing and taste even better.
Why You’ll Love This Recipe
- Super Easy & Quick: You’ll whip it up in about 15 minutes—perfect for last-minute cravings or party prep.
- Creative and Fun: The whimsical witch design is a crowd-pleaser, especially with kids helping out.
- Customizable: You can swap out candies or colors to suit your taste or occasion.
- Tasty AND Festive: These barks combine melty chocolate, salty pretzels, and peanut butter cups for an irresistible mix.

Ingredients You’ll Need
The magic behind this Melted Witch Bark Recipe is all about the little details in the ingredients. Each one adds flavor and texture that works beautifully together, and you don’t need anything fancy—just good-quality candies you enjoy.
- Wilton Candy Melts (vibrant green): These melt smoothly and hold their shape perfectly, plus I love the festive green color that makes the witches pop.
- Mini chocolate chips: Divided for melting and decorating, they add delicious melty swirls and tiny “eyes.”
- Pretzel sticks: Pretzels double as the witch’s broomstick — salty crunch that balances the sweetness.
- Mini Reese’s Peanut Butter Cups: Their creamy peanut butter flavor and size make them perfect little bodies for the witches.
- Halloween Oreos: These add that classic chocolate cookie crunch and serve as fun little witch hats.
- Hershey’s Hugs: The white chocolate with a hint of peppermint is perfect for hat trim — it’s a nice contrast in both flavor and color.
Variations
I love customizing this Melted Witch Bark Recipe depending on the mood and who’s joining the fun. Whether you want it more chocolatey, extra crunchy, or a little less sweet, there’s always a way to tailor it to your taste.
- Nut-Free Version: Replace Reese’s with mini peanut butter-free cups or candy buttons to avoid nuts but still keep that creamy middle.
- Color Twist: Swap the green candy melts for orange or purple to match your party theme or just because you like mixing things up.
- Extra Crunch: Add some crushed candy canes or toffee bits on top – my kids lose their minds when I do this!
- Spicy Kick: Sprinkle a tiny pinch of cinnamon or chili powder into the melted chocolate for a subtle warmth that pairs surprisingly well.
How to Make Melted Witch Bark Recipe
Step 1: Get everything prepped and ready
Before you start melting any chocolate, lay out a piece of parchment paper on a cookie sheet. This is your workspace for making the bark, so give yourself a clean, non-stick surface. Next, get your pretzel sticks, mini Reese’s, Oreos, Hugs, and half of the mini chocolate chips out and lined up close by. Trust me, having everything ready to grab is key because once that chocolate melts, you want to work quickly.
Step 2: Melt the green candy melts gently
Place 1 cup of the candy melts in a small pot and melt over low heat, stirring constantly. Keep the heat low to avoid burning the melts—burnt candy melts are something I learned to avoid the hard way. Once you see that smooth, glossy chocolate, spoon it carefully onto the parchment paper and spread it out into circles about 4 inches in diameter. The round shape helps your witches come together nicely.
Step 3: Add swirls with the remaining chocolate chips
Next, melt the remaining half cup of mini chocolate chips over low heat in a separate pot—again, stirring constantly. This melted chocolate adds some pretty swirl details to your witch barks. Spoon just a tiny amount of the melted chips onto each green circle, then use a toothpick to gently swirl the chocolates together. It makes the bark look magical and gives you a fun pattern.
Step 4: Create your witches
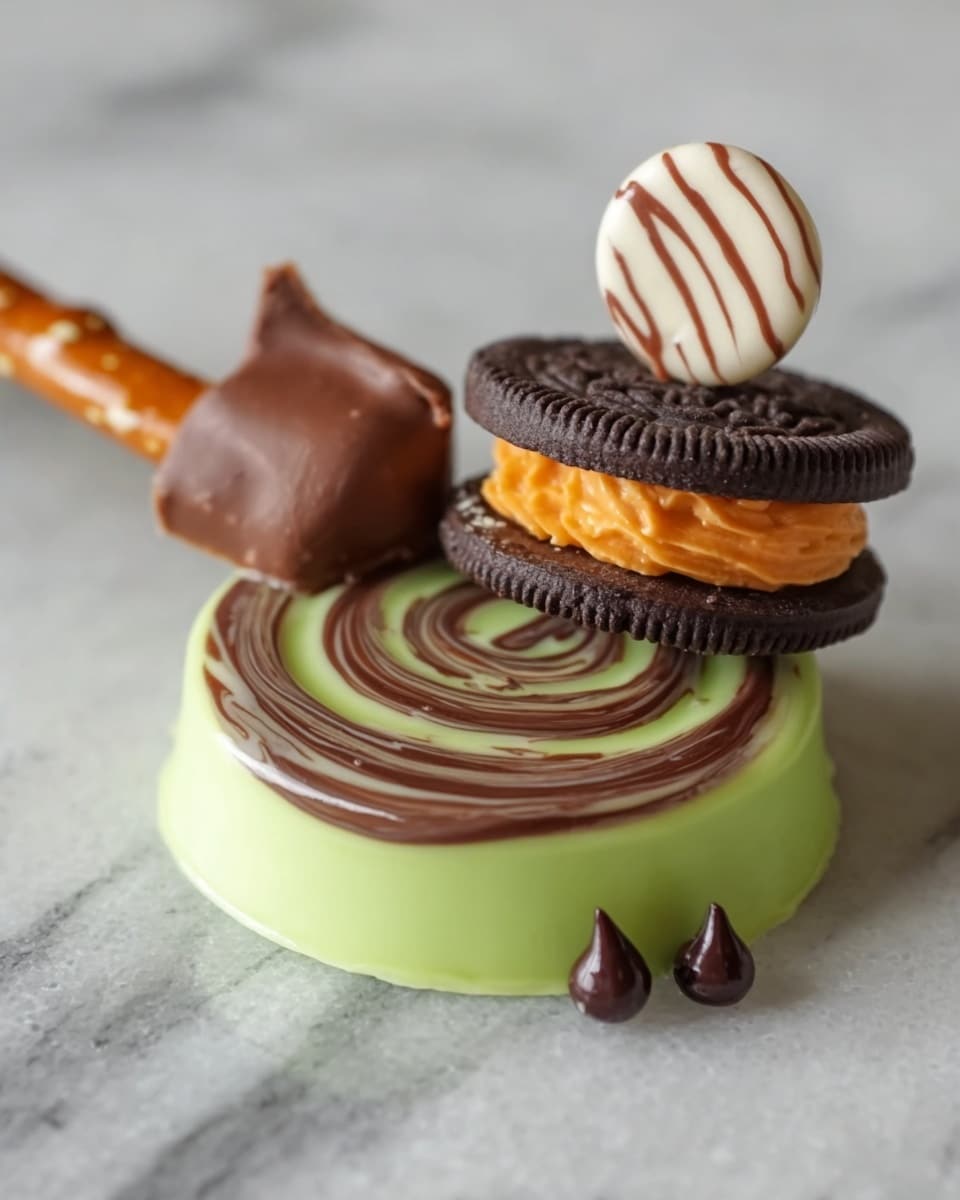
Here’s where the real fun starts! Place an Oreo near the edge of the circle to serve as your witch’s hat. Then dip a Hershey’s Hug into the excess melted chocolate and place it on top of the Oreo—it acts like the hat trim. Use mini chocolate chips to dot eyes on the green bark area close to the “hat.” For the broomstick, stick pretzel sticks into a mini Reese’s placed on the opposite side of the Oreo. The contrast of colors and textures here makes it so cute and realistic.
Step 5: Let set and enjoy!
Leave your melted witch bark on the parchment paper until fully set—about 10 minutes at room temperature should do. Once hardened, they’re ready to snack on or package up for a party favor. If you want, pop them in the fridge for faster setting, but I find room temp works best to keep the bark shiny and not brittle.
Pro Tips for Making Melted Witch Bark Recipe
- Use Low Heat for Melting: I learned that patience pays off here—melting slowly avoids lumpy or burnt chocolate.
- Work Quickly with Parchment: Once the chocolate is melted and spread, move fast adding decorations so it doesn’t set too soon.
- Keep Candies Close: Having all your toppings within arm’s reach helps the process go smoother and your designs look sharp.
- Avoid Refrigerating Long-Term: I found that storing in the fridge too long can cause condensation and dull colors—room temp storage works best for freshness.
How to Serve Melted Witch Bark Recipe
Garnishes
I typically keep garnishes simple—mini chocolate chips for eyes and the Hershey’s Hugs for hat trims really bring the witches to life without overwhelming the bark. Sometimes, I add a few edible glitter sprinkles or colored sugar to add extra sparkle, especially if serving for a kids’ party.
Side Dishes
Since these witch barks are pretty rich, I like pairing them with a cup of warm apple cider or hot cocoa—it complements that sweet-and-salty vibe perfectly. For a bigger Halloween spread, add some spiced nuts or pumpkin-flavored popcorn as well.
Creative Ways to Present
For special occasions, I’ve arranged the melted witches on a large platter surrounded by autumn leaves and mini pumpkins, which really ups the festive factor. Wrapping individual barks in cellophane tied with orange and black ribbons also makes adorable party favors or teacher gifts!
Make Ahead and Storage
Storing Leftovers
After making your melted witch bark, I store any leftovers in an airtight container at room temperature. In my experience, keeping it out of the fridge prevents moisture buildup and keeps the chocolate shiny and crisp for up to a week.
Freezing
I’ve tried freezing this bark occasionally when I made extras. Just wrap pieces tightly in plastic wrap and place them in a freezer-safe bag. When you’re ready to enjoy, let them thaw at room temperature. The texture stays pretty close to fresh, though sometimes the colors soften a bit.
Reheating
If your bark softens or loses its snap, avoid reheating fully. Instead, let it warm at room temp or a few minutes on the counter; I’ve found reheating melts the chocolate and makes it sticky. Best to enjoy as is—or make fresh!
FAQs
-
Can I use regular chocolate instead of candy melts for the Melted Witch Bark Recipe?
Absolutely! You can substitute regular chocolate chips or bars, but keep in mind that candy melts hold their shape differently and come in vibrant colors like the green used here. If using regular chocolate, temper it gently and expect a slightly different texture and look.
-
How long does the Melted Witch Bark last?
Stored properly in an airtight container at room temperature, the bark stays fresh for up to a week. Beyond that, the chocolate might start to lose its shine or taste slightly stale.
-
Can I make this Melted Witch Bark Recipe ahead of time for a party?
Yes! This recipe is great for making a day or two ahead. Just store the finished bark at room temp in an airtight container and avoid refrigeration to keep it looking and tasting its best.
-
What’s the best way to melt the candy melts without burning them?
Use low heat and stir constantly while melting. You can also melt the candy melts in short bursts in the microwave, stirring in between. Avoid high heat, which causes clumping or burning.
Final Thoughts
This Melted Witch Bark Recipe holds a special place in my heart because it’s one of those recipes that’s as delightful to make as it is to eat. I remember the first time I made it with my kids—they loved designing their own witches and seeing how the candies came to life on the bark. It’s the kind of treat that brings the family together, sparks creativity, and tastes downright delicious. So, if you want an easy, fun, and festive snack that’s sure to impress, give this recipe a try. I promise you’ll be smiling as much as I do every time I serve it!
Print
Melted Witch Bark Recipe
- Prep Time: 5 minutes
- Cook Time: 10 minutes
- Total Time: 15 minutes
- Yield: 8 servings (8 melted witches)
- Category: Dessert
- Method: Stovetop
- Cuisine: American
Description
This Melted Witch Bark recipe is a fun and festive Halloween treat that combines vibrant green candy melts with an assortment of mini candies and pretzel sticks to create adorable witch-themed snacks. Perfect for parties, these easy-to-make melted candy circles are decorated with mini Reese’s Peanut Butter Cups, Halloween Oreos, Hershey’s Hugs, and chocolate chips, making a delicious and visually striking dessert.
Ingredients
Base
- 1 bag Wilton Candy Melts (vibrant green)
Add-ins and Decorations
- 1/2 cup mini chocolate chips (divided)
- 8 pretzel sticks
- 8 mini Reese’s Peanut Butter Cups
- 8 Halloween Oreos
- 8 Hershey’s Hugs
Instructions
- Prepare the workspace: Begin by laying out parchment paper on a cookie sheet to prevent the melted candy from sticking and for easy cleanup.
- Organize ingredients: Get pretzel sticks, Reese’s Peanut Butter Cups, Halloween Oreos, Hershey’s Hugs, and mini chocolate chips out and ready so they are easy to grab during assembly.
- Melt the Candy Melts: Place 1 cup of green candy melts in a small pot and melt on low heat while stirring constantly to avoid burning. Once fully melted, spoon the candy onto the parchment paper and spread into circles approximately 4 inches in diameter.
- Melt remaining mini chocolate chips: Quickly add the remaining mini chocolate chips to a small pot and melt on low heat, stirring constantly. Spoon a small amount of the melted mini chips onto the green candy circles and use a toothpick to swirl them around, creating decorative patterns.
- Add decorations: Place one Halloween Oreo to represent a witch’s hat in the corner of each melted candy circle. Dip a Hershey’s Hug into excess melted chocolate and place it on top of the Oreo. Use mini chocolate chips to make eyes next to the hat.
- Assemble the witch handle: Stick a pretzel stick into each mini Reese’s Peanut Butter Cup. Then, place these on the opposite side of the Oreo to represent the witch’s broomstick.
- Set and serve: Let the assembled melted witch barks set completely until firm. Once set, they are ready to eat or can be packaged for later enjoyment.
Notes
- Simple sweet Melted Witch Bark is SO cute and festive, making it perfect for a party activity.
- Use parchment paper for easy removal and cleanup.
- Work quickly when swirling designs and adding decorations to prevent the candy from hardening too soon.
- You can customize decorations with other Halloween-themed candies if desired.
Nutrition
- Serving Size: 1 serving
- Calories: 251
- Sugar: 27g
- Sodium: 114mg
- Fat: 12g
- Saturated Fat: 7g
- Unsaturated Fat: 5g
- Trans Fat: 0g
- Carbohydrates: 32g
- Fiber: 1g
- Protein: 2g
- Cholesterol: 3mg


![Quick and Easy 28-Minute Meal: [Title] Recipe](https://lickplates.com/wp-content/uploads/2025/07/0_2-1751477889532-768x960.webp)


