
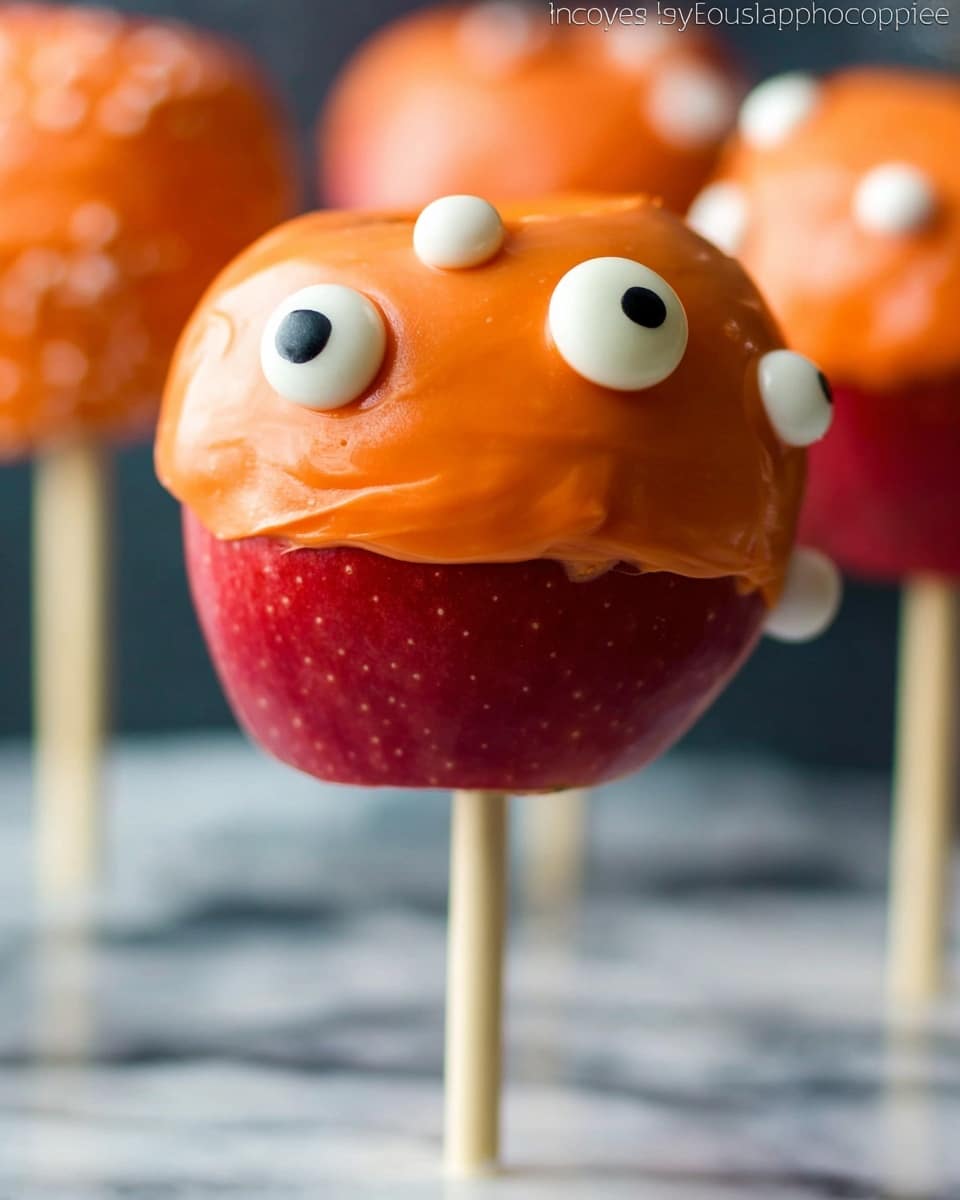
If you’re craving a festive and fun treat that will have everyone talking, this Halloween Candied Apples Recipe is an absolute must-try! I absolutely love how these apples turn out—vibrant, sweet, and just the right amount of spooky with those adorable candy eyeballs staring back at you. Whether you’re prepping for a Halloween party or just want a fun weekend activity, this recipe is super straightforward and delivers amazing results. Keep reading because not only will I walk you through every step, but I’ll share my best tips for flawless candied apples every time!
Why You’ll Love This Recipe
- Super Easy to Make: You don’t need to be a candy expert—just a few simple ingredients and you’re good to go.
- Eye-Catching Presentation: Those candy eyeballs? They make these apples irresistibly fun and festive.
- Perfect for Kids and Adults: My family goes crazy for this; it’s sweet, colorful, and festive enough to please any crowd.
- Quick Prep Time: From start to finish, you’re looking at about 30 minutes—which means less time waiting and more time enjoying!

Ingredients You’ll Need
Each ingredient here plays a starring role in making your Halloween candied apples pop with flavor and fun. I always pick apples that are firm and shiny because they hold up beautifully under the candy coating, and the Wilton Candy Melts come in great seasonal colors that really make this treat extra festive.
- Wilton Candy Eyeballs: These little guys add the perfect spooky touch and come in different sizes, so feel free to mix and match.
- Wilton Candy Melts: I love using lavender, green, and orange because they scream Halloween and melt smoothly for a perfect coating.
- Wood Treat Sticks: Essential for holding your apples upright and making them easy to enjoy without sticky hands.
- Medium Apples: I recommend McIntosh or Granny Smith because they’re tart and crisp, balancing out the sweet coating wonderfully.
Variations
I love how this Halloween Candied Apples Recipe can be customized in so many fun ways. Sometimes I like to swap out the candy melts for a chocolate dip or sprinkle crushed nuts or Halloween-themed sprinkles on top. It’s all about making the treat your own and adding those little personal touches that make you smile.
- Chocolate Coating: I once dipped the apples in dark chocolate before adding the candy eyeballs, which added a rich and slightly less sweet twist.
- Sprinkles and Nuts: Adding some Halloween sprinkles or crushed peanuts gives a fun texture contrast my family loves.
- Different Apple Types: Try Fuji or Honeycrisp for a sweeter bite that contrasts deliciously with the candy coating.
- Gluten-Free or Vegan Options: All ingredients here are generally allergy-friendly, but always double-check the candy melts and eyeballs for specific dietary labels.
How to Make Halloween Candied Apples Recipe
Step 1: Prep Your Apples and Sticks
Start by washing your apples thoroughly and drying them completely—any moisture on the surface will prevent the candy coating from sticking properly. Then, carefully insert a wooden treat stick into the stem end of each apple, making sure it’s stable and goes in about halfway. This makes dipping easier and keeps your hands mess-free later on.
Step 2: Melt the Candy
In a microwave-safe bowl, melt your Wilton Candy Melts in 30-second intervals, stirring well between each to avoid scorching. The key here is patience—melting slowly will give you a silky smooth candy that coats the apples perfectly without burning. I’ve learned that sometimes it takes a few gentle stirs before the last lumps melt away.
Step 3: Dip and Decorate
Now comes the fun part—dipping! Hold an apple by the stick and dip it into the melted candy, twirling it around to coat evenly. Then, lift it out and gently shake off any excess so the coating isn’t too thick. While the candy is still wet, stick on the candy eyeballs. They’ll set in place as the candy hardens, giving your apples that playful, creepy look that’s perfect for Halloween.
Step 4: Let Them Set
Place the dipped apples on a parchment-lined baking sheet and allow them to cool and harden at room temperature. If your kitchen is warm, pop them in the fridge for 10-15 minutes to speed up the process. Just be careful not to leave them too long, or condensation can form and make your candy coating a bit sticky.
Pro Tips for Making Halloween Candied Apples Recipe
- Dry Apples Thoroughly: I’ve learned that any water on the apples can cause the candy to slide right off, so don’t rush this step.
- Use a Tall Container for Dipping: It’s easier to dip and twirl your apples in a narrow cup rather than a shallow bowl to ensure even coverage.
- Add Eyeballs Quickly: The candy sets fast, so be ready to stick on the eyeballs right after dipping while the coating is still tacky.
- Avoid Condensation: If cooling in the fridge, let them come back to room temp before serving to prevent sticky buildup.
How to Serve Halloween Candied Apples Recipe
Garnishes
I like to keep it simple with the candy eyeballs, but sometimes I add a little edible glitter or Halloween-themed sprinkles right after dipping for extra sparkle. It makes the apples feel even more festive and festive—and kids especially love the shiny touches!
Side Dishes
These Halloween candied apples pair beautifully with warm drinks like apple cider or hot chocolate. For parties, I’ve served them alongside pumpkin-shaped sugar cookies or a plate of cheesy Halloween-themed snacks for a fun combo of sweet and savory.
Creative Ways to Present
One year, I set up a Halloween candy apple bar with different candy melts, toppings, and lots of eyeballs so guests could decorate their own. It was a huge hit! Displaying them upright in a decorative pumpkin-shaped container or a festive basket also adds to the spooky vibe and keeps them from rolling around.
Make Ahead and Storage
Storing Leftovers
I usually store leftover candied apples in a single layer, loosely wrapped in parchment paper inside an airtight container at room temperature. They keep well for a couple of days, but the candy coating is best enjoyed fresh to maintain that perfect crunch.
Freezing
Freezing candied apples isn’t something I recommend because the texture of the apples changes dramatically when frozen and thawed, often becoming mushy. If you want to prep in advance, make the candy coating separately and dip apples right before serving instead.
Reheating
Since these are best enjoyed fresh, reheating isn’t really necessary and can cause the candy coating to melt or lose its crunch. If the coating becomes sticky, letting them sit at room temperature for a while usually helps to restore the texture.
FAQs
-
Can I use other types of apples for this Halloween Candied Apples Recipe?
Absolutely! While I prefer tart apples like Granny Smith or McIntosh for balance, you can use any firm apple you like. Just make sure they’re fresh and dry before dipping for the best coating adhesion.
-
What should I do if my candy melts are too thick?
If the candy melts get too thick, gently stir in a small amount of vegetable shortening or coconut oil to thin them out. This makes dipping easier and creates a smoother finish.
-
Can I make these Halloween candied apples ahead of time?
You can prep the apples and candy melts in advance, but I recommend dipping and decorating them on the day you plan to serve for the freshest taste and best texture.
-
How do I keep the candy coating from melting on humid days?
Humidity can make the candy coating sticky or soft. Try to keep the apples in a cool, dry place. If necessary, refrigerate them briefly to set the coating but bring back to room temp before serving to avoid condensation.
Final Thoughts
This Halloween Candied Apples Recipe is one of those simple joys that never fail to bring smiles and a little festive magic to any gathering. I love sharing this with family and friends because it’s easy to make, fun to decorate, and downright delicious. Give it a try—you’ll find yourself coming back to this recipe year after year, and I promise it’ll quickly become a Halloween tradition you treasure just like I do!
Print
Halloween Candied Apples Recipe
- Prep Time: 30 minutes
- Cook Time: 0 minutes
- Total Time: 30 minutes
- Yield: 12 apples
- Category: Dessert
- Method: No-Cook
- Cuisine: American
Description
Celebrate Halloween with these festive Halloween Candied Apples featuring colorful candy melts and spooky candy eyeballs. Perfect for a fun and easy holiday treat, these apples are coated in vibrant melted candy and decorated to delight kids and adults alike. With simple ingredients and a quick 30-minute prep, these candied apples bring a playful twist to classic caramel apples without the sticky mess.
Ingredients
Main Ingredients
- 1 package Wilton Candy Eyeballs (small-sized, medium-sized or a combination of both)
- 12 ounces Wilton Candy Melts (recommended colors: Lavender, Green, and Orange)
- 12 wood treat sticks
- 12 medium apples (such as McIntosh or Granny Smith), washed and polished dry
Instructions
- Prepare the Apples: Begin by thoroughly washing and drying the apples. Removing all moisture ensures the candy melts will adhere smoothly to the surface of the apples.
- Insert Sticks: Carefully insert one wood treat stick into the stem end of each apple, pushing it about halfway through to secure it firmly for dipping.
- Melt the Candy: Place the Wilton Candy Melts in a microwave-safe bowl and melt according to the package instructions, usually heating in 30-second increments and stirring until smooth.
- Dip the Apples: Holding an apple by the stick, dip it into the melted candy until fully coated. Allow any excess candy to drip off before setting the apple upright on parchment paper or a nonstick surface to harden slightly.
- Decorate with Eyeballs: While the candy coating is still tacky, press the Wilton candy eyeballs onto the apples to create spooky eyes. Use as many eyes as you like for a creepy effect.
- Let Set: Allow the candy coating to fully harden at room temperature before serving, about 15-20 minutes. This ensures the candy is set and the decorations stay in place.
Notes
- This Halloween treat has its eyes on you! Brightly-colored Halloween Candied Apples are sweet, fun, and take only about 30 minutes to prepare.
- Use tart apples like Granny Smith for a nice balance to the sweetness of the candy coating.
- Make sure apples are completely dry before dipping or the candy won’t stick properly.
- For added flair, you can drizzle contrasting candy colors or sprinkle edible glitter once coated.
- Store apples at room temperature in a cool, dry place for up to 2 days for best texture.
Nutrition
- Serving Size: 1 apple
- Calories: 157 kcal
- Sugar: 27 g
- Sodium: 15 mg
- Fat: 4 g
- Saturated Fat: 3 g
- Unsaturated Fat: 1 g
- Trans Fat: 0 g
- Carbohydrates: 33 g
- Fiber: 4 g
- Protein: 1 g
- Cholesterol: 0 mg


