
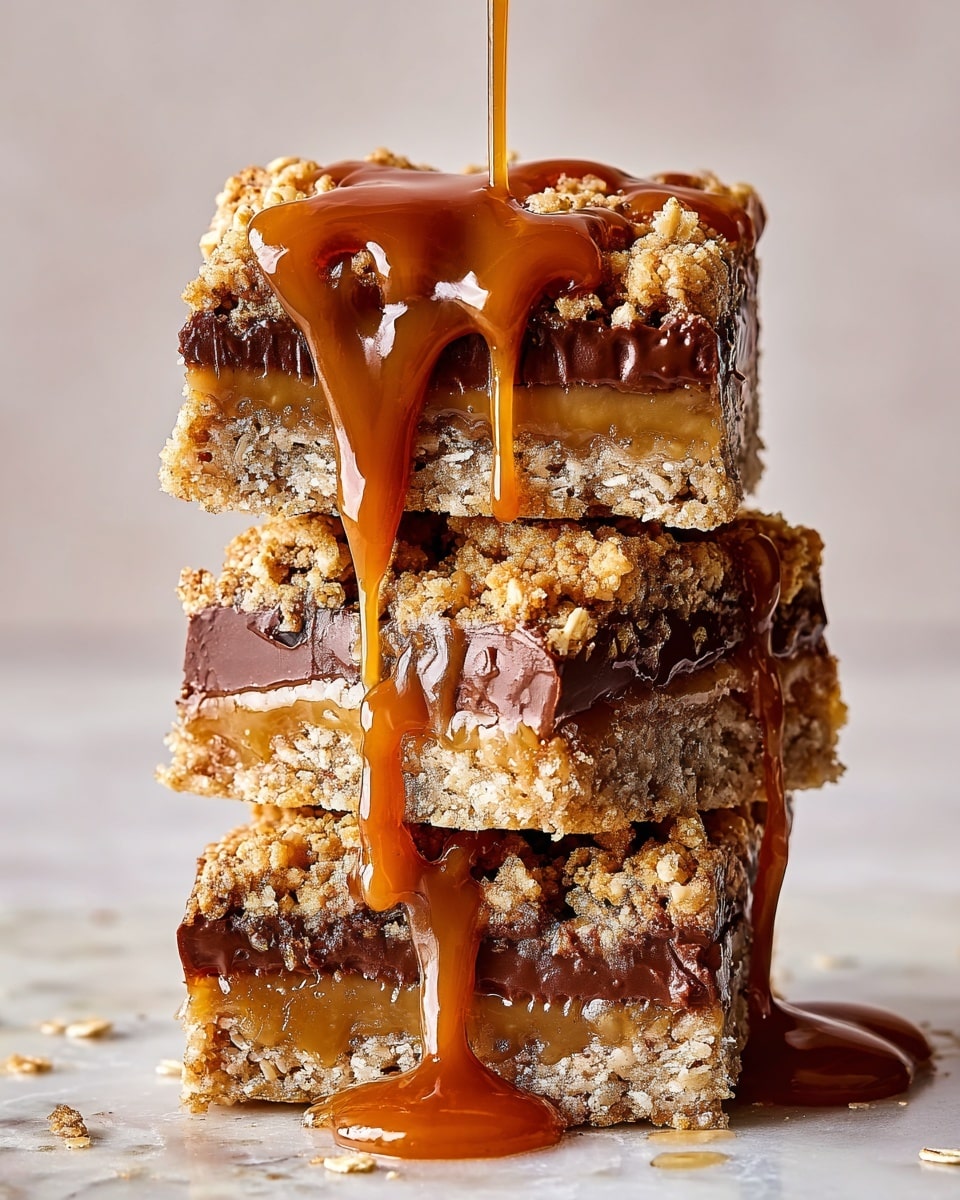
I absolutely love sharing this Carmelitas Recipe because it hits all the right notes—chewy oats, rich caramel, and melty chocolate in every bite. When I first tried making carmelitas at home, I was amazed at how simple it was to get bakery-quality bars without a lot of fuss. You’ll find that this recipe works fantastic for potlucks, after-school snacks, or even as a sweet breakfast treat when you want to indulge.
What makes this Carmelitas Recipe worth trying isn’t just the flavor, but also the textural balance. The buttery oat crust crisps just enough, the caramel is perfectly gooey, and the chocolate chips add that classic touch of melty sweetness. Plus, with just a handful of ingredients you likely already have nearby, it’s surprisingly easy to whip up — trust me, your family will go crazy for this one!
Why You’ll Love This Recipe
- Simple to Make: The crumbly oat base and melted caramel come together quickly without complicated techniques.
- Perfect Texture: You get a delightful mix of chewy, gooey, and crispy layers in every single bite.
- Crowd-Pleaser: My family goes nuts for these—great for sharing or gifting during the holidays.
- Versatile Ingredients: The pantry staples make it easy to keep these bars on demand without special shopping trips.

Ingredients You’ll Need
These ingredients combine beautifully to create a deliciously rich and textured Carmelitas Recipe. Some items, like the soft caramels and brown sugar, bring in that deep caramel flavor, while oats add a hearty chewiness—perfect balance.
- Cooking spray: Use this to prevent sticking; it helps get your bars out cleanly.
- All-purpose flour: Gives structure to the oat crumble; make sure it’s fresh for best texture.
- Old-fashioned oats: These add the signature chew and hearty grain taste that’s essential here.
- Unsalted butter: Softened butter blends into the crumble for that rich, buttery bite—don’t substitute with margarine for the best result.
- Light brown sugar: Adds moisture and a subtle molasses flavor that complements the caramel beautifully.
- Pure vanilla extract: Boosts the overall flavor with a warm, inviting aroma.
- Kosher salt: Enhances the sweetness and balances the flavors.
- Soft caramels: These melt into luscious gooey caramel; look for a quality brand with real cream.
- Whole milk: Helps to melt the caramels smoothly and creates the perfect consistency.
- Flaky sea salt: Sprinkled on top, this brings a crunchy salt contrast that totally elevates the caramel.
- Semisweet chocolate chips: These add melty richness without overwhelming sweetness.
Variations
I like to play around with this Carmelitas Recipe depending on the occasion—sometimes swapping chocolate chips for white chocolate or tossing in chopped nuts for extra crunch. The beauty is that this recipe really lends itself to personalization, so feel free to get creative!
- Nutty Carmelitas: Adding chopped pecans or walnuts in the oat mixture adds a delightful texture and nutty flavor that my family always raves about.
- Dark Chocolate Twist: Using bittersweet or dark chocolate chips gives a richer, less sweet flavor perfect if you want to dial back sweetness.
- Salted Carmelitas: Increasing the flaky sea salt on top a bit enhances the sweet-salty combination that I personally adore.
- Gluten-Free Option: Try using gluten-free oats and a gluten-free flour blend to make this treat safe for gluten-sensitive friends.
How to Make Carmelitas Recipe
Step 1: Prep Your Pan and Oven
Preheat your oven to 350°F (175°C). Spray a 13×9-inch baking pan with cooking spray then line it with parchment paper, making sure to let some hang over the sides for easy lifting later. This step saves you from having to scrape or break your bars apart.
Step 2: Make the Oat Crumble
In a large bowl, combine the all-purpose flour, old-fashioned oats, softened butter, light brown sugar, vanilla extract, and kosher salt. Mix until it’s just crumbly and all ingredients are evenly incorporated—don’t overwork it or the oats can get too smashed.
Step 3: Bake the Base Layer
Press half of your oat mixture firmly into the bottom of your prepared pan to create an even layer. Bake it just until the edges are starting to turn golden brown, about 12 minutes. Let it cool for 10 minutes before adding your toppings—this keeps the crust intact.
Step 4: Melt the Caramel
While your crust cools, melt the soft caramels with whole milk in a small saucepan over low heat. Stir occasionally to prevent burning and watch as it becomes a smooth, luscious sauce—this usually takes about 12 minutes. Don’t rush the heat or the caramel might seize.
Step 5: Assemble the Layers
Scatter the chocolate chips evenly over the baked crust, then pour the warm caramel sauce over the chocolate. Use a spatula to gently smooth the caramel so the chips are mostly covered. Finally, sprinkle the remaining oat mixture on top, pressing lightly to flatten it out.
Step 6: Final Bake and Cool
Bake your carmelitas for about 25 minutes, or until the oat topping is golden and you can see caramel bubbling around the edges. Let them cool completely in the pan so the bars set and slice cleanly—this usually takes at least an hour.
Pro Tips for Making Carmelitas Recipe
- Soft Butter Matters: Make sure your butter is softened to room temperature for even mixing—you want that dough crumbly, not overly greasy.
- Low and Slow Caramel: Melting caramel on low heat takes patience but prevents burning and gives you that perfect smoothness.
- Don’t Skip Cooling Time: Let your bars cool fully before slicing to avoid a gooey mess—you can refrigerate for 30 minutes if you’re in a hurry.
- Use Parchment for Easy Removal: The parchment overhang helps you lift out the whole slab easily without breaking bars apart.
How to Serve Carmelitas Recipe
Garnishes
I love sprinkling a tiny pinch of flaky sea salt on the bars just before serving to balance the sweetness and add a little crunch. Sometimes I add a light dusting of powdered sugar for an elegant touch when sharing with guests.
Side Dishes
When I’m serving carmelitas at gatherings, I like to pair them with fresh fruit like berries or apple slices—something bright and tangy to cut through the richness. A cup of strong coffee or black tea also complements these bars beautifully.
Creative Ways to Present
For birthdays or holiday parties, I’ve decorated the top layer with a swirl of caramel or drizzled melted white chocolate. Cutting the bars into bite-sized squares and presenting them on a tiered dessert tray always gets compliments.
Make Ahead and Storage
Storing Leftovers
I store leftover carmelitas in an airtight container at room temperature for up to 3 days—though honestly, they rarely last that long! If your kitchen is warm, I recommend storing them in the fridge to prevent the caramel from getting too sticky.
Freezing
You can freeze these bars for up to 2 months by wrapping them tightly in plastic wrap and then placing in a freezer-safe bag. When I freeze them, I like to slice before freezing so I can grab a bar whenever the caramel craving hits.
Reheating
To reheat, I pop a carmelita square in the microwave for about 10-15 seconds to get that melty warmth back, but watch carefully so it doesn’t get too soft or lose its shape. Alternatively, warming briefly in a 300°F oven wrapped in foil works great to keep a crispy edge.
FAQs
-
Can I use caramel sauce instead of soft caramels for the Carmelitas Recipe?
While caramel sauce sounds convenient, it’s usually thinner than melted soft caramels mixed with milk. This recipe relies on the thicker, richer caramel texture that soft caramels provide to hold everything together and create that chewy layer. If you use caramel sauce, you might want to reduce any added liquids to avoid a runny filling.
-
How do I prevent my caramel layer from getting too stiff or hard?
Melting the caramels slowly with whole milk ensures the caramel stays smooth and pourable. Avoid overheating or cooking caramel too aggressively—low, gentle heat is key. Also, don’t overbake the bars once assembled; about 25 minutes is enough for a bubbly but gooey caramel layer.
-
Can I make these Carmelitas Recipe dairy-free?
It’s possible to make a dairy-free version by substituting butter with a plant-based alternative and using dairy-free caramel candies and milk substitutes like oat or coconut milk. Keep in mind the texture and flavor might vary slightly, but it still yields delicious bars.
Final Thoughts
I can’t recommend this Carmelitas Recipe enough if you’re looking for a sweet treat that’s both comforting and a little bit fancy. Every time I bake a batch, friends and family ask for the recipe, which always makes me smile. Give this one a try—you’ll enjoy mastering a dessert that’s as fun to make as it is to eat. Once you nail the layers and that perfect caramel pull, this recipe will be a keeper in your baking rotation.
Print
Carmelitas Recipe
- Prep Time: 15 mins
- Cook Time: 37 mins
- Total Time: 1 hr 2 mins
- Yield: 12 servings
- Category: Dessert
- Method: Baking
- Cuisine: American
Description
Deliciously chewy Carmelitas featuring a buttery oat crust, gooey salted caramel layer, and melty semisweet chocolate chips, baked to golden perfection. This treat combines rich flavors and textures perfect for dessert or a sweet snack.
Ingredients
For the Crust and Topping
- 2 cups (240 g) all-purpose flour
- 2 cups old-fashioned oats
- 1 1/2 cups (3 sticks) unsalted butter, softened
- 1 1/2 cups (320 g) packed light brown sugar
- 2 tsp pure vanilla extract
- 1/4 tsp kosher salt
- Cooking spray
For the Caramel and Chocolate Layer
- 1 (11-oz) bag soft caramels
- 1/4 cup whole milk
- Pinch of flaky sea salt
- 2 cups semisweet chocolate chips
Instructions
- Preheat and Prepare Pan: Preheat your oven to 350°F (175°C). Grease a 13″ x 9″ baking pan with cooking spray, then line it with parchment paper for easy removal later.
- Mix Crust and Press: In a large bowl, combine the flour, oats, softened butter, brown sugar, vanilla extract, and kosher salt. Stir until the mixture is crumbly but combined. Press half of this oat mixture firmly into the bottom of the prepared pan to form the crust. Set the remaining oat mixture aside for topping.
- Bake the Crust: Bake the pressed crust in the preheated oven for about 12 minutes, or until it just begins to turn golden brown. Remove from oven and let cool for 10 minutes to set.
- Melt Caramel: While the crust cools, place the soft caramels and whole milk in a small saucepan over low heat. Stir occasionally until the caramels melt completely and the mixture is smooth, about 12 minutes. Remove from heat and stir in a pinch of flaky sea salt to enhance the flavor.
- Assemble Layers: Sprinkle the semisweet chocolate chips evenly over the baked crust. Pour the warm caramel evenly over the chocolate chips, spreading gently to cover. Finally, sprinkle and press the reserved oat mixture evenly on top.
- Bake the Carmelitas: Return the pan to the oven and bake for about 25 minutes, or until the oat topping is golden brown and the caramel is bubbling at the edges. Remove from oven and allow to cool completely in the pan.
- Slice and Serve: Once cooled, carefully lift the parchment paper to remove the Carmelitas from the pan. Slice into 12 squares and serve.
Notes
- Ensure the caramel melts slowly over low heat to prevent burning.
- Using parchment paper makes removing the bars easier and helps keep their shape.
- Press the oat topping gently but firmly to create a sturdy layer.
- Store Carmelitas in an airtight container at room temperature for up to 3 days or refrigerate for up to a week.
Nutrition
- Serving Size: 1 bar (approx. 1/12th of recipe)
- Calories: 420
- Sugar: 28g
- Sodium: 110mg
- Fat: 23g
- Saturated Fat: 14g
- Unsaturated Fat: 8g
- Trans Fat: 0.2g
- Carbohydrates: 53g
- Fiber: 3g
- Protein: 4g
- Cholesterol: 40mg


