
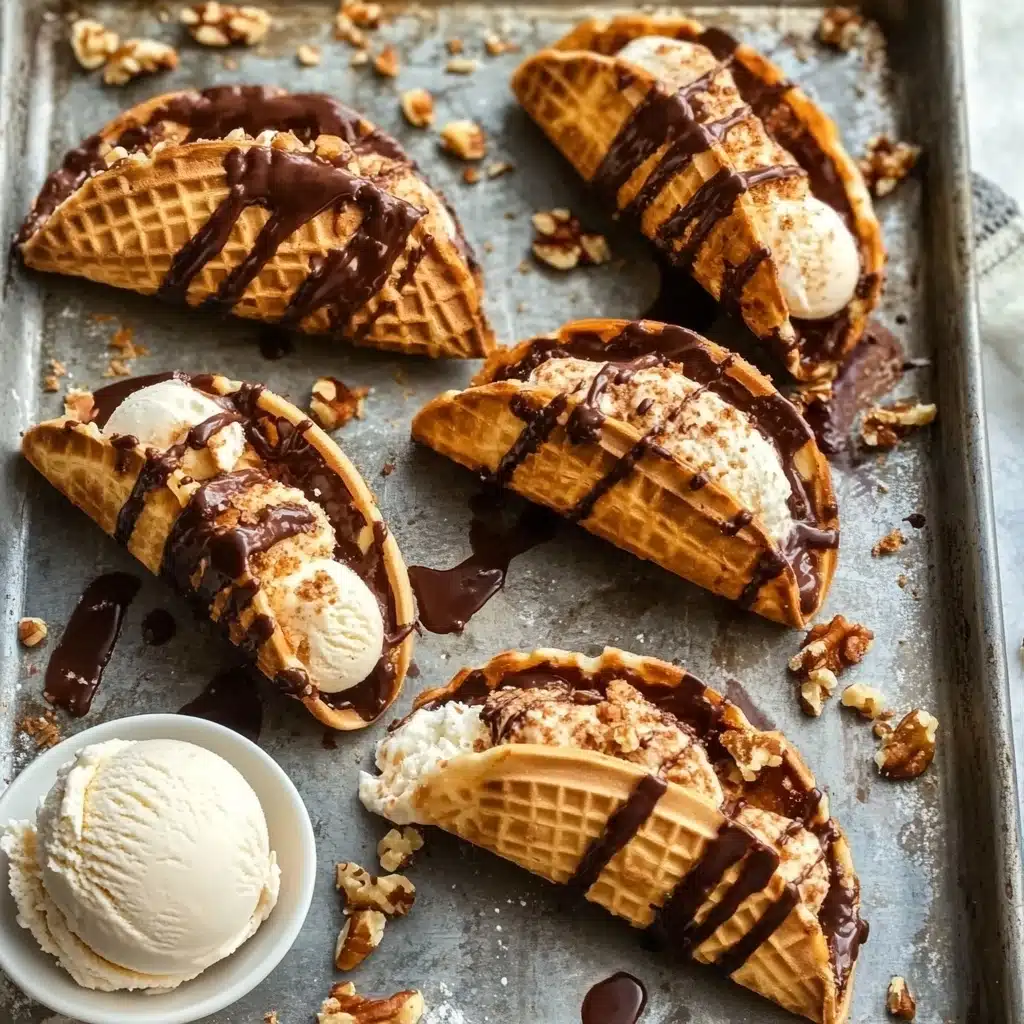
If you grew up craving that iconic chocolate-dipped, peanut-crunched ice cream taco from the ice cream truck, get ready to relive the magic—right from your own kitchen! These Homemade Choco Tacos are a nostalgic treat, combining creamy, rippled ice cream, crisp vanilla waffle “shells,” and a generous dunk in chocolate-peanut shell. They’re so fun and unexpectedly easy, you’ll want to make (and eat) them all year long.
Why You’ll Love This Recipe
- Ultimate Childhood Nostalgia: Homemade Choco Tacos taste even better than the originals, and every bite will transport you right back to summer afternoons by the ice cream truck.
- Simple Ingredients, Big Flavor: You won’t believe how a handful of pantry basics transform into crispy shells, luscious ripple ice cream, and that magic chocolate “crunch.”
- Customizable to Your Heart’s Content: Mix up the flavors, add your own toppings, or swap in a store-bought shortcut—these Choco Tacos are a canvas for your wildest dessert dreams.
- Make Ahead and Shareable: They freeze beautifully and are irresistibly shareable, making them the ultimate treat for parties, birthdays, or a “just because” Friday night celebration.

Ingredients You’ll Need
The best part about these Homemade Choco Tacos? They’re made almost entirely with simple kitchen staples! Each ingredient is thoughtfully chosen to create those iconic layers—the creamy, dreamy ice cream, the crisp waffle “taco,” the fudgy ripple, and the signature chocolate-peanut crunch. Let’s break it down:
- Heavy Cream: The base for the ultra-creamy, no-churn vanilla ice cream. Make sure it’s cold for the fluffiest whip!
- Sweetened Condensed Milk: Adds richness and sweetness to the ice cream, making it scoopable and silky-smooth.
- Vanilla Bean Paste or Extract: For that classic vanilla flavor and beautiful specks—use paste if you have it, but extract works great too.
- Cocoa Powder and Granulated Sugar: The secret to a glossy, decadent fudge ripple running through the ice cream.
- Heavy Cream (for fudge): Enriches the ripple, making it smoother and more luxurious.
- Unsalted Butter: Gives the fudge sauce its sheen and lushness.
- Egg Whites: Create structure and crispiness in the homemade waffle cone batter.
- Granulated and Brown Sugar: A little of each amps up caramel notes and crunch in the taco shells.
- Flour: The backbone of the shells—be sure to measure it well for perfect texture.
- Melted Butter: Richens and binds the batter, with a subtle, buttery taste to complement the fillings.
- Chocolate Chips and Coconut Oil: Melted together, this duo forms the snappy chocolate shell that seals in the ice cream.
- Finely Chopped Peanuts: Don’t skip—these are essential for that classic crunchy finish!
Variations
The magic of Homemade Choco Tacos is just how flexible they are. With a few tweaks, you can go dairy-free, change up the fillings, or make them truly your own. Here are some tasty ways to riff on the classic:
- Go Dairy-Free: Use your favorite dairy-free ice cream (store-bought or homemade) and swap in vegan butter for the shells—you’ll never miss the original!
- Chocolate Lovers’ Dream: Stir a little cocoa powder into the ice cream base or use chocolate ice cream for an extra-chocolaty take.
- Pick Your Nut: Try toasted almonds, pistachios, or even spicy candied nuts in place of the classic peanuts for a new flavor spin.
- Fun with Toppings: Sprinkle on mini M&M’s, crushed pretzels, or flaked salt instead of chopped nuts for color and crunch.
- Shortcut Version: Feeling rushed? Use store-bought waffle cones and your favorite ice cream—the homemade fudge ripple and chocolate-peanut shell will still deliver that “wow” factor!
How to Make Homemade Choco Tacos
Step 1: Make the Fudge Ripple
Start by whisking together the cocoa powder, sugar, and heavy cream in a small saucepan over medium-low heat. Once it’s gently warmed, add in the butter and keep whisking until the mixture becomes a glossy, smooth sauce. Off the heat, stir in vanilla extract and a pinch of salt. Let the fudge sauce cool to room temperature—you want ribbons, not puddles, in your ice cream.
Step 2: Whip the Ice Cream Base
In a stand mixer or with a hand mixer, whip the heavy cream until you get stiff but creamy peaks—it should stand up on its own but still look luscious, not grainy. In a separate large bowl, combine your sweetened condensed milk, vanilla bean paste (or extract), and a pinch of salt. Gently fold in about a cup of the whipped cream first to lighten it up, then fold in the rest just until no streaks remain. This gentle folding keeps everything cloud-like and spoonable after freezing.
Step 3: Layer and Freeze the Ice Cream
Spoon a layer (about a quarter) of your ice cream base into a loaf pan, then swirl in a third of your cooled fudge ripple. Repeat, layering ice cream and fudge ripple until you run out, ending with a layer of ice cream on top. Cover and freeze for at least three hours until fully firm—the anticipation is so worth it!
Step 4: Make and Shape the Taco Shells
In a medium bowl, beat egg whites, both sugars, and vanilla extract until well combined. Add the salt and half the flour, mixing until smooth, then the rest of the flour and melted butter to form a thick batter. With your waffle cone maker set just above medium, drop a heaping tablespoon of batter onto the center. Press and cook for 3 minutes or until golden. Remove with tongs, let cool for just a few seconds, then quickly and carefully bend into a taco shape. Hold for about 15 seconds as it sets—you’ll be amazed how crisp they get as they cool!
Step 5: Fill and Chill the Homemade Choco Tacos
When the ice cream’s set but easy to scoop, gently fill each taco shell with softened ice cream, smoothing with a small spatula or the back of a spoon. Pop the filled tacos back into the freezer for 10 to 15 minutes—this helps set everything before you go for the chocolate dip.
Step 6: Dip in Chocolate-Peanut Shell and Enjoy!
Microwave the chocolate chips and coconut oil in 30 second bursts, stirring until silky smooth. Stir in the chopped peanuts for that signature crunch. Carefully dip the tops of your frosty Choco Tacos into the chocolate-peanut mixture—don’t forget to work quickly so the shell hardens and your ice cream keeps its cool. Freeze until the chocolate is set, then dive in!
Pro Tips for Making Homemade Choco Tacos
- Cool Those Layers: Be sure your fudge ripple has cooled and your taco shells are room temp before adding ice cream, or you’ll risk melty chaos and soggy shells.
- Taco Shell Shaping Secrets: Work quickly, shaping the hot shells right off the waffle maker—if they cool too long, they’ll lose their flexibility and snap instead of bend.
- Freeze Between Steps: Always freeze the filled tacos before dipping in chocolate. Freezing sets the ice cream and helps the chocolate coat instantly for that satisfying shell.
- Chocolate Coating Mastery: Let your chocolate mixture cool just a little before dipping, so it’s not so hot that it melts your ice cream—smooth dipping with less mess!
How to Serve Homemade Choco Tacos
Garnishes
Dress up your Homemade Choco Tacos with an extra sprinkle of chopped peanuts, festive sprinkles, or a drizzle of melted white chocolate. You can even dust a little flaked sea salt on top—it really brings out the chocolatey richness! Serve right from the freezer for the best snap and crunch.
Side Dishes
While a Homemade Choco Taco is pure joy all on its own, you can make dessert time even more special by serving them with a pitcher of cold brew coffee, fresh berries, or a side of sparkling lemonade. For a playful twist, offer them alongside a sundae bar with extra add-ons and toppings for everyone to mix and match.
Creative Ways to Present
Line up your Homemade Choco Tacos in mini cupcake liners, or tuck them into a fun taco holder for a dessert “taco truck” experience at home. If you’re celebrating, wrap each one in parchment and tie with twine for adorable party favors. Or, stack them up on a chilled serving platter and let everyone grab their own for the ultimate summer dessert buffet!
Make Ahead and Storage
Storing Leftovers
Your Homemade Choco Tacos will keep best in the freezer, wrapped individually in parchment or plastic wrap and stored in an airtight container. This keeps them fresh, crisp, and ready for an impromptu treat whenever a craving strikes. They’re at their prime in the first week, when the shells are still super snappy!
Freezing
Freezing is the secret to that classic Choco Taco texture. After dipping in chocolate, allow the tacos to chill until the shell is solid (about 5–10 minutes). For longer storage, keep them tightly wrapped in layers—this helps prevent freezer burn and keeps unwanted odors at bay. They’ll stay delicious for up to one month!
Reheating
No need to reheat—just a few minutes on the counter is all it takes for the shells to soften slightly and the ice cream to get ultra-creamy. If they’re rock-hard, give them 5 minutes at room temp before serving for dreamy bite-ability!
FAQs
-
Can I make Homemade Choco Tacos without a waffle cone maker?
Yes! While a waffle cone maker gives the best texture, you can make thin pancakes on a nonstick skillet and shape them quickly into taco shells. They’ll be a bit softer, but still delicious and fun.
-
What’s the best way to shape the taco shells?
Work fast! Remove each shell from the maker and, while still hot but cool enough to handle, drape over a rolling pin or form with your hands. Hold for about 15 seconds until set—if you wait too long, they’ll harden flat.
-
Can I use different ice cream flavors in my Homemade Choco Tacos?
Absolutely! Try chocolate, strawberry, coffee, or fun swirl flavors for a unique twist. You can even layer flavors for a Neapolitan-inspired taco.
-
How do I avoid soggy shells when making ahead?
Always cool taco shells completely before stuffing, and freeze them as soon as they’re filled. Keeping the tacos tightly wrapped while stored in the freezer also helps prevent moisture from softening the shells.
Final Thoughts
If you’ve never tried a Homemade Choco Taco, this is your sign to grab a friend, make a batch, and savor every crunchy, creamy, chocolate-dipped bite. Whether for a party, a nostalgic treat, or just because, they’re guaranteed to put a giant smile on your face. Can’t wait to hear how you make them your own!
Print
Homemade Choco Tacos Recipe
- Prep Time: 1 hour
- Cook Time: 1 hour
- Total Time: 4 hours 55 minutes
- Yield: 8-10 choco tacos
- Category: Dessert
- Method: Mixing, Baking, Freezing
- Cuisine: American
- Diet: Vegetarian
Description
Indulge in the irresistible combination of creamy ice cream, rich fudge ripple, crispy waffle cones, and decadent chocolate-peanut coating with these homemade Choco Tacos. Perfect for satisfying your sweet cravings!
Ingredients
Ice cream base:
- 2 cups heavy cream, cold
- 1 14oz can sweetened condensed milk
- 1 tbsp vanilla bean paste or 2 tsp vanilla extract
- Pinch of salt
Fudge ripple:
- 2 tablespoons cocoa powder
- 2 tablespoons granulated sugar
- 2 tablespoons heavy cream
- 1 tablespoon unsalted butter
- 1/2 teaspoon vanilla extract
- Pinch of salt
Waffle cones:
- 2 egg whites
- 3 1/2 tablespoons granulated sugar
- 3 1/2 tablespoons brown sugar
- 3/4 teaspoon vanilla extract
- 1/8 teaspoon salt
- 2/3 cup flour
- 2 tbsp melted butter
For coating:
- 1 1/2 cups chocolate chips
- 1 1/2 tablespoon coconut oil
- 3/4 cup finely chopped peanuts
Instructions
- Make the fudge sauce for the ice cream ripple: In a small saucepan, whisk together the cocoa powder, sugar and heavy cream over medium-low heat. Once it starts to heat up, add in the butter and whisk until the butter is melted and the mixture is smooth and shiny. Remove from heat and whisk in the vanilla and salt. Set aside to cool.
- Prepare the ice cream base: Add heavy cream to a stand mixer (or a bowl with a hand mixer) and beat until stiff peaks form (a few minutes). In a large bowl, mix together condensed milk, vanilla bean paste and salt. Add about 1 cup of the whipped cream and gently fold it in, then add in the remaining whipped cream and fold until no lumps remain.
- Layer the ice cream: Pour 1/4 of the ice cream base into a loaf pan, then drizzle on 1/3 of the fudge sauce. Repeat 3 more times, finishing with a layer of ice cream. Freeze until set – about 3 hours.
- Make the waffle cones: Add egg whites, both sugars and vanilla extract to a bowl and beat with a hand mixer until well combined. Add in salt and half of the flour and continue mixing until smooth. Add in remaining flour and melted butter and mix until a smooth batter forms. Preheat waffle cone maker to just above medium heat. Place one heaping tablespoon of batter in the center of the waffle cone maker, then close it. Every waffle cone maker will cook differently, but ours took about 3 minutes to get golden brown. Remove with tongs, let cool for a few seconds, then (carefully) shape into a taco shape with your hands and hold in place for 15 seconds. They will harden in less than a minute.
- Scoop ice cream into shells and freeze briefly: Scoop slightly softened ice cream into each of the “taco” cones, using a small spatula or the back of a spoon to smooth out the ice cream. Place in freezer for 10-15 minutes.
- Prepare peanut-chocolate topping and assemble: Add chocolate chips and coconut oil to a microwave safe bowl. Microwave in 30 second intervals, stirring well between each interval, until fully melted. Stir in chopped peanuts. Dip the top of ice cream taco in the chocolate peanut mixture. Return to freezer for 5-10 minutes, or until hardened. Keep stored in freezer.
Notes
- Waffle cone maker: This is the one we use.
- Make it dairy free: Use your favorite store-bought nondairy ice cream for the filling, and use nondairy butter in the waffle cone batter!
- Be sure to add the choco tacos back to the freezer after stuffing them with ice cream. Odds are, you will have some melting that will need to re-solidify. You also want the tacos to be as cold as possible when you dip them in the chocolate coating, so that it sets quickly.
- Short on time? Just use store bought ice cream instead.
- Let the fudge sauce cool before layering it into the ice cream.
- Let the taco shells cool before filling them with ice cream.
- Make sure the chocolate peanut topping has cooled slightly before dipping the ice cream-filled shells into it.
- Choco Taco is a registered trademark of Simco Logistics, Inc. and/or Klondike, a Unilever brand. This recipe is a homemade version inspired by the original Choco Taco and is not affiliated with or endorsed by Klondike or Unilever. All trademarks, service marks, and trade names are the property of their respective owners.
- Our waffle cone recipe is adapted from Pudge Factor, which was adapted from David Lebovitz’s The Perfect Scoop.
- Fudge sauce recipe adapted from The Pioneer Woman.
Nutrition
- Serving Size: 1 choco taco
- Calories: 574
- Sugar: 53 g
- Sodium: 565.3 mg
- Fat: 33.3 g
- Saturated Fat: 18.5 g
- Unsaturated Fat: 12.1 g
- Trans Fat: 0 g
- Carbohydrates: 63.7 g
- Fiber: 3.9 g
- Protein: 10.8 g
- Cholesterol: 64.3 mg


