
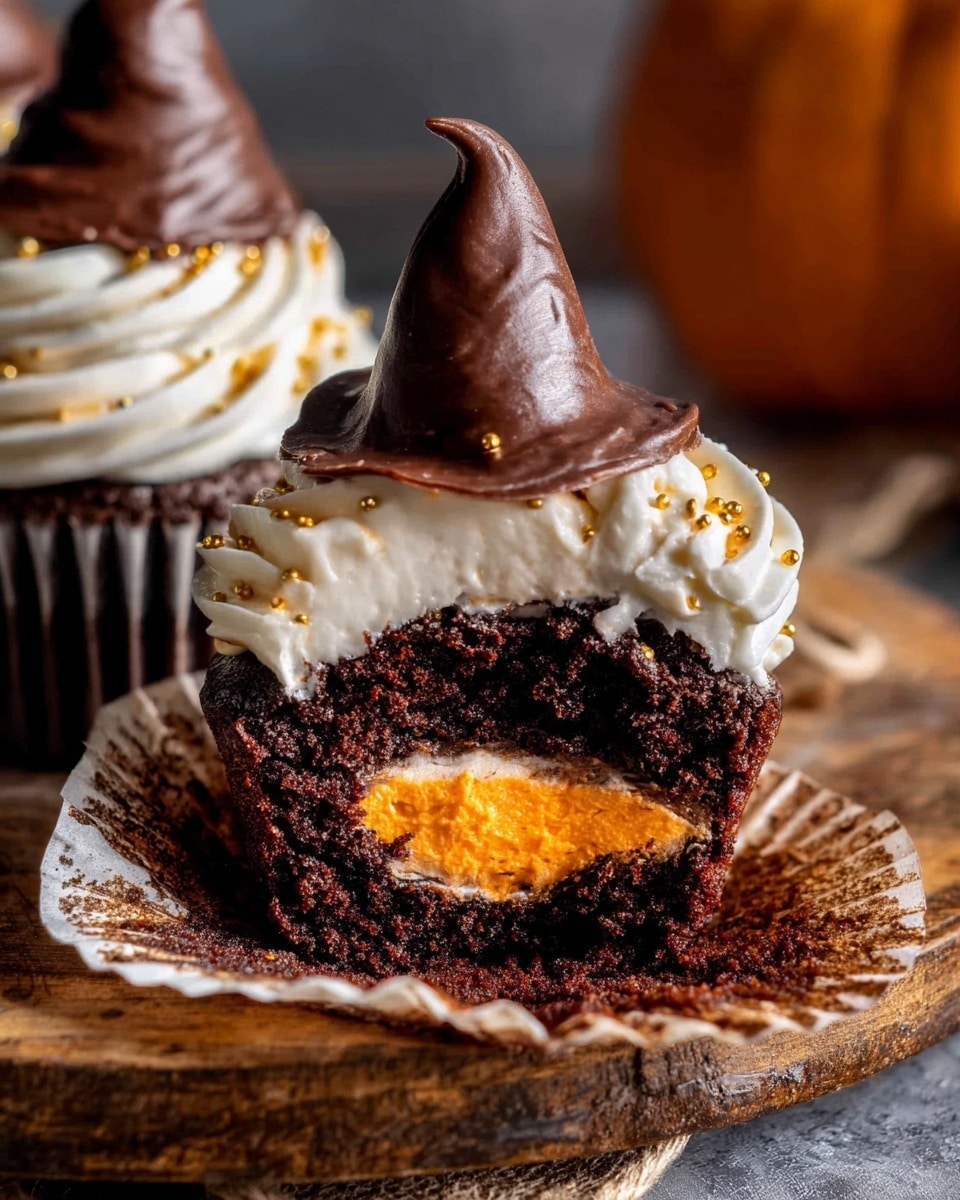
If you’re a Harry Potter fan (like me!), you’re going to flip over this **Harry Potter Sorting Hat Cupcakes Recipe**. These aren’t just any cupcakes — they’re delightfully moist chocolate cupcakes bursting with magic from the Hogwarts house colors and topped with little edible sorting hats that your friends and family will absolutely adore. I’ve tested this recipe time and again, and I promise it’s easier than it looks, with some fun tricks to nail that perfect magical finish every time. Stick with me, and I’ll walk you through how to bring a bit of wizarding wonder to your kitchen!
Why You’ll Love This Recipe
- Deliciously Moist Cupcakes: Thanks to the sour cream and balanced ingredients, these cupcakes stay tender and rich every single time.
- Fun and Festive Design: The Sorting Hat decorations aren’t just cute—they turn dessert into an event that everyone remembers.
- House-Colored Filling Magic: The cream cheese frosting inside matches each Hogwarts house, making every bite a surprise.
- Perfect for Harry Potter Parties: Whether it’s a birthday or themed night, these cupcakes steal the show with their charm and taste.

Ingredients You’ll Need
I like that the ingredients for this Harry Potter Sorting Hat Cupcakes Recipe are simple pantry staples with a few special twists—like espresso powder to deepen that chocolate flavor plus sour cream for moisture and tang. Using fresh, room-temperature eggs and dairy really helps your batter come together smoothly, too.
- All-purpose flour: Spoon and level it for accurate measuring so your cupcakes have the perfect crumb.
- Dutch process cocoa powder: This lends a richer, smoother chocolate flavor compared to natural cocoa, ideal for our magical sorting hats.
- Baking powder & baking soda: Both help your cupcakes rise beautifully without puffing too much.
- Salt: Just a pinch balances the sweetness and enhances all the flavors.
- Espresso powder (optional): Adding this amplifies the chocolate taste without any coffee flavor—trust me, it makes a difference!
- Unsalted butter: Softened butter creates a tender crumb and supports the frosting’s creaminess.
- Granulated sugar: Sweetens gently while helping with cupcake texture.
- Egg & egg yolk: Using both gives richness and helps keep the cupcakes moist.
- Vanilla extract: Adds warmth and rounds out flavors.
- Sour cream: The secret to moist, tender cupcakes with a slight tang.
- Whole milk: Also at room temp to ensure smooth batter consistency.
- Powdered sugar: For ultra-smooth frosting and sweet filling.
- Heavy cream: Adds silkiness to the frosting so it spreads perfectly.
- Oreos: The filling is scooped out to create the chocolate “hat” base—creative and tasty!
- Dark chocolate & coconut oil: Melted together, they form the perfect frosting shell for the hats.
- Cream cheese: For a tangy, luscious frosting that’s the base for the Hogwarts house colors.
- Gel food coloring: Vibrant colors for your house-themed filling—blue for Ravenclaw, red for Gryffindor, gold for Hufflepuff, and green for Slytherin.
- Sprinkles: For that final magical touch—optional but highly recommended!
Variations
I love that you can make this Harry Potter Sorting Hat Cupcakes Recipe your own! Whether it’s swapping out ingredients or changing up decorations, these cupcakes are like a blank canvas waiting for your creative magic. Here are a few ways I like to switch things up:
- Chocolate Lovers’ Version: Double the cocoa powder in the batter and add mini chocolate chips for extra indulgence—my family goes nuts for this one.
- Vanilla Sorting Hats: For a lighter twist, try a vanilla cake base with colored buttercream instead of chocolate—it’s a fresh change for summer birthdays.
- Allergy-Friendly: I once needed a dairy-free version, so I swapped butter for coconut oil and cream cheese for a nut-based cream cheese alternative—still delicious and less worry!
- Fruit-Filled Surprise: Adding a dollop of raspberry or strawberry jam in the center can add a sweet-tart surprise under the rich frosting.
How to Make Harry Potter Sorting Hat Cupcakes Recipe
Step 1: Mix Dry Ingredients with Care
Start by sifting together the all-purpose flour, Dutch process cocoa powder, baking powder, baking soda, salt, and espresso powder into a bowl. Sifting helps avoid lumps and ensures everything is evenly distributed, which is key for tender cupcakes with a consistent texture. When I first tried this recipe, I skipped sifting and ended up with some cocoa clumps—lesson learned!
Step 2: Cream Butter and Sugar Until Fluffy
In a separate bowl, beat the softened butter and granulated sugar on medium speed until the mixture is light and fluffy. This usually takes about 3-5 minutes. I like to scrape down the sides halfway through so everything blends perfectly. The fluffier this gets, the better your cupcakes will rise and have that melt-in-your-mouth crumb you love.
Step 3: Add Eggs and Vanilla Slowly
Next, add the whole egg and egg yolk one at a time, beating well after each addition. Then mix in the vanilla. Make sure your eggs are truly at room temperature to avoid curdling. I can’t stress this enough; it’s one of those small touches that really improve cupcake texture—you’ll see!
Step 4: Incorporate Wet and Dry Ingredients Alternately
Add the dry ingredient mixture in three parts, alternating with the sour cream and milk—start and finish with the dry ingredients. Mix each addition just until combined; overmixing can make cupcakes tough, which is the last thing you want. When I first made these, I mixed too vigorously, and the cupcakes were a little dense, so go easy here.
Step 5: Bake and Cool
Pour the batter evenly into cupcake liners (I got 12 perfect-sized cupcakes). Bake at 350°F (175°C) for about 18 minutes or until a toothpick inserted comes out clean. Don’t skip the test because ovens can vary! Once baked, cool them completely on a wire rack. This step is crucial before frosting, or your frosting might melt and lose shape.
Step 6: Prepare House-Colored Cream Cheese Filling
Beat together softened butter, cold cream cheese, and powdered sugar until smooth and fluffy. Divide the frosting into four bowls and mix in your gel food colors representing Gryffindor red, Hufflepuff gold, Ravenclaw blue, and Slytherin green. This part is super fun and feels like bringing the sorting magic alive. I use a toothpick for the colors first so I can build the perfect shade gradually.
Step 7: Core and Fill Cupcakes
Use a cupcake corer or a small knife to remove a center section from each cupcake. Fill the hole with one of the colored frostings you made. When I serve these, I love surprising guests by mixing up the houses—keep one color per cupcake for easy sorting or mix it up for fun!
Step 8: Make the Chocolate Sorting Hats
Take your Oreo cookies, remove the cream filling, and set aside. Melt the dark chocolate with coconut oil gently in a double boiler or microwave, stirring frequently to avoid burning. Dip the Oreo bases into the melted chocolate, then place them on parchment to harden. Once firm, use a piping bag to add a little frosting “band” in the house color on the hat and decorate with sprinkles. I discovered this technique when I wanted hats that actually held shape and tasted delicious—a total win!
Step 9: Assemble and Serve!
Place each chocolate sorting hat on top of your filled cupcakes. Sprinkle with a few festive sprinkles if you like, and voilà—you’ve created a Hogwarts feast everyone will rave about. My family goes crazy for how charming these look and can’t believe there’s so much flavor packed in. Plus, every cupcake tells a story!
Pro Tips for Making Harry Potter Sorting Hat Cupcakes Recipe
- Use Room Temperature Ingredients: Make sure your eggs, sour cream, and milk are all room temp for smooth batter and even baking.
- Don’t Overmix the Batter: Mix just until ingredients are combined to keep your cupcakes light and tender.
- Gradually Build Gel Food Coloring: Adding color a little at a time lets you control the shade so it matches your Hogwarts house colors perfectly.
- Chill the Chocolate Hats if Needed: If the melted chocolate starts to get sticky while decorating, pop the hats in the fridge for a few minutes to firm up before adding bands and sprinkles.
How to Serve Harry Potter Sorting Hat Cupcakes Recipe
Garnishes
I usually keep garnishes pretty simple—tiny edible gold stars, rainbow sprinkles, or these fun themed house-colored sugar pearls add just the right whimsical touch without overwhelming the cupcakes. You can even add little lightning bolt sprinkles for that unmistakable wizard vibe. It’s those small details that really complete the look and have guests saying “Wow!”
Side Dishes
If you’re serving these at a party, I like pairing them with light, easy nibbles like butterbeer-flavored popcorn or cauldron-shaped fruit cups. These cupcakes shine as the centerpiece, so keep your sides simple but themed, like chocolate frogs or Bertie Bott’s Every Flavour Beans to keep the fun going.
Creative Ways to Present
For a Harry Potter-themed birthday or watch party, I’ve arranged cupcakes on a tiered cake stand decorated with house banners and miniature broomsticks as accents. Another favorite trick is serving them in a wooden crate lined with faux leaves for a Hogwarts forest vibe. You can even wrap each cupcake in parchment tied with a ribbon for an “acceptance letter” feel. It’s all about little immersive touches that make the experience magical.
Make Ahead and Storage
Storing Leftovers
If you have leftovers (lucky you!), store the cupcakes—unassembled is best—in an airtight container in the fridge for up to 3 days. I like to keep the chocolate hats separate until serving day so they don’t get soft or sticky. This helps preserve all that beautiful frosting and decoration while keeping flavors fresh.
Freezing
I’ve frozen the cupcake bases successfully by wrapping each tightly in plastic wrap and placing in a freezer-safe bag. They keep well for up to two months. When ready to use, thaw overnight in the fridge then fill and decorate as usual. Just note that assembled cupcakes don’t freeze well due to the frosting, so freezing before filling is your best bet.
Reheating
Since these are best served at room temperature, I usually take refrigerated cupcakes out about 30 minutes before serving. If frozen, warming gently in the microwave for 10-15 seconds can revive softness—just be cautious not to heat too long or the frosting might melt. I’ve found that patience here pays off when you want cupcakes that look and taste fresh.
FAQs
-
Can I make the chocolate sorting hats ahead of time?
Absolutely! In fact, I recommend making the chocolate Oreos a day in advance so they have plenty of time to harden and you can decorate them at your own pace without feeling rushed.
-
What if I don’t have espresso powder—can I skip it?
You can skip the espresso powder if you want. It’s just there to intensify the chocolate flavor without adding coffee taste. Your cupcakes will still taste great without it, but if you want that extra depth, it’s worth adding.
-
How do I prevent the frosting colors from bleeding?
Use gel food coloring sparingly and mix well. Allow the colored frosting to chill slightly before filling the cupcakes. Also, letting cupcakes cool completely before adding colored frosting helps prevent any bleeding.
-
Can I make these cupcakes gluten-free?
Yes! Substitute gluten-free flour blend for the all-purpose flour but choose a blend that includes xanthan gum for best results. Your cupcakes may be a bit more delicate, so handle gently when coring and filling.
Final Thoughts
This Harry Potter Sorting Hat Cupcakes Recipe holds a special place in my kitchen—there’s something magical about transforming simple ingredients into a treat that brings smiles and sparks imagination. I’ve shared this at parties and cozy movie nights, and the excitement it creates is priceless. I hope you enjoy making these as much as I do and that they add a sprinkle of Hogwarts magic to your table. After all, who says you need a wand to make magic happen in your kitchen?
Print
Harry Potter Sorting Hat Cupcakes Recipe
- Prep Time: 150 min
- Cook Time: 18 min
- Total Time: 168 min
- Yield: 12 cupcakes
- Category: Dessert
- Method: Baking
- Cuisine: American
Description
Delight in the magical world of Harry Potter with these Sorting Hat Cupcakes! Moist and rich chocolate cupcakes are filled with vibrant Hogwarts house colors and topped with beautifully decorated mini sorting hats, perfect for any Potterhead celebration.
Ingredients
Cupcake Batter
- 1 cup (125 g) all-purpose flour, spooned and leveled
- 5 tbsp (25 g) Dutch process cocoa powder
- 1/2 tsp baking powder
- 1/2 tsp baking soda
- 1/4 tsp salt
- 1 tsp espresso powder (optional)
- 1/4 cup (56 g) unsalted butter, softened
- 3/4 cup (150 g) granulated white sugar
- 1 egg, at room temperature
- 1 egg yolk, at room temperature
- 1 tsp vanilla extract
- 1/4 cup (60 g) sour cream, at room temperature
- 1/2 cup (120 ml) whole milk, at room temperature
Chocolate Filling
- 6 Oreos, with filling removed
- 6 oz dark chocolate bars, chopped
- 1 tsp coconut oil
Chocolate Buttercream Frosting
- 1/2 cup (112 g) unsalted butter, softened
- pinch of salt
- 1/4 cup (20 g) Dutch process cocoa powder
- 1 cup (130 g) powdered sugar
- 2 tbsp (30 ml) heavy cream
Cream Cheese Frosting
- 1 cup (224 g) unsalted butter, softened
- 8 oz (226 g) cream cheese, cold
- 3 cups (390 g) powdered sugar
- Blue, green, gold and red gel food coloring
- Sprinkles for decorating
Instructions
- Prepare the Cupcake Batter: In a medium bowl, sift together the flour, Dutch process cocoa powder, baking powder, baking soda, salt, and espresso powder. In a separate large bowl, cream the 1/4 cup softened butter with granulated sugar until fluffy. Beat in the egg and egg yolk one at a time, then add vanilla extract. Alternate adding the dry ingredients and the sour cream with the whole milk, beginning and ending with the dry ingredients, mixing just until combined.
- Bake the Cupcakes: Preheat your oven to 350°F (175°C). Line a 12-cup muffin pan with paper liners and fill each cup about two-thirds full with batter. Bake for 16-18 minutes or until a toothpick inserted into the center comes out clean. Remove from oven and allow cupcakes to cool completely on a wire rack.
- Make the Chocolate Filling: Remove the filling from the Oreos and crush the cookies finely. In a microwave-safe bowl, melt the dark chocolate with the coconut oil in 20-second intervals, stirring until smooth. Mix the crushed Oreos into the melted chocolate and refrigerate until firm but spreadable.
- Fill the Cupcakes: Once cupcakes are cooled, core out the center of each cupcake using a small knife or cupcake corer. Fill each hollow with the prepared chocolate Oreo filling and replace the top piece of the cupcake slightly if desired for a neat look.
- Prepare the Chocolate Buttercream Frosting: Beat the 1/2 cup softened butter and pinch of salt until creamy. Add the cocoa powder and powdered sugar gradually, alternating with heavy cream, beating until smooth and fluffy. Spread or pipe this frosting evenly on each cupcake as a base layer.
- Prepare the Cream Cheese Frosting and Color: In a large bowl, beat the unsalted butter and cold cream cheese together until smooth. Gradually add powdered sugar, beating until fluffy. Divide frosting into four bowls and tint each with blue, green, gold, and red gel food coloring representing the Hogwarts houses. Use piping bags fitted with small round or star tips to decorate the cupcakes with house-colored frosting swirls, creating mini sorting hats. Add sprinkles for extra magic.
Notes
- These cupcakes are best enjoyed the day they are made or within two days stored in the refrigerator.
- For a stronger chocolate flavor, use high-quality Dutch processed cocoa powder.
- The espresso powder is optional but enhances the depth of the chocolate flavor.
- Use gel food coloring to avoid thinning your frosting.
- If you don’t have a cupcake corer, you can use a small knife carefully to hollow out the cupcakes.
Nutrition
- Serving Size: 1 cupcake
- Calories: 380
- Sugar: 32g
- Sodium: 150mg
- Fat: 24g
- Saturated Fat: 14g
- Unsaturated Fat: 8g
- Trans Fat: 0g
- Carbohydrates: 38g
- Fiber: 2g
- Protein: 4g
- Cholesterol: 70mg

